AutoBuilds and deployment using TeamCity CI server
When developing software solutions sometimes there is a need to automate process of builds, deployments and testing tasks. One of the possible solutions is the TeamCity server. This Continuous Integration server is especially useful when managing multiple SVN branches that need to be deployed to multiple web applications when any predefined change occurs.
One of the triggers that we can use to start the build and deployment is SVN change. In this article I will show you how to configure auto build and deployment of .net web application triggered by SVN changes.
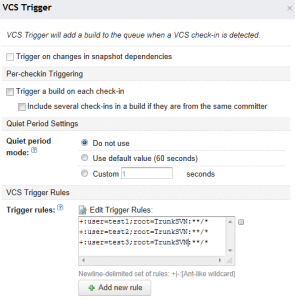
After we have installed TeamCity, we need to create project and add VCS root (I won’t be describing that as it is quite straightforward). After that we will have to define SVN trigger that detects repo changes and triggers the build. Configuration below triggers build when one of 3 developers will commit his/her changes (to the main trunk).
Next thing to do is to configure Visual Studio project file .csproj to auto build and deploy application on AfterBuild event task. To do it please open .csproj in notepad and add the code below:
 <PropertyGroup>
    <DeployTarget>0</DeployTarget>
    <DeployTargetFolder>\\TestServer\MyApplication</DeployTargetFolder>
    <PublishTarget>0</PublishTarget>
    <PublishFolder>..\Deployment\MyApplication</PublishFolder>
  </PropertyGroup>
  <Target Name="PublishProperties">
    <CreateProperty Value="$(PublishFolder)">
      <Output TaskParameter="Value" PropertyName="WebProjectOutputDir" />
    </CreateProperty>
    <CreateProperty Value="$(PublishFolder)\bin\">
      <Output TaskParameter="Value" PropertyName="OutDir" />
    </CreateProperty>
  </Target>
  <Target Name="WebPublish" DependsOnTargets="BeforeBuild;PublishProperties">
    <RemoveDir Directories="$(PublishFolder)" ContinueOnError="true" />
    <CallTarget Targets="ResolveReferences;_CopyWebApplication" />
  </Target>
  <Target Name="Deploy" DependsOnTargets="WebPublish">
    <CreateProperty Value="$(DeployTargetFolder)" Condition="$(DeployFolder) == ''">
      <Output TaskParameter="Value" PropertyName="DeployFolder" />
    </CreateProperty>
    <RemoveDir Directories="$(DeployFolder)" Condition="$(CleanDeploy) == 1" />
    <ItemGroup>
      <DeploymentFiles Include="$(PublishFolder)\**\*.*" />
    </ItemGroup>
    <Copy SourceFiles="@(DeploymentFiles)" DestinationFolder="$(DeployFolder)\%(RecursiveDir)" />
  </Target>
  <Target Name="AfterBuild">
    <CallTarget Targets="WebPublish" Condition="$(PublishTarget) == 1" />
    <CallTarget Targets="Deploy" Condition="$(DeployTarget) == 1" />
  </Target>
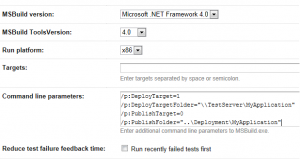
You can notice that in the PropertyGroup there are some params the build will be configured with. In our case we configure DeployTarget and PublishTarget to 0 becase we want to avoid visual studio to trigger the deployment each time we hit F5. We will override this params from the TeamCity triggered build. See the configuration below:
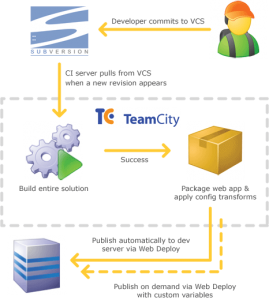
The whole process illustrates this diagram:
P.S. If you want to run FxCop as build step, additional change is required. After installing FxCop you need to manually adjust the build agent properties in following location: C:\TeamCity\buildAgent\conf\buildAgent.properties
Following configuration needs to be added:
 system.FxCopRoot=C\:\\Program Files (x86)\\Microsoft Fxcop 10.0
 system.FxCopCmdFileVersion=10.0.30319.1
 system.WindowsSDK7.1
Otherwise you will get “no suitable Build Agent” error
Good luck with your configuration 🙂

