Multiple object bindings on MVC view

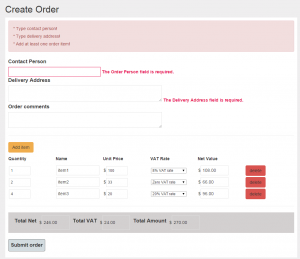
Multiple object bindings in MVC are the common requirement when working with more advanced UI. An example of that can be creating order form with multiple order items being added dynamically by the user.

In such a scenario we can create binding for our “Order” model as normal and create partial view with the structure of our “OrderItem” class separately. By doing this, the user will be able to dynamically preload order items using ajax request, appending created html to div container.

When submitting the form, order items will be automatically bound to the nested property list, provided the html control ids and names will follow the convention: name of the list property, index id and property name; id=’OrderItems_ID__Quantity’

For example:

   <input type="number" id='OrderItems_@(Model.OrderItemId)__Quantity' value="@Model.Quantity" name='OrderItems[@Model.OrderItemId].Quantity'/>
 

MVC-order

Lets create our order and order items classes first

   public class Order
    {
        public int OrderId { get; set; }
        [Required]
        [Display(Name = "Order Person")]
        public string OrderPerson { get; set; }
        [Required]
        [Display(Name = "Delivery Address")]
        public string DeliveryAddress { get; set; }
        public string OrderComments { get; set; }
        public DateTime OrderDate { get; set; }
        public double TotalNet { get; set; }
        public double TotalVAT { get; set; }
        public double TotalAmount { get; set; }
        [Required]
        public List<OrderItem> OrderItems { get; set; }
    }

	public class OrderItem
    {
        public int OrderItemId { get; set; }
        [Required]
        public string ItemName { get; set; }
        [Required]
        public int Quantity { get; set; }
        [Required]
        public double? UnitPrice { get; set; }
        public double VATRate { get; set; }
        public double TotalValue { get; set; }
    }
 

Our Order form will look the standard way, plus extra element for dynamically added elements:

  <div class="form-group">
    <b>@Html.ActionLink("Add item", "LoadBlankItemRow", null, new { id = "addOrderItem", @class = "btn btn-warning" })</b>
     <div style="padding-top: 10px;">
         <p class="itemColumn">Quantity</p>
         <p class="itemColumn">Name</p>
         <p class="itemColumn">Unit Price</p>
         <p class="itemColumn">VAT Rate</p>
         <p class="itemColumn">Net Value</p>
         <p class="itemColumn"></p>
       </div>
     <div id="editorRows">
        @foreach (var itemModel in Model.OrderItems)
         {
            @Html.Partial("_OrderItem", itemModel)
         }
       </div>
   </div>
 

When user clicks the Add item link, the controller action is being invoked returning html structure reflecting the list item model.

   [HttpGet]
   public virtual PartialViewResult LoadBlankItemRow(int id)
   {
     var orderItem = new OrderItem { OrderItemId = id, Quantity = 1 };

     return PartialView("_OrderItem", orderItem);
   }
 

We will use jquery to get the current numbers of items already inserted and define the current index. This will be used to create appropriate control names required for nested model bindings:

   $("#addOrderItem").click(function (e) {
        var itemIndex = $("#editorRows input.iHidden").length;
        $.get("@Url.Action("LoadBlankItemRow", "Order")/" + itemIndex, function (data) {
            $("#editorRows").append(data);
        });
        return false;
    });
 

Each dynamically inserted row will have JavaScript logic to remove the current row and recalculate total values:

    $("a.deleteRow").click(function () {
        $(this).parents("#itemRow").remove();
        calculateTotals();
        return false;
    });

    $('#OrderItems_@(Model.OrderItemId)__Quantity').blur(function () {
        updateTotalValue(@Model.OrderItemId);
    });
    $('#OrderItems_@(Model.OrderItemId)__UnitPrice').blur(function () {
        updateTotalValue(@Model.OrderItemId);
    });
    $('#OrderItems_@(Model.OrderItemId)__VATRate').change(function () {
        updateTotalValue(@Model.OrderItemId);
    });

Finally, scripts included on parent model form will calculate and update controls located outside the partial view, providing Total amount for the entire order.

   function updateTotalValue(id) {
        var qnt = $('#OrderItems_' + id + '__Quantity').val();
        var uprc = $('#OrderItems_' + id + '__UnitPrice').val();

        var vat = parseFloat($('#OrderItems_' + id + '__VATRate').val());
        if (vat == 0) { val = (qnt * uprc); } else { val = (qnt * uprc) * (1 + vat / 100); }
        if (qnt == 0 || uprc == 0) { val = 0; }

        $('#OrderItems_' + id + '__TotalValue').val(val.toFixed(2));
        calculateTotals();
    }

    function calculateTotals() {
        var totalNet = 0.0; var totalVat = 0.0;

        $("#editorRows").children().each(function (index) {
            var qnt = $('#OrderItems_' + index + '__Quantity').val();
            var uprc = $('#OrderItems_' + index + '__UnitPrice').val();
            var vat = parseFloat($('#OrderItems_' + index + '__VATRate').val());
            if (qnt != null && qnt != 'NaN') {
                totalNet += qnt * uprc;
                if (vat != 0) {
                    totalVat += parseFloat((qnt * uprc) * (vat / 100));
                }
            }
        });

        $('#TotalNet').val(totalNet.toFixed(2));
        $('#TotalVAT').val(totalVat.toFixed(2));
        $('#TotalAmount').val((totalNet + totalVat).toFixed(2));
    }

I have included working project below. Enjoy!

MVC OrderForm

1 Star2 Stars3 Stars4 Stars5 Stars (1 votes, average: 5.00 out of 5)
Loading...Loading...

Umbraco custom model with pager

Umbraco is the open source content management system allowing for quick content creation and easy customization as it uses ASP.NET MVC pattern to render page components.

The power of Umbraco is the flexibility and a host of features it provides out of the box. It is also written in C# which makes it especially popular amongst the developers.

Creating custom views with Umbraco is very easy, as we can set-up our own routing methods by inheriting from RenderMvcController and overriding action methods accepting and returning RenderModel object:

public class MyPageController : RenderMvcController
{

public override ActionResult Index(RenderModel model)
{
//your logic here

return base.Index(model);
}
}

However, if we want to accept and return our own custom model, the hack is required.
Suppose we want to return custom model containing pager information. We can do that by extending RenderModel class as follows:

public class MyCustomModel : RenderModel
{
public MyCustomModel() : this(new UmbracoHelper(UmbracoContext.Current).TypedContent(UmbracoContext.Current.PageId)) { }
public MyCustomModel(IPublishedContent content, CultureInfo culture) : base(content, culture) { }
public MyCustomModel(IPublishedContent content) : base(content) { }

public string Title { get; set; }
public List<IPublishedContent> ModelItems { get; set; }
public Pager Pager { get; set; }
}

Our pager class will look as this:

 public class Pager
 {
 public int TotalPages { get; set; }
 public int CurrentPage { get; set; }
 public int PageSize { get; set; }
 public int NumberOfRows { get; set; }
 }
 

Next, our controller action will have following logic:

public override ActionResult Index(RenderModel model)
{
var myCustomModel = new MyCustomModel();

var modelItems = model.Content.Children.OrderByDescending(x => x.CreateDate);
//pager logic
const int PAGE_SIZE = 6;
var currentPage = 1;
int.TryParse(Request.QueryString["page"], out currentPage);

myCustomModel.Pager = new Pager()
{
PageSize = PAGE_SIZE,
TotalPages = (int)Math.Ceiling((double)modelItems.Count() / (double)PAGE_SIZE),
CurrentPage = currentPage
};

myCustomModel.ModelItems = currentPage == 0 ? modelItems.Take(PAGE_SIZE).ToList() : modelItems.Skip((currentPage - 1) * PAGE_SIZE).Take(PAGE_SIZE).ToList();

if (myCustomModel.Pager.CurrentPage > myCustomModel.Pager.TotalPages) { myCustomModel.Pager.CurrentPage = myCustomModel.Pager.TotalPages; }
else if (myCustomModel.Pager.CurrentPage < 1) { myCustomModel.Pager.CurrentPage = 1; }

return base.Index(myCustomModel);
}

As we return custom model from the action, we also need to define this in our custom view as shown below:

@inherits Umbraco.Web.Mvc.UmbracoViewPage<MyCustomModel>

<div class="row">
<div class="col-md-6">
@foreach (var item in Model.ModelItems.Take(Model.Pager.NumberOfRows))
{
//display your item data here
}
</div>
</div>

@Html.Partial("_Pager", Model.Pager) //embed pager view

Finally, the pager partial view should look as follows:

@model Pager

@{
var IsBreak = false;
}

<div class="container">
@if (Model.TotalPages > 1)
{
<ul class="pager">
@if (Model.CurrentPage > 1)
{
<li><a href="?page=@(Model.CurrentPage - 1)">Previous</a></li>
}
@for (int p = 1; p < Model.TotalPages + 1; p++)
{
var linkClass = (p == Model.CurrentPage) ? "disabled" : "active";
if (p == Model.CurrentPage)
{
<li class="@Html.Raw(linkClass)"><a href="?page=@p">@p</a></li>
IsBreak = false;
}
else
{
if (p == 1
|| p == Model.CurrentPage - 1
|| p == Model.CurrentPage + 1
|| p == Model.TotalPages - 1
|| p == Model.TotalPages)
{
<li class="@Html.Raw(linkClass)"><a href="?page=@p">@p</a></li>
IsBreak = false;
}
else
{
if (IsBreak)
{
continue;
}
else
{
<li><a href="#">...</a></li>
IsBreak = true;
}
}
}
}

@if (Model.CurrentPage < Model.TotalPages)
{
<li><a href="?page=@(Model.CurrentPage + 1)">Next</a></li>
}
</ul>
}
</div>

The above is fully working example – of course you need to do some html adjustments depending on your requirements. Enjoy!

1 Star2 Stars3 Stars4 Stars5 Stars (No Ratings Yet)
Loading...Loading...