10 reasons why to outsource in-house software development

Software development outsourcing has always been an very attractive option for many IT companies operating in developed countries and perceived as a way to boost the competitiveness on the local market. A lot of businesses operating on the global market, already proved the effectiveness of software outsourcing by reducing internal costs while maintaining high quality of products and services.

Offshore development team can greatly increase your productivity by allowing your in-house stuff to fucus on your core business, while delivering products and services to your clients in a usual manner. At the same time, your payroll costs may deacreese greatly, so you will have more money for future investments.


What are the main reasons for software outsourcing?


1 – Cost Savings

Outsourcing may reduce your costs by up-to 50% while reducing workload on your in-house employees. Taking into account the fact, that outsourcing usually does not require any up-front costs, makes it very attractive. This is especially true for the UK, as currently the British pound is on the seven-year high against the Euro and other European currencies.


2 – Time Savings

Outsourcing will save you a lot of time as you dont need to manage directly the team of dedicated developers, so you can deliver your products to the market more quickly, below the budget.


3 – Extending in house capabilities

Companies struggling on the global market, may experience lack of experience in some areas of expertise necessary to develop innovative products. Software development outsourcing may bridge this gap by providing these missing in-house skills.


4 – Flexibility

With the outsourcing team, you are more flexible being able quickly increase or decrease the team size when necessary. You will also save time on recruiting new in-house employees. This is especially true for short time projects where local, short term freelancers, may cost you a fortune.


5 – Talented IT Professionals

You will have much broader access to talented IT professionals by going overseas and bypassing the gaps in hiring pools in more developed countries.


6 – Risk Mitigation

You can mitigate the risk by choosing outsourcing company specializing in area of your business with the good track of record operating in well managed software development environment.


7 – Enhanced Accuracy

Dedicated team of developers is more likely to meet the pre-defined deadlines on the project as they are more flexible in scaling out their internal team.


8 – Focused Strategy

Dedicated team of developers will streamline your business strategy by allowing you to focus on the core of your business.


9 – Technological Advances

By using dedicated team of developers specialized in specific area of technology, you will gain competitive advantage over your competitors.


10 –  Increased Availability

Dedicated team of developers operating in different time zone e.g. GMT +2 will increase your aviability by being able e.g. to do some urgent tasks before or after your client’s business hours.


Finally

Outsourcing software development may become a game changer for the companies operating on highly competitive markets, in the age of globalization and technological advances.


Please contact us to find out what we can do for you..


1 Star2 Stars3 Stars4 Stars5 Stars (No Ratings Yet)
Loading...Loading...

Using Windows Azure Service Bus Topics in distributed systems

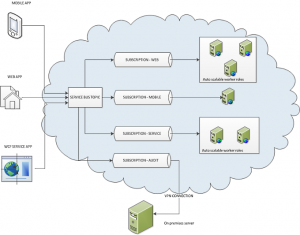
Service Bus topics allow to perform one way communication using publish/subscribe model. In that model the Service Bus topic can be treated as a intermediary queue that multiple users/components can subscribe to.

When publishing a message we can choose to route it to all subscribers or to apply filters for each subscription resulting in each subscriber receiving messages that are addressed to him. With Service Bus topics we can easily scale distributed applications communicating with each other within or across multiple networks.

In this article I will show you how to build and test Service Bus topic on your local computer. In our example we will simulate sending messages from the web, mobile and service application to the Service Bus Topic.

These messages will be then routed to relevant subscriptions based on defined filters we assigned for each of them. Subscription for messages from the web application will be using multiple auto scalable worker roles to process the business logic. Same will apply for service messages. If we don’t expect a lot of traffic coming from mobile application, we can then use single worker role (with failover settings).

Autoscaling worker roles can be performed using Enterprise Library 5.0 – Autoscaling Application Block (aka WASABi). This will ensure that appropriate number of worker roles will be automatically started when traffic increases and stopped if the traffic will ease.

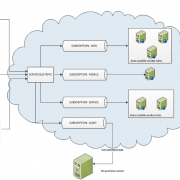
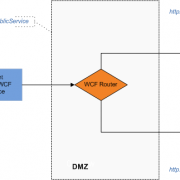
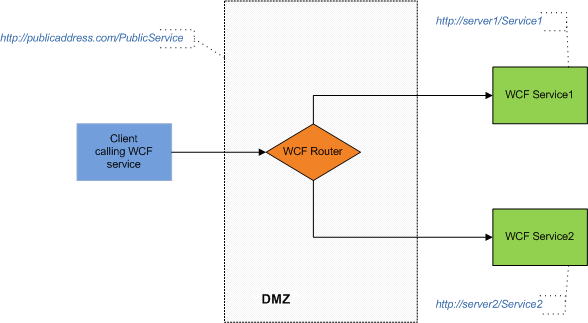
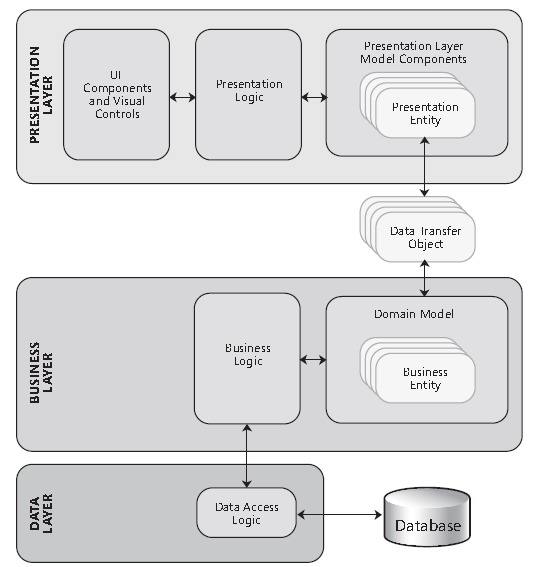
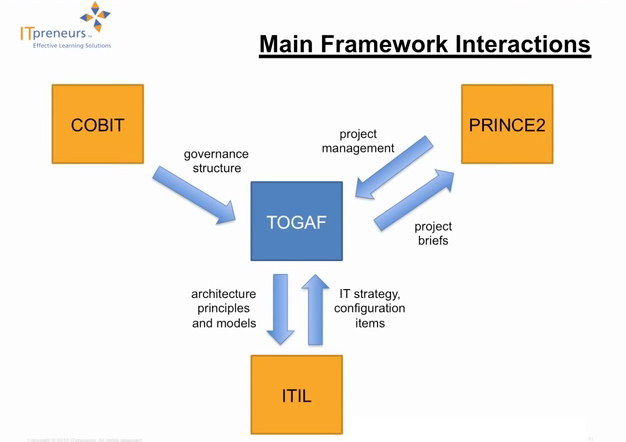
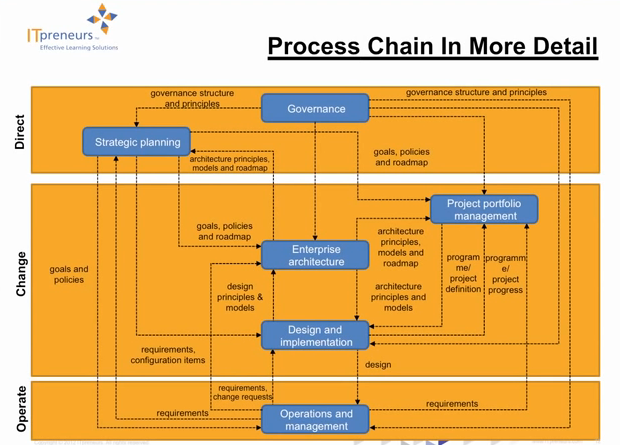
See high level architecture diagram below:

ServiceBusTopic


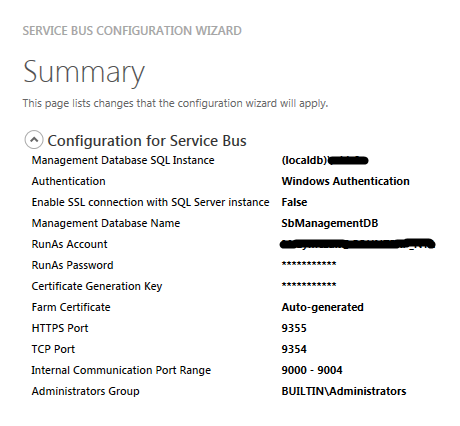
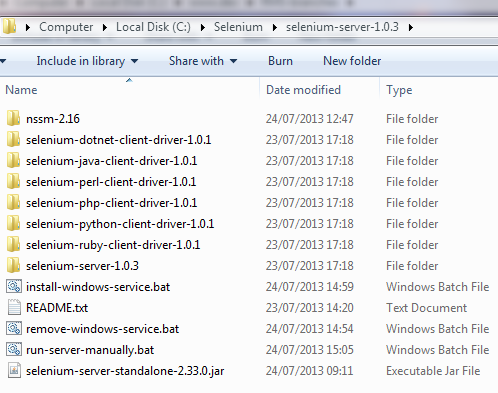
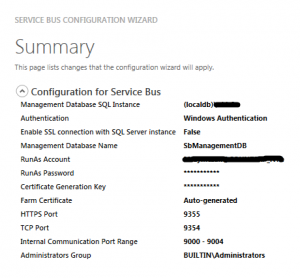
In order to start, we need to first install “Service Bus 1.0 for Windows Server” (runs on Win7 as well). After installation please go to start > Service Bus 1.0 > Service Bus Configuration. Then use the wizard to set up the web farm first and after that, join your computer to that farm – this will essentially create namespace within the namespace on your local machine.

ServiceBus-configuration

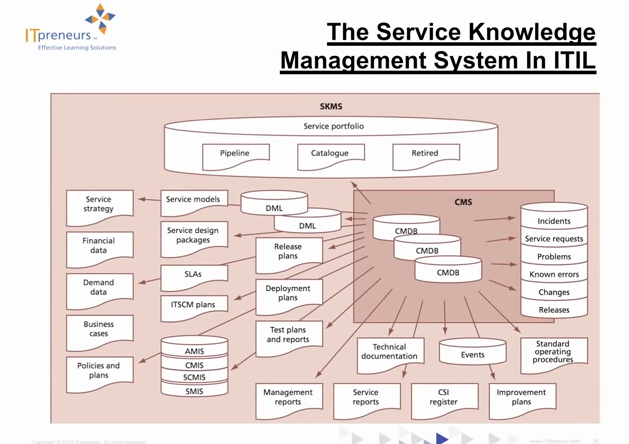
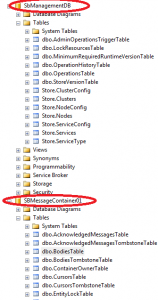
After you configure the Service Bus installation you will get endpoint address that your local application will use to connect to the Service Bus. You may notice that after installation there are 2 databases created on you local MSSQL server, see below image:

ServiceBus-tables

In order to connect to our Service Bus we will use the function below. This will create connection string the pass in to the NamespaceManager class.

  //use this setting when deploying to Windows Azure
  <add key="Microsoft.ServiceBus.ConnectionString" value="Endpoint=sb://[your namespace].servicebus.windows.net;SharedSecretIssuer=owner;SharedSecretValue=[your secret]" />

 public static string getLocalServiceBusConnectionString()
 {
    var ServerFQDN = System.Net.Dns.GetHostEntry(string.Empty).HostName;
    var ServiceNamespace = "ServiceBusDefaultNamespace";
    var HttpPort = 9355;
    var TcpPort = 9354;

    var connBuilder = new ServiceBusConnectionStringBuilder();
    connBuilder.ManagementPort = HttpPort;
    connBuilder.RuntimePort = TcpPort;
    connBuilder.Endpoints.Add(new UriBuilder() { Scheme = "sb", Host = ServerFQDN, Path = ServiceNamespace }.Uri);
    connBuilder.StsEndpoints.Add(new UriBuilder() { Scheme = "https", Host = ServerFQDN, Port = HttpPort, Path = ServiceNamespace }.Uri);

    return connBuilder.ToString();
 }

Within the worker role we will use NamespaceManager to create Service Bus Topic (if does not exist). We will also create subscriptions and associated filters.
Please notice that subscription will filter messages using MessageOrigin property. This property will be assigned to the message in the message send method for each application separately (web, mobile, service).

 public void CreateServiceBusTopicAndSubscriptions(NamespaceManager namespaceManager)
 {
    #region Configure and create Service Bus Topic
    var serviceBusTestTopic = new TopicDescription(TopicName);
    serviceBusTestTopic.MaxSizeInMegabytes = 5120;
    serviceBusTestTopic.DefaultMessageTimeToLive = new TimeSpan(0, 1, 0);

    if (!namespaceManager.TopicExists(TopicName))
    {
        namespaceManager.CreateTopic(serviceBusTestTopic);
    }
    #endregion

    #region Create filters and subsctiptions
    //create filters
    var messagesFilter_Web = new SqlFilter("MessageOrigin = 'Web'");
    var messagesFilter_Mobile = new SqlFilter("MessageOrigin = 'Mobile'");
    var messagesFilter_Service = new SqlFilter("MessageOrigin = 'Service'");

    if (!namespaceManager.SubscriptionExists(TopicName, "WebMessages"))
    {
        namespaceManager.CreateSubscription(TopicName, "WebMessages", messagesFilter_Web);
    }

    if (!namespaceManager.SubscriptionExists(TopicName, "MobileMessages"))
    {
        namespaceManager.CreateSubscription(TopicName, "MobileMessages", messagesFilter_Mobile);
    }

    if (!namespaceManager.SubscriptionExists(TopicName, "WCfServiceMessages"))
    {
        namespaceManager.CreateSubscription(TopicName, "WCfServiceMessages", messagesFilter_Service);
    }
    #endregion
}

We also need to create subscription clients in “OnStart” method giving each subscriber a unique name.

 public override bool OnStart()
 {
    // Set the maximum number of concurrent connections 
    ServicePointManager.DefaultConnectionLimit = 12;

    // Create the queue if it does not exist already
    //string connectionString = CloudConfigurationManager.GetSetting("Microsoft.ServiceBus.ConnectionString");
    var connectionString = getLocalServiceBusConnectionString();
    var namespaceManager = NamespaceManager.CreateFromConnectionString(connectionString);

    //create topic and subscriptions
    CreateServiceBusTopicAndSubscriptions(namespaceManager);

    // Initialize subscription for web, mobile and service
    SubscriptionClients.Add(SubscriptionClient.CreateFromConnectionString(connectionString, TopicName, "WebMessages"));
    SubscriptionClients.Add(SubscriptionClient.CreateFromConnectionString(connectionString, TopicName, "MobileMessages"));
    SubscriptionClients.Add(SubscriptionClient.CreateFromConnectionString(connectionString, TopicName, "WCfServiceMessages"));

    IsStopped = false;
    return base.OnStart();
}

Inside the run method we will use Task Parallel foreach method to create separate task for each subscriber listening for incoming messages.
This is only to simulate multiple subscribers in one place. Normally each worker role will connect to the topic listening for the messages appropriate for it’s type (separate for web, mobile and service).

public override void Run()
{
 Parallel.ForEach(SubscriptionClients, currentSubscrtiption =>
 {
    while (!IsStopped)
    {
        #region Receive messages
        try
        {
            // Receive the message
            var receivedMessage = currentSubscrtiption.Receive();
         
            if (receivedMessage != null)
            {
                var messageFrom = receivedMessage.Properties["MessageOrigin"].ToString();

                switch (messageFrom)
                {
                    case "Web":
                        //send it to web processing logic

                        break;
                    case "Mobile":
                        //send it to mobile processing logic

                        break;
                    case "Service":
                        //send it to service processing logic

                        break;
                    default:
                        break;
                }

                // Process the message
                Trace.WriteLine(Environment.NewLine + "--------------------------" + Environment.NewLine);
                Trace.WriteLine(string.Format("{0} message content: {1}", messageFrom, receivedMessage.GetBody<string>()));

                receivedMessage.Complete();
            }
        }
        catch (MessagingException e)
        {
            if (!e.IsTransient)
            {
                Trace.WriteLine(e.Message);
                throw;
            }

            Thread.Sleep(10000);
        }
        catch (OperationCanceledException e)
        {
            if (!IsStopped)
            {
                Trace.WriteLine(e.Message);
                throw;
            }
        }
        #endregion
    }
});
}

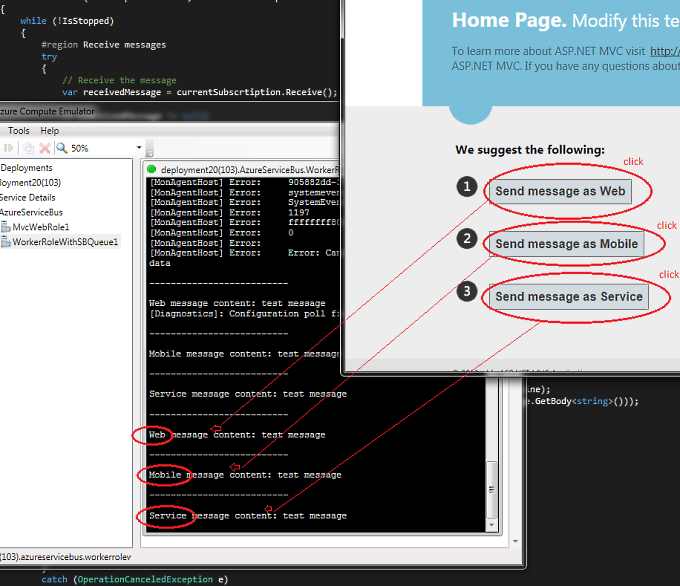
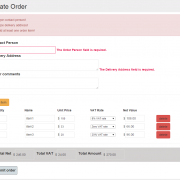
Finally we can simulate sending messages from the MVC application. We will use 3 different buttons to create and send messages.

 [HttpPost]
 public ActionResult SendWebMessage()
 {
    SendMessage("Web");

    return RedirectToAction("Index", "Home");
 }

 [HttpPost]
 public ActionResult SendMobileMessage()
 {
    SendMessage("Mobile");

    return RedirectToAction("Index", "Home");
 }

 [HttpPost]
 public ActionResult SendServiceMessage()
 {
    SendMessage("Service");

    return RedirectToAction("Index", "Home");
 }

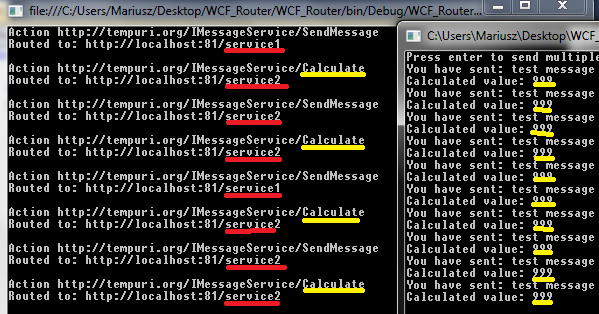
See the image below:

ServiceBusTopic-subscriptions

Please note that when sending messages we have to assign value to message.Properties[“MessageOrigin”]. This will be used by the Service Bus Topic to route messages to appropriate subscriptions.

 void SendMessage(string type)
 {
    var connectionString = getLocalServiceBusConnectionString();

    var Client = TopicClient.CreateFromConnectionString(connectionString, "ServiceBusTestTopic");

    var message = new BrokeredMessage("test message");
    message.Properties["MessageOrigin"] = type;

    Client.Send(message);
 }

As usual, I have attached working project files for your tests 🙂

AzureServiceBus

1 Star2 Stars3 Stars4 Stars5 Stars (No Ratings Yet)
Loading...Loading...

Social media Sentiment Analysis using C# API

Sentiment Analysis in Social media has become very important for many companies over the last few years as more and more people use this communication channel not only to exchange the messages, but also to express their opinions about the products and services they use or used in the past.

In order to start proper sentiment analysis, we need to use correct Text Analytics and Text Mining techniques. The fastest way is to use external API to get the information we need and then import that data on the daily basis to our system database, where we can visualize and track the results.

In this article I will show you, how you can convert unstructured data e.g. tweets using text2data.org API, into structured information that you can use to track sentiment towards the brand, product or company.

First step is to register in the service and get the private key to be used in your API calls. Next, you need to download API SDK from here

The code below, will just create request object containing your information and post that to platform using json or xml format. The response object will have information you need: Detected Entities, Themes, Keywords, Citations, Slang words and abbreviations. For each of these you can get sentiment result as double, polarity and score (positive, negative or neutral). Received information can be formatted the way you want. Below is complete sample (except for private key):

  static void Main(string[] args)
   {
        var inputText = "I am not negative about the LG brand.";
        var privateKey = "-------------"; //add your private key here (you can find it in the admin panel once you sign-up)
        var secret = ""; //this should be set-up in admin panel as well.

       var doc = new Document()
       {
          DocumentText = inputText,
          IsTwitterContent = false,
          PrivateKey = privateKey,
          Secret = secret
       };

       var docResult = API.GetDocumentAnalysisResult(doc); //execute request

       if (docResult.Status == (int)DocumentResultStatus.OK) //check status
       {
        //display document level score
        Console.WriteLine(string.Format("This document is: {0}{1} {2}", docResult.DocSentimentPolarity, docResult.DocSentimentResultString, docResult.DocSentimentValue.ToString("0.000")));

        if (docResult.Entities != null && docResult.Entities.Any())
        {
         Console.WriteLine(Environment.NewLine + "Entities:");
         foreach (var entity in docResult.Entities)
         {
           Console.WriteLine(string.Format("{0} ({1}) {2}{3} {4}", entity.Text, entity.KeywordType, entity.SentimentPolarity, entity.SentimentResult, entity.SentimentValue.ToString("0.0000")));
          }
       }
 
      if (docResult.Keywords != null && docResult.Keywords.Any())
      {
         Console.WriteLine(Environment.NewLine + "Keywords:");
         foreach (var keyword in docResult.Keywords)
          {
             Console.WriteLine(string.Format("{0} {1}{2} {3}", keyword.Text, keyword.SentimentPolarity, keyword.SentimentResult, keyword.SentimentValue.ToString("0.0000")));
            }
        }

        //display more information below if required 

      }
      else
      {
          Console.WriteLine(docResult.ErrorMessage);
      }

       Console.ReadLine();
  }

You can always validate results by checking the demo site (on text2data.org platform)

sentiment-analysis

Enjoy 🙂

Social-Media-Icons

1 Star2 Stars3 Stars4 Stars5 Stars (1 votes, average: 5.00 out of 5)
Loading...Loading...

Creating custom WCF message router – load balancer

The very common requirement is to route WCF messages from the publicly exposed front-end service (perimeter network) to other services sitting within the local network. This is the good security model that lets us implement routing or load balancer if needed. The front-end service will also act as a firewall in this scenario. The routing may be performed based on the requested service method, content or custom algorithm.

The image below shows typical hight level service infrastructure within the organization.

wcf_router

Let’s start with defining our service that the client will use to send requests. The “Calculate” method will be used to perform time consuming operation that will require more CPU usage.

  [ServiceContract]
    public interface IMessageService
    {
        [OperationContract]
        string SendMessage(string value);

        [OperationContract]
        int Calculate(string value); 
    }

  public class MessageService : IMessageService
  {
        public string SendMessage(string value)
        {
            return string.Format("You have sent: {0}", value);
        }

        public int Calculate(string value)
        {
            //do calculation
            return 999;
        }
    }

Next, we need to define IRouter interface. In our example we will use two methods: RouteMessage, that will process and route the messages and AddAvailableEndPoints, that will be used to assign available endpoints for the requests to be routed to. Please note that our router will not be using service contracts which is very useful as we don’t want to recompile router service each time our message service interface changes. You may also implement function to assign routing rules, in our example we will hard-code the rules for better clarity.

  [ServiceContract]
    public interface IRouter
    {
        [OperationContract(Action = "*", ReplyAction = "*")]
        Message RouteMessage(Message message);

        void AddAvailableEndPoints(List<EndpointAddress> addressList);        
    }

Let’s create our router class now. Please note that we are using static constructor as we will only use one instance of the service (creating and destroying channel factory is very costly operation).

 static IChannelFactory<IRequestChannel> factory;
 List<EndpointAddress> addressList;
 int routeCount;

  //create only one instance
  static Router()
  {
    try
    {
        var binding = new BasicHttpBinding();
        factory = binding.BuildChannelFactory<IRequestChannel>(binding);

        factory.Open();
    }
    catch (Exception e)
    {
        Console.WriteLine("Exception: {0}", e.Message);
    }
  }

Now we need to implement the actual routing algorithm. In our case, when message arrives we will check the action method that proxy object will use to execute on the target service. We have hard-coded the method “Calculate” to be routed to service2, the other request will be routed equally among available services. You can also use XmlDocument class to parse message content if needed.
Of course in the production environment you may want to pass in routing rules as a object and examine that when processing arrived message prior routing it to appropriate service.

 public Message RouteMessage(Message message)
 {
    IRequestChannel channel = null;
    Console.WriteLine("Action {0}", message.Headers.Action);
    try
    {
        //Route based on custom conditions
        if (message.Headers.Action.ToLower().EndsWith("calculate")) //or use custom routing table stored in other location
        {
            //use second endpoint as it has more resources for time consuming operations
            channel = factory.CreateChannel(this.addressList.Skip(1).First());
            Console.WriteLine("Routed to: {0}\n", this.addressList.Skip(1).First().Uri);
        }
        else
        {
            //or
            #region Route other requests equally
            //we assume only 2 endpoints for this example 
            if (routeCount % 2 == 0)
            {
                channel = factory.CreateChannel(this.addressList.First());
                Console.WriteLine("Routed to: {0}\n", this.addressList.First().Uri);
            }
            else
            {
                channel = factory.CreateChannel(this.addressList.Skip(1).First());
                Console.WriteLine("Routed to: {0}\n", this.addressList.Skip(1).First().Uri);
            }
            //reset route counter
            if (routeCount > 10000) { routeCount = 0; } else { routeCount++; }
            #endregion           
        }

        //remove context as the message will be redirected
        message.Properties.Remove("ContextMessageProperty");

        channel.Open();

        var reply = channel.Request(message);

        channel.Close();

        return reply;
    }
    catch (Exception e)
    {
        Console.WriteLine(e.Message);
        return null;
    }
}

At this time, we can create client application that will call our front-end service(router) multiple times for our test.

 static void Main(string[] args)
 {
    Console.Write("Press enter to send multiple messages");
    Console.ReadLine();

    var baseFrontOfficeAddress = new Uri("https://localhost:81/FrontOffice");

    try
    {
        var binding = new BasicHttpBinding();
        var endpoint = new EndpointAddress(baseFrontOfficeAddress);

        var factory = new ChannelFactory<IMessageService>(binding, endpoint);
        var channel = factory.CreateChannel();

        //simulate multiple requests
        for (var i = 0; i < 10; i++)
        {
            var reply = channel.SendMessage("test message");
            Console.WriteLine(reply);

            var replyCalulated = channel.Calculate("test message");
            Console.WriteLine("Calculated value: " + replyCalulated);
        }

        Console.ReadLine();
        factory.Close();
    }
    catch (Exception ex)
    {
        Console.WriteLine(ex.Message);
        Console.ReadLine();
    }
}

In order to receive client requests we need to start our services. In our example we will host router and available services within the same application. Normally we would deploy router service within DMZ zone and target services on the separate computers withing our local network. For security reasons, only router service would be exposed to public network.

 static void Main(string[] args)
 {
    //execute this first using cmd (win7)
    //netsh http add urlacl url=https://+:81/FrontOffice user=Domain(or PC name)\UserName
    //netsh http add urlacl url=https://+:81/service1 user=Domain(or PC name)\UserName
    //netsh http add urlacl url=https://+:81/service2 user=Domain(or PC name)\UserName

    //front office endpoint - all clients will call this address before requests will be routed
    var baseFrontOfficeAddress = new Uri("https://localhost:81/FrontOffice");

    #region Target service endpoints that requests can be routed to (can be more than 2)
    var baseEndPointAddress1 = new Uri("https://localhost:81/service1");
    var baseEndPointAddress2 = new Uri("https://localhost:81/service2");

    var endPoint1 = new EndpointAddress(baseEndPointAddress1);
    var endPoint2 = new EndpointAddress(baseEndPointAddress2); 
    #endregion

    #region These services should normally be deployed to different servers within the organization
    //start service 1
    var hostService1 = new ServiceHost(typeof(MessageService1), baseEndPointAddress1);
    hostService1.AddServiceEndpoint(typeof(IMessageService), new BasicHttpBinding(), "");
    hostService1.Open();
    Console.WriteLine("MessageService1 service running");

    //start service 2
    var hostService2 = new ServiceHost(typeof(MessageService2), baseEndPointAddress2);
    hostService2.AddServiceEndpoint(typeof(IMessageService), new BasicHttpBinding(), "");
    hostService2.Open();
    Console.WriteLine("MessageService2 service running");        
    #endregion

    #region Start router service
    var router = new Router();

    //add available service enpoints
    router.AddAvailableEndPoints(new List<EndpointAddress>() { endPoint1, endPoint2 });

    var routerHost = new ServiceHost(router);
    routerHost.AddServiceEndpoint(typeof(IRouter), new BasicHttpBinding(), baseFrontOfficeAddress);
    routerHost.Open();

    Console.WriteLine("Router service running");           
    #endregion           
    
    Console.WriteLine("---Run client to send messages---");  
    Console.ReadLine(); 
}

The results of our test is shown below. In this example we chose to route all requests for “Caluculate” method to “service2” (as it located on faster machine within the network), the other requests are routed equally to service1 or service2.

routed_messages

Above way of routing messages is very flexible as it is implemented on the very low level. The other way of routing messages is to use RoutingService class. In this approach you would define the routing table, endpoints and filters in your configuration file. Based on these settings you would add service behavior that will use RoutingService class to route messages.

I have attached project files below for your tests. Please execute below commands before testing it:

netsh http add urlacl url=https://+:81/FrontOffice user=Domain(or PC name)\UserName”
netsh http add urlacl url=https://+:81/service1 user=Domain(or PC name)\UserName
netsh http add urlacl url=https://+:81/service2 user=Domain(or PC name)\UserName

WCF_Router

1 Star2 Stars3 Stars4 Stars5 Stars (No Ratings Yet)
Loading...Loading...

Integrating automated Selenium tests with TeamCity

Automated tests are crucial these days to achieve high quality software products as they are being prone to errors especially during agile process where changes can occur at any stage causing our solution to stop functioning properly. Apart from standard testing using TDD, Mocking etc. there is always a need to perform interface tests simulating an user using our website. The ideal solution in that case are automated Selenium tests.


Selenium tests give us possibility to create user case scenarios that we can test either on our dev applications or live websites deployed to the clients. This will give us a chance to test all cases after the build will happen either on demand or when we deploy live version of our product.

Selenium tests can be created by the developer or business analyst or testers as this not requires programming skills. In order to start creating tests we need to download Selenium IDE plug-in for Firefox: https://docs.seleniumhq.org/download/

Creating tests is similar to recording macros in Excel, all we need to do is to record our actions that we want to test, image below shows the example:


selenium-ide

Please note that you need to install Firefox version 21.0 the newer version is not working with selenium (Firefox bug).

After our test is created, we need to export it to .cs C# file as pictured below:

selenium-export

The next step is to create small library project application. We will use this project to compile our test files exported from the Selenium IDE. After we have the project created, we simply need to copy our exported .cs file to our project and compile dll.

selenium-project-files

If we want to integrate Selenium tests with the TeamCity server, we can do it by including previously created project into our development project files. After that, we can configure TeamCity build step to run our Selenium tests on every triggered build. To configure build step, we need to choose NUnit runner type (or other test framework of your choice)

buildstep

If we have configured everything correctly, the test will run on every application change. Of course Selenium tests must be run at the end, when project is compiled and deployed on the server (if this is our local dev environment).

When tests finish, we can check the status in TeamCity admin panel or configure email notification or use TeamCity Tray Notifier to track the results.

test-results

The final thing that needs to be set-up is the Selenium server. You can run the Selenium server locally by turning it on when needed and then running NUnit application to check the test locally. In our case we want the Selenium to be running on the server as a Windows Service.

After downloading Selenium RC https://docs.seleniumhq.org/projects/remote-control/ we unpack the files to following location C:\Selenium\selenium-server-1.0.3 You not necessarily need all that files as it also includes web drivers for other languages. Anyway, our folder structure should look similar to following:

selenium-files

We also need to download nssm-2.16 (“Non-Sucking Service Manager”), we will use it to install Windows Service running our Selenium server. When we run run-server-manually.bat, the Selenium server will be launched, it will stop after you close console window – this will help when testing on your local machine.
The script looks like this:

 java -jar selenium-server-standalone-2.33.0.jar -port 4444

I have also created 2 scripts: install-windows-service.bat and remove-windows-service.bat that install and remove Windows Service on the target server. The logic is as follows:

//install Windows Service
C:\Selenium\selenium-server-1.0.3\nssm-2.16\win64\nssm.exe install Selenium-Server "C:\Program Files (x86)\Java\jre7\bin\java.exe" "-jar C:\Selenium\selenium-server-1.0.3\selenium-server-standalone-2.33.0.jar"

//Uninstall Windows Service
C:\Selenium\selenium-server-1.0.3\nssm-2.16\win64\nssm.exe remove Selenium-Server

After installing Windows Service, please make sure it is running by going to Control panel > Administrative Tools > Services. You also need to remember to check java path as it differs for x64 systems.
That’s it. I have included configuration files that may help you. Hope you will be successful with your configuration 🙂

Selenium-VisualStudioApp

1 Star2 Stars3 Stars4 Stars5 Stars (1 votes, average: 5.00 out of 5)
Loading...Loading...

Auto creating installers using WIX (Open source) and CI server

Creating installer packages has become more complicated recently as the Microsoft decided to not to support installation projects (.vdproj) in VS 2012 upwards. On the top of that there is additional difficulty if we want to auto-create installers on the server that hasn’t got commercial Visual Studio installed – we just cannot do it 🙁

The perfect solution for that is to use WIX installer (Open source). WIX enables you to build installation packages from xml files without relying on Visual Studio. The only component required is to install WIX toolset on the build server (wixtoolset.org)

The main WIX file is the .wixproj file that builds the required package either from inside Visual Studio or from command line – without VS. In that project file we can find some commands that use WIX heat, candle and light modules to create required msi files. See sample below:

Harvesting module will create dynamic list of all files that need to be included into installer. This list is gathered after our website app is published to the local folder:

  <Exec Command="&quot;$(WixPath)heat.exe&quot; dir $(PublishF) -dr INSTALLLOCATION -ke -srd -cg MyWebWebComponents -var var.publishDir -gg -out WebSiteContent.wxs" ContinueOnError="false" WorkingDirectory="." />

After harvesting, we can finally build installer. Please note that we can pass in custom parameters when triggering candle module, the parameters must be preceded with the letter “d” e.g. -dMyParam. In our sample we will use this to pass in command line arguments that will define our installer’s name, version, website root etc.

 <Exec Command="&quot;$(WixPath)candle.exe&quot; -ext WixIISExtension -ext WixUtilExtension -ext WiXNetFxExtension -dProductName=$(ProductName) -dWebFolderName=$(WebFolderName) -dProductVersion=$(ProductVersion) -dUpgradeCode=$(UpgradeCode) -dProductCode=$(ProductCode) -dpublishDir=$(PublishF) -dMyWebResourceDir=. @(WixCode, ' ')" ContinueOnError="false" WorkingDirectory="." />

 <Exec Command="&quot;$(WixPath)light.exe&quot; -ext WixUIExtension -ext WixIISExtension -ext WixUtilExtension -ext WiXNetFxExtension -out $(MsiOut) @(WixObject, ' ')" ContinueOnError="false" WorkingDirectory="." />

For the purpose of this article we will create very simple installer without configuring IIS settings, deploying sql scripts etc. All installer’s basic configuration can be found in UIDialogs.wxs, MyWebUI.wxs, IisConfiguration.wxs – you may want to adjust it for your needs. The file Product.wxs is the main entry point where you can define installation folders, actions, validations etc.

Please note that adding UpgradeCode and MajorUpgrade configuration elements will result in any older installed version to be automatically un-installed prior the installation. Also, any custom params you want to use inside your installer configuration must be used like this $(var.MyParamName).

 <Product Id="$(var.ProductCode)" 
			 Name="$(var.ProductName)" 
			 Language="1033" 
			 Version="$(var.ProductVersion)" 
			 Manufacturer="MyCompany" 
			 UpgradeCode="$(var.UpgradeCode)" >
 <MajorUpgrade DowngradeErrorMessage="A newer version of Product Name Removed is already installed."/> 
 
 .....

After defining our WIX configuration files, we can finally build our installer. We can do it by using batch or Power Shell script, or use Visual Studio to do it. It is because the .wixproj file it’s just normal ms-build file.

When using CI server we can simply run power-shell installation process by passing in our version number (build number, revision etc.) and other parameters we need.

This is how we can run it with PS:
WIX_installer-powershell

We can still use Visual Studio to do the same, as presented below:
WIX_installer-visualstudio

I have attached working sample below. Please don’t forget to install WIX toolset before running it. Also please check if all paths to WIX and msbuild folders are the same on your server (or use environment variables instead).

Enjoy!
MyWebsite

1 Star2 Stars3 Stars4 Stars5 Stars (1 votes, average: 5.00 out of 5)
Loading...Loading...

Using presentation model components and entities in ntier architecture

When designing applications that will run in the n-tier environment there are some additional factors to be considered. First of all it is very likely that your business entities will be located on separate machine. In this scenario there is a need to create objects in your UI layer that will have functionality of the business objects sitting on separate tier. Those objects should also include businesses validation logic and be able to easily apply bindings to UI components.

When transferring business entity data between the tiers, there is a need to create “data transformation objects” that transport object information across the network (if not invoked directly). DTOs also allow to separate layers and expose only those data that we will use (encapsulation). It is especially useful when using restful services.

Diagram below shows the typical n-tier architecture using presentation components and entities.

pres_model_components

Diagram 1. Presentation model components and entities in multi tier application (please refer to “Microsoft Application Architecture Guide, 2nd Edition” book for more details).

Please note that using DTOs may incur some performance lost as the objects need to be mapped and transformed between the layes/tiers. Solution for that could be executing batch commands at once sending final results as combined object to avoid round trips within the network.

If your tiers are located within your local network it is advisable to use TCP protocol(more efficient) otherwise use HTTP/HTTPS when transferring data across the public network.

1 Star2 Stars3 Stars4 Stars5 Stars (No Ratings Yet)
Loading...Loading...

TOGAF vs COBIT, PRINCE2 and ITIL – Webinar

TOGAF is currently the most popular open architecture framework that is widely implemented in medium and big organizations. It’s ADM lets us operate within generic, proven framework when defining the Enterprise Architecture.

If you are an Architect or PM, it is very useful to know how TOGAF relates to other frameworks like COBIT, ITIL and PRINCE2.

Digram below shows how those frameworks overlap with each other on the operation, governance and change management level.
togaf_process_change_frameworks
We can clearly see that TOGAF overlaps with COBIT in architecture governance, with ITIL in service/ operation area and with PRINCE2 in change management.

Further interaction is shown on the next diagram:

Togaf_cobit_itil_prince2

Process chain for the above diagrams depicts following image:

process_change_detials

ITIL itself, can be described as follows:

service_level_knowhow_itil

Finally, the last diagram shows how PRINCE2 relates to Architecture within its operational level:

architecture_in_prince2

For more information, please check following video:


1 Star2 Stars3 Stars4 Stars5 Stars (1 votes, average: 4.00 out of 5)
Loading...Loading...

Multiple object bindings on MVC view

Multiple object bindings in MVC are the common requirement when working with more advanced UI. An example of that can be creating order form with multiple order items being added dynamically by the user.

In such a scenario we can create binding for our “Order” model as normal and create partial view with the structure of our “OrderItem” class separately. By doing this, the user will be able to dynamically preload order items using ajax request, appending created html to div container.

When submitting the form, order items will be automatically bound to the nested property list, provided the html control ids and names will follow the convention: name of the list property, index id and property name; id=’OrderItems_ID__Quantity’

For example:

   <input type="number" id='OrderItems_@(Model.OrderItemId)__Quantity' value="@Model.Quantity" name='OrderItems[@Model.OrderItemId].Quantity'/>
 

MVC-order

Lets create our order and order items classes first

   public class Order
    {
        public int OrderId { get; set; }
        [Required]
        [Display(Name = "Order Person")]
        public string OrderPerson { get; set; }
        [Required]
        [Display(Name = "Delivery Address")]
        public string DeliveryAddress { get; set; }
        public string OrderComments { get; set; }
        public DateTime OrderDate { get; set; }
        public double TotalNet { get; set; }
        public double TotalVAT { get; set; }
        public double TotalAmount { get; set; }
        [Required]
        public List<OrderItem> OrderItems { get; set; }
    }

	public class OrderItem
    {
        public int OrderItemId { get; set; }
        [Required]
        public string ItemName { get; set; }
        [Required]
        public int Quantity { get; set; }
        [Required]
        public double? UnitPrice { get; set; }
        public double VATRate { get; set; }
        public double TotalValue { get; set; }
    }
 

Our Order form will look the standard way, plus extra element for dynamically added elements:

  <div class="form-group">
    <b>@Html.ActionLink("Add item", "LoadBlankItemRow", null, new { id = "addOrderItem", @class = "btn btn-warning" })</b>
     <div style="padding-top: 10px;">
         <p class="itemColumn">Quantity</p>
         <p class="itemColumn">Name</p>
         <p class="itemColumn">Unit Price</p>
         <p class="itemColumn">VAT Rate</p>
         <p class="itemColumn">Net Value</p>
         <p class="itemColumn"></p>
       </div>
     <div id="editorRows">
        @foreach (var itemModel in Model.OrderItems)
         {
            @Html.Partial("_OrderItem", itemModel)
         }
       </div>
   </div>
 

When user clicks the Add item link, the controller action is being invoked returning html structure reflecting the list item model.

   [HttpGet]
   public virtual PartialViewResult LoadBlankItemRow(int id)
   {
     var orderItem = new OrderItem { OrderItemId = id, Quantity = 1 };

     return PartialView("_OrderItem", orderItem);
   }
 

We will use jquery to get the current numbers of items already inserted and define the current index. This will be used to create appropriate control names required for nested model bindings:

   $("#addOrderItem").click(function (e) {
        var itemIndex = $("#editorRows input.iHidden").length;
        $.get("@Url.Action("LoadBlankItemRow", "Order")/" + itemIndex, function (data) {
            $("#editorRows").append(data);
        });
        return false;
    });
 

Each dynamically inserted row will have JavaScript logic to remove the current row and recalculate total values:

    $("a.deleteRow").click(function () {
        $(this).parents("#itemRow").remove();
        calculateTotals();
        return false;
    });

    $('#OrderItems_@(Model.OrderItemId)__Quantity').blur(function () {
        updateTotalValue(@Model.OrderItemId);
    });
    $('#OrderItems_@(Model.OrderItemId)__UnitPrice').blur(function () {
        updateTotalValue(@Model.OrderItemId);
    });
    $('#OrderItems_@(Model.OrderItemId)__VATRate').change(function () {
        updateTotalValue(@Model.OrderItemId);
    });

Finally, scripts included on parent model form will calculate and update controls located outside the partial view, providing Total amount for the entire order.

   function updateTotalValue(id) {
        var qnt = $('#OrderItems_' + id + '__Quantity').val();
        var uprc = $('#OrderItems_' + id + '__UnitPrice').val();

        var vat = parseFloat($('#OrderItems_' + id + '__VATRate').val());
        if (vat == 0) { val = (qnt * uprc); } else { val = (qnt * uprc) * (1 + vat / 100); }
        if (qnt == 0 || uprc == 0) { val = 0; }

        $('#OrderItems_' + id + '__TotalValue').val(val.toFixed(2));
        calculateTotals();
    }

    function calculateTotals() {
        var totalNet = 0.0; var totalVat = 0.0;

        $("#editorRows").children().each(function (index) {
            var qnt = $('#OrderItems_' + index + '__Quantity').val();
            var uprc = $('#OrderItems_' + index + '__UnitPrice').val();
            var vat = parseFloat($('#OrderItems_' + index + '__VATRate').val());
            if (qnt != null && qnt != 'NaN') {
                totalNet += qnt * uprc;
                if (vat != 0) {
                    totalVat += parseFloat((qnt * uprc) * (vat / 100));
                }
            }
        });

        $('#TotalNet').val(totalNet.toFixed(2));
        $('#TotalVAT').val(totalVat.toFixed(2));
        $('#TotalAmount').val((totalNet + totalVat).toFixed(2));
    }

I have included working project below. Enjoy!

MVC OrderForm

1 Star2 Stars3 Stars4 Stars5 Stars (1 votes, average: 5.00 out of 5)
Loading...Loading...

Umbraco custom model with pager

Umbraco is the open source content management system allowing for quick content creation and easy customization as it uses ASP.NET MVC pattern to render page components.

The power of Umbraco is the flexibility and a host of features it provides out of the box. It is also written in C# which makes it especially popular amongst the developers.

Creating custom views with Umbraco is very easy, as we can set-up our own routing methods by inheriting from RenderMvcController and overriding action methods accepting and returning RenderModel object:

public class MyPageController : RenderMvcController
{

public override ActionResult Index(RenderModel model)
{
//your logic here

return base.Index(model);
}
}

However, if we want to accept and return our own custom model, the hack is required.
Suppose we want to return custom model containing pager information. We can do that by extending RenderModel class as follows:

public class MyCustomModel : RenderModel
{
public MyCustomModel() : this(new UmbracoHelper(UmbracoContext.Current).TypedContent(UmbracoContext.Current.PageId)) { }
public MyCustomModel(IPublishedContent content, CultureInfo culture) : base(content, culture) { }
public MyCustomModel(IPublishedContent content) : base(content) { }

public string Title { get; set; }
public List<IPublishedContent> ModelItems { get; set; }
public Pager Pager { get; set; }
}

Our pager class will look as this:

 public class Pager
 {
 public int TotalPages { get; set; }
 public int CurrentPage { get; set; }
 public int PageSize { get; set; }
 public int NumberOfRows { get; set; }
 }
 

Next, our controller action will have following logic:

public override ActionResult Index(RenderModel model)
{
var myCustomModel = new MyCustomModel();

var modelItems = model.Content.Children.OrderByDescending(x => x.CreateDate);
//pager logic
const int PAGE_SIZE = 6;
var currentPage = 1;
int.TryParse(Request.QueryString["page"], out currentPage);

myCustomModel.Pager = new Pager()
{
PageSize = PAGE_SIZE,
TotalPages = (int)Math.Ceiling((double)modelItems.Count() / (double)PAGE_SIZE),
CurrentPage = currentPage
};

myCustomModel.ModelItems = currentPage == 0 ? modelItems.Take(PAGE_SIZE).ToList() : modelItems.Skip((currentPage - 1) * PAGE_SIZE).Take(PAGE_SIZE).ToList();

if (myCustomModel.Pager.CurrentPage > myCustomModel.Pager.TotalPages) { myCustomModel.Pager.CurrentPage = myCustomModel.Pager.TotalPages; }
else if (myCustomModel.Pager.CurrentPage < 1) { myCustomModel.Pager.CurrentPage = 1; }

return base.Index(myCustomModel);
}

As we return custom model from the action, we also need to define this in our custom view as shown below:

@inherits Umbraco.Web.Mvc.UmbracoViewPage<MyCustomModel>

<div class="row">
<div class="col-md-6">
@foreach (var item in Model.ModelItems.Take(Model.Pager.NumberOfRows))
{
//display your item data here
}
</div>
</div>

@Html.Partial("_Pager", Model.Pager) //embed pager view

Finally, the pager partial view should look as follows:

@model Pager

@{
var IsBreak = false;
}

<div class="container">
@if (Model.TotalPages > 1)
{
<ul class="pager">
@if (Model.CurrentPage > 1)
{
<li><a href="?page=@(Model.CurrentPage - 1)">Previous</a></li>
}
@for (int p = 1; p < Model.TotalPages + 1; p++)
{
var linkClass = (p == Model.CurrentPage) ? "disabled" : "active";
if (p == Model.CurrentPage)
{
<li class="@Html.Raw(linkClass)"><a href="?page=@p">@p</a></li>
IsBreak = false;
}
else
{
if (p == 1
|| p == Model.CurrentPage - 1
|| p == Model.CurrentPage + 1
|| p == Model.TotalPages - 1
|| p == Model.TotalPages)
{
<li class="@Html.Raw(linkClass)"><a href="?page=@p">@p</a></li>
IsBreak = false;
}
else
{
if (IsBreak)
{
continue;
}
else
{
<li><a href="#">...</a></li>
IsBreak = true;
}
}
}
}

@if (Model.CurrentPage < Model.TotalPages)
{
<li><a href="?page=@(Model.CurrentPage + 1)">Next</a></li>
}
</ul>
}
</div>

The above is fully working example – of course you need to do some html adjustments depending on your requirements. Enjoy!

1 Star2 Stars3 Stars4 Stars5 Stars (No Ratings Yet)
Loading...Loading...