Using Windows Azure Service Bus Topics in distributed systems
Service Bus topics allow to perform one way communication using publish/subscribe model. In that model the Service Bus topic can be treated as a intermediary queue that multiple users/components can subscribe to.
When publishing a message we can choose to route it to all subscribers or to apply filters for each subscription resulting in each subscriber receiving messages that are addressed to him. With Service Bus topics we can easily scale distributed applications communicating with each other within or across multiple networks.
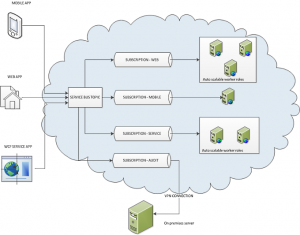
In this article I will show you how to build and test Service Bus topic on your local computer. In our example we will simulate sending messages from the web, mobile and service application to the Service Bus Topic.
These messages will be then routed to relevant subscriptions based on defined filters we assigned for each of them. Subscription for messages from the web application will be using multiple auto scalable worker roles to process the business logic. Same will apply for service messages. If we don’t expect a lot of traffic coming from mobile application, we can then use single worker role (with failover settings).
Autoscaling worker roles can be performed using Enterprise Library 5.0 – Autoscaling Application Block (aka WASABi). This will ensure that appropriate number of worker roles will be automatically started when traffic increases and stopped if the traffic will ease.
See high level architecture diagram below:
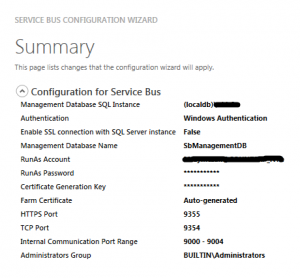
In order to start, we need to first install “Service Bus 1.0 for Windows Server” (runs on Win7 as well). After installation please go to start > Service Bus 1.0 > Service Bus Configuration. Then use the wizard to set up the web farm first and after that, join your computer to that farm – this will essentially create namespace within the namespace on your local machine.
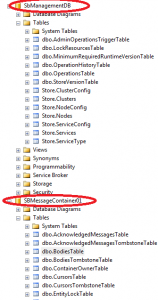
After you configure the Service Bus installation you will get endpoint address that your local application will use to connect to the Service Bus. You may notice that after installation there are 2 databases created on you local MSSQL server, see below image:
In order to connect to our Service Bus we will use the function below. This will create connection string the pass in to the NamespaceManager class.
  //use this setting when deploying to Windows Azure
  <add key="Microsoft.ServiceBus.ConnectionString" value="Endpoint=sb://[your namespace].servicebus.windows.net;SharedSecretIssuer=owner;SharedSecretValue=[your secret]" />

 public static string getLocalServiceBusConnectionString()
 {
    var ServerFQDN = System.Net.Dns.GetHostEntry(string.Empty).HostName;
    var ServiceNamespace = "ServiceBusDefaultNamespace";
    var HttpPort = 9355;
    var TcpPort = 9354;

    var connBuilder = new ServiceBusConnectionStringBuilder();
    connBuilder.ManagementPort = HttpPort;
    connBuilder.RuntimePort = TcpPort;
    connBuilder.Endpoints.Add(new UriBuilder() { Scheme = "sb", Host = ServerFQDN, Path = ServiceNamespace }.Uri);
    connBuilder.StsEndpoints.Add(new UriBuilder() { Scheme = "https", Host = ServerFQDN, Port = HttpPort, Path = ServiceNamespace }.Uri);

    return connBuilder.ToString();
 }
Within the worker role we will use NamespaceManager to create Service Bus Topic (if does not exist). We will also create subscriptions and associated filters.
Please notice that subscription will filter messages using MessageOrigin property. This property will be assigned to the message in the message send method for each application separately (web, mobile, service).
 public void CreateServiceBusTopicAndSubscriptions(NamespaceManager namespaceManager)
 {
    #region Configure and create Service Bus Topic
    var serviceBusTestTopic = new TopicDescription(TopicName);
    serviceBusTestTopic.MaxSizeInMegabytes = 5120;
    serviceBusTestTopic.DefaultMessageTimeToLive = new TimeSpan(0, 1, 0);

    if (!namespaceManager.TopicExists(TopicName))
    {
        namespaceManager.CreateTopic(serviceBusTestTopic);
    }
    #endregion

    #region Create filters and subsctiptions
    //create filters
    var messagesFilter_Web = new SqlFilter("MessageOrigin = 'Web'");
    var messagesFilter_Mobile = new SqlFilter("MessageOrigin = 'Mobile'");
    var messagesFilter_Service = new SqlFilter("MessageOrigin = 'Service'");

    if (!namespaceManager.SubscriptionExists(TopicName, "WebMessages"))
    {
        namespaceManager.CreateSubscription(TopicName, "WebMessages", messagesFilter_Web);
    }

    if (!namespaceManager.SubscriptionExists(TopicName, "MobileMessages"))
    {
        namespaceManager.CreateSubscription(TopicName, "MobileMessages", messagesFilter_Mobile);
    }

    if (!namespaceManager.SubscriptionExists(TopicName, "WCfServiceMessages"))
    {
        namespaceManager.CreateSubscription(TopicName, "WCfServiceMessages", messagesFilter_Service);
    }
    #endregion
}
We also need to create subscription clients in “OnStart” method giving each subscriber a unique name.
 public override bool OnStart()
 {
    // Set the maximum number of concurrent connections
    ServicePointManager.DefaultConnectionLimit = 12;

    // Create the queue if it does not exist already
    //string connectionString = CloudConfigurationManager.GetSetting("Microsoft.ServiceBus.ConnectionString");
    var connectionString = getLocalServiceBusConnectionString();
    var namespaceManager = NamespaceManager.CreateFromConnectionString(connectionString);

    //create topic and subscriptions
    CreateServiceBusTopicAndSubscriptions(namespaceManager);

    // Initialize subscription for web, mobile and service
    SubscriptionClients.Add(SubscriptionClient.CreateFromConnectionString(connectionString, TopicName, "WebMessages"));
    SubscriptionClients.Add(SubscriptionClient.CreateFromConnectionString(connectionString, TopicName, "MobileMessages"));
    SubscriptionClients.Add(SubscriptionClient.CreateFromConnectionString(connectionString, TopicName, "WCfServiceMessages"));

    IsStopped = false;
    return base.OnStart();
}
Inside the run method we will use Task Parallel foreach method to create separate task for each subscriber listening for incoming messages.
This is only to simulate multiple subscribers in one place. Normally each worker role will connect to the topic listening for the messages appropriate for it’s type (separate for web, mobile and service).
public override void Run()
{
 Parallel.ForEach(SubscriptionClients, currentSubscrtiption =>
 {
    while (!IsStopped)
    {
        #region Receive messages
        try
        {
            // Receive the message
            var receivedMessage = currentSubscrtiption.Receive();

            if (receivedMessage != null)
            {
                var messageFrom = receivedMessage.Properties["MessageOrigin"].ToString();

                switch (messageFrom)
                {
                    case "Web":
                        //send it to web processing logic

                        break;
                    case "Mobile":
                        //send it to mobile processing logic

                        break;
                    case "Service":
                        //send it to service processing logic

                        break;
                    default:
                        break;
                }

                // Process the message
                Trace.WriteLine(Environment.NewLine + "--------------------------" + Environment.NewLine);
                Trace.WriteLine(string.Format("{0} message content: {1}", messageFrom, receivedMessage.GetBody<string>()));

                receivedMessage.Complete();
            }
        }
        catch (MessagingException e)
        {
            if (!e.IsTransient)
            {
                Trace.WriteLine(e.Message);
                throw;
            }

            Thread.Sleep(10000);
        }
        catch (OperationCanceledException e)
        {
            if (!IsStopped)
            {
                Trace.WriteLine(e.Message);
                throw;
            }
        }
        #endregion
    }
});
}
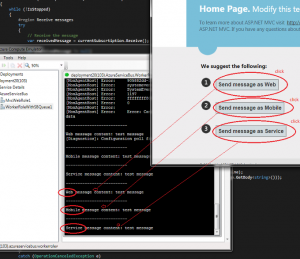
Finally we can simulate sending messages from the MVC application. We will use 3 different buttons to create and send messages.
 [HttpPost]
 public ActionResult SendWebMessage()
 {
    SendMessage("Web");

    return RedirectToAction("Index", "Home");
 }

 [HttpPost]
 public ActionResult SendMobileMessage()
 {
    SendMessage("Mobile");

    return RedirectToAction("Index", "Home");
 }

 [HttpPost]
 public ActionResult SendServiceMessage()
 {
    SendMessage("Service");

    return RedirectToAction("Index", "Home");
 }
See the image below:
Please note that when sending messages we have to assign value to message.Properties[“MessageOrigin”]. This will be used by the Service Bus Topic to route messages to appropriate subscriptions.
 void SendMessage(string type)
 {
    var connectionString = getLocalServiceBusConnectionString();

    var Client = TopicClient.CreateFromConnectionString(connectionString, "ServiceBusTestTopic");

    var message = new BrokeredMessage("test message");
    message.Properties["MessageOrigin"] = type;

    Client.Send(message);
 }
As usual, I have attached working project files for your tests 🙂

