Creating custom sound wave analysis control

The very common requirement when working with the sound files is to display and analyze the sound wave within the form element. The best way of doing that is to create custom sound wave analysis control that we can reuse throughout the multiple projects.

In this article I will show you how to create control that draws the wave on the form. We will use Open source nAudio dll to load sound files. Then we will perform custom drawings based on the extracted sound samples.

soundwave_analysis

Let’s create CustomWaveViewer class that inherits from UserControl. After that we have to define basic variables, the handlers and the rendering thread. The rendering thread will be used when user subscribe to our event handler wanting to take control over the rendering speed. Otherwise the control will render immediately and no additional thread is needed.

 public class CustomWaveViewer : UserControl
 {
   public delegate void OnLineDrawHandler(Point point1, Point point2);
   public event OnLineDrawHandler OnLineDrawEvent;
   private WaveStream waveStream;
   private Thread RenderThread;
    .....
}

When initiating the control we will set double buffer and basic variables. When user will call InitControl, control will be recalculated to fit to our window size.

  public CustomWaveViewer()
 {
    // This call is required by the Windows.Forms Form Designer.
    InitializeComponent();

    //use double buffer to avoid flickering
    this.DoubleBuffered = true;

    this.PenColor = Color.Lime;
    this.PenWidth = 1;
 }

 public void InitControl()
 {
    if (waveStream == null) return;

    var samples = (int)(waveStream.Length / bytesPerSample);
    startPosition = 0;
    SamplesPerPixel = samples / this.Width;
}

After the sound file is loaded we need to calculate bytesPerSample variable that depends on BitsPerSample value and the number of channels.

 public WaveStream WaveStream
 {
    get
    {
        return waveStream;
    }
    set
    {
        waveStream = value;
        if (waveStream != null)
        {
            bytesPerSample = (waveStream.WaveFormat.BitsPerSample / 8) * waveStream.WaveFormat.Channels;
        }
        this.Invalidate();
    }
}

Before we will render the lines we want to create grid lines by using following method:

 private void DrawImageGrid(System.Drawing.Graphics gfx)
 {
    int numOfCells = 30; int cellSize = (int)(gfx.ClipBounds.Height / 4);

    for (int y = 0; y < numOfCells; ++y)
    {
        gfx.DrawLine(new System.Drawing.Pen(System.Drawing.Color.Gray, 1), 0, y * cellSize, numOfCells * cellSize, y * cellSize);
    }

    for (int x = 0; x < numOfCells; ++x)
    {
        gfx.DrawLine(new System.Drawing.Pen(System.Drawing.Color.Gray, 1), x * cellSize, 0, x * cellSize, numOfCells * cellSize);
    }
}

The main method that renders the lines is the OnPaint method of our custom control. In that method we either draw the lines immediately or pass it to the other thread that user can control from the UI. See the in-line comments:

 protected override void OnPaint(PaintEventArgs e)
 {
    try
    {
        //draw grid before drawing the wave
        DrawImageGrid(e.Graphics);

        if (waveStream != null)
        {
            int bytesRead;
            var waveData = new byte[samplesPerPixel * bytesPerSample];
            waveStream.Position = startPosition + (e.ClipRectangle.Left * bytesPerSample * samplesPerPixel);
            ControlPoints.Clear();// clear points 

            using (var linePen = new Pen(PenColor, PenWidth))
            {
                for (var x = e.ClipRectangle.X; x < e.ClipRectangle.Right; x += 1)
                {
                    short low = 0;
                    short high = 0;

                    bytesRead = waveStream.Read(waveData, 0, samplesPerPixel * bytesPerSample);

                    if (bytesRead == 0) { break; }

                    for (var n = 0; n < bytesRead; n += 2)
                    {
                        var sample = BitConverter.ToInt16(waveData, n);
                        if (sample < low) { low = sample; }
                        if (sample > high) { high = sample; }
                    }

                    //calculate min and max values for the current line
                    var lowPercent = ((((float)low) - short.MinValue) / ushort.MaxValue);
                    var highPercent = ((((float)high) - short.MinValue) / ushort.MaxValue);

                    var point1 = new Point(x, (int)(this.Height * lowPercent));
                    var point2 = new Point(x, (int)(this.Height * highPercent));

                    //if event is not hoocked in, then render wave instantly
                    if (OnLineDrawEvent == null)
                    {
                        e.Graphics.DrawLine(linePen, point1, point2);
                    }
                    else
                    {
                        //save points to be used in the rendering thread
                        ControlPoints.Add(point1, point2);
                    }
                }
            }

            //abort current thead if sound has been reloaded
            if (RenderThread != null && RenderThread.IsAlive)
            {
                RenderThread.Abort();
            }

            //start rendering thread
            RenderThread = new Thread(TriggerDrawing);
            RenderThread.IsBackground = true;
            RenderThread.Start();
        }
    }
    catch (Exception)
    {
    }

    base.OnPaint(e);
}

When we pass the rendering to other thread, we simply need to trigger OnLineDrawEvent event for each line stored in our buffer (ControlPoints variable). The UI will then receive the event with the line data.

 void TriggerDrawing()
 {
    //check if the event is attached
    if (OnLineDrawEvent != null)
    {
        foreach (var pointSet in ControlPoints)
        {
            OnLineDrawEvent(pointSet.Key, pointSet.Value);//trigger event and pass the points to the UI
            Thread.Sleep(RenderDelay); //set custom delay
        }
    }
}

Our main UI methods will look as follows. After dropping our custom control on the form, we need to configure it by passing sound wave file path and attach rendering method. The RenderDelay variable will also be used by slider to dynamically control rendering speed.

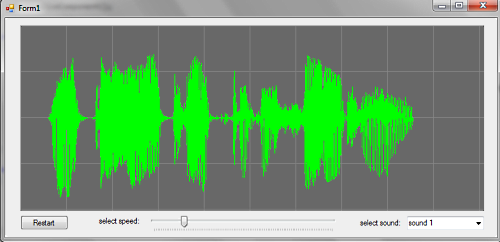
 private void Form1_Load(object sender, EventArgs e)
 {
    comboBox1.SelectedIndex = 0;//select first sound

    //Attach draw event otherwise the control will render instantly
    customWaveViewer1.OnLineDrawEvent += new CustomWaveViewer.OnLineDrawHandler(customWaveViewer1_OnLineDrawEvent);

    //set initial speed - it can be configured using UI slider
    customWaveViewer1.RenderDelay = 20;

    LoadWaive();//init control
 }

 void LoadWaive()
 {
    var path = "../../sounds/" + comboBox1.Text.Last<char>().ToString() + ".wav";

    customWaveViewer1.WaveStream = new WaveFileReader(path);
    customWaveViewer1.InitControl();
 }

 //Draw the lines when the points arrive from the background thread event
 void customWaveViewer1_OnLineDrawEvent(Point point1, Point point2)
 {
    using (var gr = customWaveViewer1.CreateGraphics())
    {
        using (var linePen = new Pen(Color.Lime, 1))
        {
            gr.DrawLine(linePen, point1, point2);
        }
    }
 }

I have attached working example below for your tests. You may also use other nAudio methods to play the sound file while it’s being rendered.

SoundAnalysis

1 Star2 Stars3 Stars4 Stars5 Stars (No Ratings Yet)
Loading...Loading...

C# commonly used coding standards

In this article I will present you with some most commonly used coding standards that I have come across while working in multiple companies.

1. Naming Conversions

1.1 Use Pascal Casing for class and method names and camel Casing for local variables

Pascal Casing:

public class MyClass
{
      public void GetData()
     {
     }
}

Camel Casing

public class MyClass
{
      public void GetData(string productName)
     { 
          var myProduct = GetProductFromDatabase(productName);
     }
}

1.2 Do not use underscores for member names eg.

//correct

public string myVariable;
public int myProduct;

//incorrect

public string my_variable;
public int _ myProduct;

1.3 Do not use shortcuts eg.

//correct
public string databaseConnectionString;

//incorrect
public string dbConnStr;

1.4 Give the function names appropriate to the returning values eg.

//correct
public  string GetProductReferenceNumber()
{
}

//incorrect
public  string GetObjectString()
{
}

1.5 Use predefined type names instead of system names eg.

//correct
int ProductID;
string ProductName;

//incorrect
Int32 ProductID;
String ProductName;

1.6 Use the var name for variable declaration if the type can be easily identified from the right hand side of the equation eg.

//correct
var name = "myname";

//incorrect
var myObject = GetBasicObject();

1.7 Use noun names for classes

//correct
public class Product
{
}

//incorrect
public class UserProduct
{
}

1.8 Use „I” prefix for interface names eg.

public interface IProductCollection

1.9 Declare private variables on the top of the classes starting with statics on the top

public class Product
{
    static string productName;
    static int productCount;

    int currectCount;
    string productLocationName;

    public void Calculate()
    {
    }
}

1.10 Use singular names for enums except bit field enums eg.

//correct
enum ProductType
{
    ProductTypeOne, ProductTypeTwo
}

//incorrect
enum ProductTypes
{
    ProductTypeOne, ProductTypeTwo
}

//correct
enum ProductTypes
{
    ProductTypeOne = 1, 
    ProductTypeTwo =2
}

2. General rules

2.1 Use && and || operands instead of single & Or |. This will avoid unnecessary comparisons eg.

//correct
If(product != null && (product.Id > 0 || product.Name.length > 0))
{
}

//incorrect
If(product != null & (product.Id > 0 | product.Name.length > 0))
{
}

2.2 Always use (vertically aligned) curly brackets eg.

//correct
foreach(var item In myCollection)
{
      var result = item.Result;
}

//incorrect
foreach(var item In myCollection)
        var result = item.Result;

2.3 Use „using” statements for objects that implement IDisposable interface eg.

//correct
using(var connection = new SqlConnection())
{
     using( var reader = command.ExecuteReader())
     {
     }
}

//incorrect
var connection = new SqlConnection();
var reader = command.ExecuteReader();

reader.close();
connection.close();

2.4 Use lambda expressions for events that you do not need have reference to at later stage in you code eg.

//correct 
public MyForm()
{
   this.Click += (s, e) =>   {
       MessageBox.Show(((ClickEventArgs)e).Point.ToString());
  };
}
//not advisable 
public MyForm()
{
      this.Click += new EventHandler(MyFunction_Click);
}

void Form1_Click(object sender, ClickEventArgs e)  
{     
     MessageBox.Show(((ClickEventArgs)e).Point.ToString());
 }

2.5 Use object initializers for creating object eg.

//correct
var product = new Product()
{
   ProductID = 1,
   ProductName = “Test”,
   CreateDate = DateTime.Now
}

//incorrect
 var product = new Product();
 product. ProductID = 1,
 product .ProductName = “Test”,
 product .CreateDate = DateTime.Now

2.6 Each function should only perform one task eg.

//correct
public int CalculatePriceWithVAT(double initPrice, double vatRate)
{
      return initPrice = initPrice * (1- vatRate);
}
//incorrect
public int CalculatePrice ()
{
      var initPrice = GetInitPrice();
      var vatRate = GetVatFromDataBase();

      return initPrice = initPrice * (1- vatRate);
}

2.7 Separate parts of the code into logical groups eg.

//correct
int CalculateStock()
{
     var fakeValue = 12;
      fakeValue += 12;

      var fakeProduct = new Product();
      var result = fakeProduct.Count + fakeValue;

      return result;
}
//avoid
int CalculateStock()
{
     var fakeValue = 12;
      fakeValue += 12;
      var fakeProduct = new Product();
      var result = fakeProduct.Count + fakeValue;
      return result;
}

2.8 In LINQ use following to check bool values eg:

//correct
If(products.Any())
{
}

//incorrect
If(products.Count() > 0 )
{
}
1 Star2 Stars3 Stars4 Stars5 Stars (1 votes, average: 5.00 out of 5)
Loading...Loading...

MSSQL database backup/ restore helper scripts

When working with MSSQL server I have spotted some general problems during restoring databases. Below I’m presenting some common solutions that can save you development time.

If you are restoring database backup taken from the same database but running on different server eg. restoring production database on your test server – you may get security error when trying to connect with the old DB user.
This is because DB user account was generated on different server where windows security token was different. The solution is to recreate the user on restored database:

//recreate user
ALTER User DB_user with LOGIN = DB_user;

//set password
ALTER LOGIN DB_user WITH PASSWORD = 'secret'

If you must overwrite you test database with the different one, you need to first close all current database connections, otherwise you may get an error saying that database is in use. The quick solution for that is the script below.
It simply sets database off-line and back on-line. This is sometimes much faster then waiting for all connections to be closed in other ways (note: use it only on the test server)

ALTER DATABASE [MyDB]
SET OFFLINE WITH ROLLBACK IMMEDIATE
ALTER DATABASE [MyDB]
SET ONLINE
GO

If you will get following error: “Cannot execute as the database principal because the principal “dbo” does not exist, this type of principal cannot be impersonated, or you do not have permission”. This is solution:

 ALTER AUTHORIZATION ON DATABASE::[myDatabase] TO [sa];

If your database backup takes a lot of space but you know that there is not too much data in it, you can simply shrink the log files before creating a backup.

Use MyDB
ALTER DATABASE MyDB
SET RECOVERY SIMPLE;
GO

DBCC SHRINKFILE ('MyDB_log',TRUNCATEONLY);
GO

ALTER DATABASE MyDB
SET RECOVERY FULL;

Finally, if you want to grant execute permissions to all stored procedures at once (on the restored database), you can use following script:

 CREATE PROCEDURE [dbo].[procExecuteOnProcs] (
   @User varchar(max)
 )
 AS
  declare procs cursor for
  select routine_schema, routine_name from information_schema.routines where routine_type = N'PROCEDURE'

  declare @Schema nvarchar(128), @Name nvarchar(128), @SQL nvarchar(512)

  open procs
  fetch next from procs into @Schema, @Name
  while @@fetch_status = 0
  begin
    set @SQL = N'grant execute on [' + @Schema + N'].[' + @Name + N'] to ' + @User
    exec sp_ExecuteSQL @SQL
    fetch next from procs into @Schema, @Name
  end
  close procs
  deallocate procs

Hope these simple tricks will help you. Please note that you can also automate above scripts to be part of other processes.

1 Star2 Stars3 Stars4 Stars5 Stars (No Ratings Yet)
Loading...Loading...

Executing sql scripts in direcory using .bat file

If you are in situation where you have to execute all sql scripts located as separate files in one folder, executing .bat file is the one of the options you can use. Executing batch command is quite flexible solution as you don’t have to recompile it every time the script will change.

The code below loops through all files within the specified directory, loads each of them into variable and replaces the param string if exists before execution. It is helpful if you need to replace database specific users (e.g. execute with ‘username’) etc.

Please note that variables within the loop are accessed by !myVar! instead of %myVar% because of delayed expansion applied.

Command cd /d %1 sets the current directory to the specified by the user in first parameter.

 @ECHO OFF
 echo script folder: %1
 echo server: %2
 echo database: %3
 echo database user: %4
 echo ----------------

setlocal enabledelayedexpansion
cd /d %1

for %%d in (*.sql) do (
   set filecontent=
   for /f "delims=" %%a in (%%d) do (set "filecontent=!filecontent!%%a")

   set "temp=!filecontent!"

   set "filecontent=!temp:#PARAM#=%4!"

   echo executing %%d
   echo ----------
   sqlcmd -S%2 -E -Q"!filecontent!" -d%3 
)
pause

Above code can be executed as follows (trusted database connection is used)

 C:\updateDB.bat "C:\scripts\" "myServer" "databaseName" PARAM_TO_REPLACE
1 Star2 Stars3 Stars4 Stars5 Stars (No Ratings Yet)
Loading...Loading...

jQuery advanced selector and filter methods

Jquery it’s a powerful framework that allows us to apply advanced client side selectors and filters using elegant and readable code. Basic selectors can be applied using following method: $(‘tr’). If we want to apply an filter to our results we can use it like that: $(‘tr:eq(1)’) which gets first tr element with the index 1.

Lets create an example with the table that has currency values we want to convert.

jquery-selectors

In our example we add styles to our existing table, next we set the first row color to red. Next, we append 9 more rows with some values. Next, we give gray color to the even rows with index greater than 1 $(‘tr:even:gt(1)’). After that we set the last row color to be equal the first one (non header row).

Next step is to convert each row value from pounds to dollars using each function. After that we set some styles to the button with value “Reset” and link with text “Add”.

At the end we catch the submit event and display the hidden form value in the confirmation dialog. See the in-line comments below.

 $(document).ready(function () {
    //set the table css
    $('table').addClass('myTable');

    //set first row color to red (after header)
    $('tr:eq(1)').css('background-color', 'red');

    //add some rows to table
    for (var i = 1; i < 10; i++) {
        $('table').append("<tr><td>Client " + i + "</td><td>" + 10 + i + "</td></tr>");
    }

    //set even row background color (with index more than 1)
    $('tr:even:gt(1)').css('background-color', 'silver');

    //set backround of last row to be same as the first row (non header)
    $('tr:last').css('background-color', $('tr:eq(1)').css('background-color'))

    //insert after second child
    $('th:nth-child(2)').text('Total (£)').after('<th>Total ($)</th>');

    //convert each value after second child for each row
    $('td:nth-child(2)').after('<td/>').each(function () {
        $(this).next().text((parseInt($(this).text()) * 1.5).toFixed(0));
    });

    //find the button with value reset and link with text add and give it some styles
    $(':submit[value="Reset"], a:contains("Add")').css('float', 'left').css('margin', '5px').css('color', 'green');

    //catch the submit action and read hidden value
    $('form[action$="/Reset"]').submit(function () {
        var summitName = $(':hidden', this).attr('value');
        return confirm('Are you sure you want to Reset ' + summitName + ' ?');
    });

});

Included sample it’s barely an tip of the iceberg of what we can achieve with jQuery. Please read jQuery documentation if you need more information on this topic. I have included working example below for your tests.
jQuery-selectors-filters

1 Star2 Stars3 Stars4 Stars5 Stars (No Ratings Yet)
Loading...Loading...

Ext.js custom loaders

If you are building applications using JavaScript frameworks and server side call-backs, you probably know how important is to show loading message to the users, especially for time consuming requests. In this article I will show you some basic methods to create custom loaders when using Ext.js.

extjs_loading

First of all we can nicely indicate loading process when starting ext.js application. It’s very simple as all we need to do is to put loading div inside the html body. When ext.js will finish loading scripts, then we simply remove that div from the page. In order to do that, we need to apply removal logic on Ext.ready event.

  // html file
 <body>
    <div id="loading-mask"></div>
    <div id="loading">
        <div class="loading-indicator">
            Loading...
        </div>
    </div>
</body>

 Ext.onReady(function () {
    setTimeout(function () { 
        Ext.get('loading').remove();  //remove element
        //fade out to get better UI experience
        Ext.get('loading-mask').fadeOut({ remove: true }); 
    }, 1250); //simulate long running process
 });

Now, let’s create basic method that applies loading mask to the element passed in

  setLoading: function (element, start, styles) {
    if (!styles) { styles = "loadingBox"; } //set default styles if not set

    if (start) {
      element.loadingMask = new Ext.LoadMask(element, { msg: "Loading...", msgCls: styles });
      element.loadingMask.show();
     }
    else {
      element.loadingMask.hide();
    }
  },

And finally, if we want to show loading message when for instance clicking the button, the following code can be applied:

{
 xtype: 'button',
 text: 'start loading',
 width: 150,
 height: 50,
 style: 'margin:50px',
 handler: function () {
    var el = this;
    me.setLoading(el, true);//show loading message

    //do you stuff here

    setTimeout(function () {
        me.setLoading(el, false); //turn it off
    }, 1000);
  }
},          

Also if you want to customize it a bit, you can do it following way:

   //simple fade-In/Out function
   fade: function (element, fadeOut) {
        if (fadeOut) {
            Ext.get(element.id).fadeOut({
                opacity: 0,
                easing: 'easeOut',
                duration: 1000,
                remove: false,
                useDisplay: false
            });
        }
        else {
            Ext.get(element.id).fadeIn({
                opacity: 1,
                easing: 'easeOut',
                duration: 1000
            });
        }
    },
  {
    xtype: 'button',
    text: 'start loading with custom styles',
    width: 250,
    height: 50,
    id: 'button2',
    style: 'margin:50px',
    handler: function () {
        var el = Ext.get('mainPanel'); //render to main panel
        me.setLoading(el, true, 'customLoader');//show loading message
        me.fade(el, true); //fade out

        //do you stuff here

        setTimeout(function () {
            me.setLoading(el, false); //turn it off
            me.fade(el, false); //fade in
        }, 1000);
    }
},

There is a lot of other ways to show custom loading messages that you can apply. I have attached sample solution for you to test different scenarios based on my example.
Ext_loading

1 Star2 Stars3 Stars4 Stars5 Stars (No Ratings Yet)
Loading...Loading...

MVC Custom View Editor Templates

When creating MVC3 razor website it is often necessary to apply custom templates on classes or properties within the objects to be displayed seamlessly throughout your application. There is number of ways to apply custom templates, one of them is to create folders in ~/Shared/DisplayTemplates/, ~/Shared/EditorTemplates/ and create partial views based on model objects we want to style. Lets start with creating basic class structure that we will work on:

custom-templates

  public partial class Client
    {
        public int ClientId { get; set; }
        public string FirstName { get; set; }
        public string LastName { get; set; }
        public DateTime BirthDate { get; set; }
        public Address HomeAddress { get; set; }

        [UIHint("bool")]
        public bool IsApproved { get; set; }

        [UIHint("Enum")]
        public Role Role { get; set; }
    }

    public enum Role
    {
        Admin, PM, Employee
    }

    public partial class Address
    {
        public string Street { get; set; }
        public string City { get; set; }
        public string Country { get; set; }
    }

As you can see there are two properties marked with the UIHint attribute. This is one of the ways to map properties with the templates.

When displaying form we can also specify template name if we want to apply template only for selected pages.

  <div class="editor-field">
        @Html.EditorFor(model => model.IsApproved)
        @Html.ValidationMessageFor(model => model.IsApproved)
    </div>

    <div class="editor-field">
        @Html.EditorFor(model => model.Role)
        @Html.ValidationMessageFor(model => model.Role)
    </div>

This is similar when creating display templates. We can also mix the ways of assigning templates by choosing the properties attributes and template names if required.

 <div class="display-field">
        @Html.DisplayFor(model => model.IsApproved)
    </div>
    <div class="display-label">
        Role</div>
    <div class="display-field">
        @Html.DisplayFor(model => model.Role, "MyRole")
    </div>

Our editor template implementation is quite simple. For each enum value in our Role class we create list item to be shown in drop down list. We also need to ensure that we give it a proper name Role.cshtml in order for the view engine to be able to correctly identify our template.

 @model Models.classes.Role
           
   <select id="Role" name="Role">
    @foreach (Models.classes.Role value in Enum.GetValues(typeof(Models.classes.Role)))
    {
        <option value="@value" @(Model == value ? "selected=\"selected\"" : "")>@value
        </option>
    }
  </select>

Display template contains the code below. We simply mark in red the current Role value. Of course it’s only a quick sample.

 @model Models.classes.Role
 @foreach (Models.classes.Role value in Enum.GetValues(typeof(Models.classes.Role)))
 {
    if (Model == value)
    {
      <p><b style="color:Red;">@value.ToString()</b></p>;
    }
    else
    {
       <p>@value.ToString()</p>
    }
 }

If we want to override the templates located in the Shared folder, we can create folder in the view (~/Views//EditorTemplates) containing different implementation. This gives us a little bit more flexibility if we have specific requirements for an single view.

We can also create generic templates to override default rendering of build-in types like bool? We apply it also by giving the attribute to the property of our object. Following implementation displays in bold one of the 3 possible object states.

    @model bool?

    @if (ViewData.ModelMetadata.IsNullableValueType && Model == null)
    {
        @:True False <b>Not Set</b>
    }
    else if (Model.Value)
    {
        @:<b>True</b> False Not Set
    }
    else
    {
        @:True <b>False</b> Not Set
    }

MVC framework gives us a chance to override and customize pretty much of everything. We can also create our own View Engine and change the way of model binding etc.

I have included project sample below for you tests.
MVC-Custom-display-templates

1 Star2 Stars3 Stars4 Stars5 Stars (No Ratings Yet)
Loading...Loading...

OpenXml Power Point templates processing

Handling Power Point templates is quite similar to handling Words templates as they both are based on OpenXML standard (see my previous article to learn how to process Word templates). In this article I will show you how to replace Power Point template with text and images using C# based application.

After creating new project we need to add two main references: DocumentFormat.OpenXml from DocumentFormat.OpenXml.dll and WindowsBase (.Net reference). Next, we need to prepare template with placeholders that our application will replace. For texts we will insert placeholder values in the the unique format that we can find parsing the document e.g. [#Paragraph1#].

For the images we need to insert image placeholders (other images) and set their names to match our parameters (e.g. myPicture1). This names needs to be provided in the parameter objects so we can find the placeholders by image name when parsing document.

powerpoint-templates

The next step is to create parameters structure that we will use when processing the document. You may want to set your own parameters depending on your project requirements.

 public class PowerPointParameter
 {
    public string Name { get; set; }
    public string Text { get; set; }
    public FileInfo Image { get; set; }
 }

We will use them as follows when initiating the objects

   var templ = new PowerPointTemplate();
    templ.PowerPointParameters.Add(new PowerPointParameter() { Name = "[#Paragraph1#]", Text = "Slide 1" });
    templ.PowerPointParameters.Add(new PowerPointParameter() { Name = "[#Paragraph2#]", Text = "Slide 2" });
    templ.PowerPointParameters.Add(new PowerPointParameter() { Name = "[#List1(string[])#]", Text = "test1 \n test 2 \n test3 \n test 2" });
    templ.PowerPointParameters.Add(new PowerPointParameter() { Name = "[#List2(string[])#]", Text = "test1 \n test 2 \n test3 \n test 2" });

    templ.PowerPointParameters.Add(new PowerPointParameter() { Name = "1", Image = new FileInfo(GetRootPath() + @"\Images\1.jpg") });
    templ.PowerPointParameters.Add(new PowerPointParameter() { Name = "2", Image = new FileInfo(GetRootPath() + @"\Images\2.jpg") });
    templ.PowerPointParameters.Add(new PowerPointParameter() { Name = "3", Image = new FileInfo(GetRootPath() + @"\Images\3.jpg") });
    templ.PowerPointParameters.Add(new PowerPointParameter() { Name = "4", Image = new FileInfo(GetRootPath() + @"\Images\4.jpg") });
    templ.PowerPointParameters.Add(new PowerPointParameter() { Name = "5", Image = new FileInfo(GetRootPath() + @"\Images\5.jpg") });

    var templatePath = GetRootPath() + @"\Templates\Template.pptx";
    var outputPath = GetRootPath() + @"\Output\Document.pptx";

    templ.ParseTemplate(templatePath, outputPath);

Having done that we can create our main function that parses the template and fills our placeholders with texts and images. We may also want to delete an slide from presentation, we can do that by getting the slideID from the SlideIdList property and use RemoveChild function. Please see the inline comments within the function below.

 public void ParseTemplate(string templatePath, string templateOutputPath)
 {
    using (var templateFile = File.Open(templatePath, FileMode.Open, FileAccess.Read)) //read our template
    {
        using (var stream = new MemoryStream())
        {
            templateFile.CopyTo(stream); //copy template

            using (var presentationDocument = PresentationDocument.Open(stream, true)) //open presentation document
            {
                // Get the presentation part from the presentation document.
                var presentationPart = presentationDocument.PresentationPart;

                // Get the presentation from the presentation part.
                var presentation = presentationPart.Presentation;

                var slideList = new List<SlidePart>();

                //get available slide list
                foreach (SlideId slideID in presentation.SlideIdList)
                {
                    var slide = (SlidePart)presentationPart.GetPartById(slideID.RelationshipId);
                    slideList.Add(slide);
                    SlideDictionary.Add(slide, slideID);//add to dictionary to be used when needed
                }

                //loop all slides and replace images and texts
                foreach (var slide in slideList)
                {
                    ReplaceImages(presentationDocument, slide); //replace images by name

                    var paragraphs = slide.Slide.Descendants<Paragraph>().ToList(); //get all paragraphs in the slide

                    foreach (var paragraph in paragraphs)
                    {
                        ReplaceText(paragraph); //replace text by placeholder name
                    }
                }

                var slideCount = presentation.SlideIdList.ToList().Count; //count slides
                DeleteSlide(presentation, slideList[slideCount - 1]); //delete last slide

                presentation.Save(); //save document changes we've made
            }
            stream.Seek(0, SeekOrigin.Begin);//scroll to stream start point

            //save output file
            using (var fileStream = File.Create(templateOutputPath))
            {
                stream.CopyTo(fileStream);
            }
        }
    }
}

Function that replaces the images. It gets all Blip objects from the slide and changes it’s embed ID that points to the image.

Similar to Word templates, we can give our own styles and transformation to the image template and it will be preserved and applied to the new image 🙂

When replacing the images we search for all image parts in a slide and then check it’s names using NonVisualDrawingProperties of the Picture elements. Please see the inline comments.

 void ReplaceImages(PresentationDocument presentationDocument, SlidePart slidePart)
 {
    // get all images in the slide
    var imagesToReplace = slidePart.Slide.Descendants<Blip>().ToList();

    if (imagesToReplace.Any())
    {
        var index = 0;//image index within the slide

        //find all image names in the slide
        var slidePartImageNames = slidePart.Slide.Descendants<DocumentFormat.OpenXml.Presentation.Picture>()
                                .Where(a => a.NonVisualPictureProperties.NonVisualDrawingProperties.Name.HasValue)
                                .Select(a => a.NonVisualPictureProperties.NonVisualDrawingProperties.Name.Value).Distinct().ToList();

        //check all images in the slide and replace them if it matches our parameter
        foreach (var imagePlaceHolder in slidePartImageNames)
        {
            //check if we have image parameter that matches slide part image
            foreach (var param in PowerPointParameters)
            {
                //replace it if found by image name
                if (param.Image != null && param.Name.ToLower() == imagePlaceHolder.ToLower())
                {
                    var imagePart = slidePart.AddImagePart(ImagePartType.Jpeg); //add image to document

                    using (FileStream imgStream = new FileStream(param.Image.FullName, FileMode.Open))
                    {
                        imagePart.FeedData(imgStream); //feed it with data
                    }

                    var relID = slidePart.GetIdOfPart(imagePart); // get relationship ID

                    imagesToReplace.Skip(index).First().Embed = relID; //assign new relID, skip if this is another image in one slide part

                    //to change picture size dynamically you can use this code
                    //int width = 150; int height = 100;
                    //int imageWidthEMU = (int)Math.Round((decimal)width * 9525);
                    //int imageHeightEMU = (int)Math.Round((decimal)height * 9525);

                    //var picture = (DocumentFormat.OpenXml.Presentation.Picture)imagesToReplace.Skip(index).First().Parent.Parent;
                    //picture.ShapeProperties.Transform2D.Extents.Cx = imageWidthEMU;
                    //picture.ShapeProperties.Transform2D.Extents.Cy = imageHeightEMU;
                    ///////
                }
            }
            index += 1;
        }
    }
}

When replacing the texts we check if paragraph contains the text that matches our parameter. If yes, then we check if to include one or multiple lines of text.
Next we create new parameter by copying the old parameter’s OuterXML (this preserves the styles). We also need to replace text that is stored in our parameter.

 void ReplaceText(Paragraph paragraph)
 {
    var parent = paragraph.Parent; //get parent element - to be used when removing placeholder
    var dataParam = new PowerPointParameter();

    if (ContainsParam(paragraph, ref dataParam)) //check if paragraph is on our parameter list
    {
        //insert text list
        if (dataParam.Name.Contains("string[]")) //check if param is a list
        {
            var arrayText = dataParam.Text.Split(Environment.NewLine.ToCharArray()); //in our case we split it into lines

            if (arrayText is IEnumerable) //enumerate if we can
            {
                foreach (var itemData in arrayText)
                {
                    Paragraph bullet = CloneParaGraphWithStyles(paragraph, dataParam.Name, itemData);// create new param - preserve styles
                    parent.InsertBefore(bullet, paragraph); //insert new element
                }
            }
            paragraph.Remove();//delete placeholder
        }
        else
        {
            //insert text line
            var param = CloneParaGraphWithStyles(paragraph, dataParam.Name, dataParam.Text); // create new param - preserve styles
            parent.InsertBefore(param, paragraph);//insert new element

            paragraph.Remove();//delete placeholder
        }
    }
}

Creating the new paragraph object preserving the styles

 public static Paragraph CloneParaGraphWithStyles(Paragraph sourceParagraph, string paramKey, string text)
 {
    var xmlSource = sourceParagraph.OuterXml;

    xmlSource = xmlSource.Replace(paramKey.Trim(), text.Trim());

    return new Paragraph(xmlSource);
}

Please note that when replacing images, the image placeholder names must be found in the document. Images that don’t match the parameter name, wont be replaced.

Having done that we can finally test our application. I have included complete working application for your tests.

PowerPointTemplates

1 Star2 Stars3 Stars4 Stars5 Stars (No Ratings Yet)
Loading...Loading...

MVC property and model level validation techniques

MVC framework gives us a lot of different techniques for validating model and properties. The simplest way of model validation is to apply property attributes. After applying property attributes the client side validation will be performed automatically using unobtrusive JavaScript. The error message are being displayed in the UI if we provide @Html.ValidationSummary(true) or property level @Html.ValidationMessageFor(m => m…….). The trick is to apply range validation to checkbox as it don’t have a value when is not checked.

   public class Client
    {
        [Required]
        public string ClientName { get; set; }

        [DataType(DataType.Date)]
        [Required(ErrorMessage = "Please enter a date of birth")]
        public DateTime DateOfBirth { get; set; }

        [Range(typeof(bool), "true", "true", ErrorMessage = "You must accept the terms")]
        public bool AreTermsAccepted { get; set; }
    }

One of the easiest validation methods is to validate model explicitly in the action method. We are simply adding the errors to ModelState object to be displayed in the UI when needed.
We can also check if binder was able to assign value by using ModelState.IsValidField. This is perfect for dateTime types. Checking business rules is also very easy with this technique.

[HttpPost]
public ViewResult CreateClient(Client client)
{
    if (string.IsNullOrEmpty(client.ClientName))
    {
        ModelState.AddModelError("ClientName", "Please enter client name");
    }
    
    if (!client.IsTermsAccepted)
    {
        ModelState.AddModelError("IsTermsAccepted", "You must accept the terms to create account");
    }

	if (ModelState.IsValidField("ClientName") && ModelState.IsValidField("IsTermsAccepted") && client.ClientName == "Mike") 
	{
       ModelState.AddModelError("", "Mike is already registered");
    }

    if (ModelState.IsValid)
    {
        repository.SaveClient(client);

        return View("Registered", client);
    }
    else
    {
        return View();
    }
}

Another way of model validation is overriding DefaultModelBinder validation methods. The logic is basically similar to what is described above but it’s gives us the way for separating the validation logic and turning it on/ off when necessary by registering in global app start function.

By overriding the SetProperty function we find each property by name. Next, we check the values before it will be bound to the model. In OnModelUpdated function we perform model validation as this is being called after all model properties has been bound.

 public class ValidatingModelBinder : DefaultModelBinder
 {
    protected override void SetProperty(ControllerContext controllerContext, ModelBindingContext bindingContext, PropertyDescriptor propertyDescriptor, object value)
    {
        // call the base implementation
        base.SetProperty(controllerContext, bindingContext, propertyDescriptor, value);

        // do property level validation
        switch (propertyDescriptor.Name)
        {
            case "ClientName":
                if (string.IsNullOrEmpty((string)value))
                {
                    bindingContext.ModelState.AddModelError("ClientName", "Please enter your name");
                }
                break;
            case "AreTermsAccepted":
                if (!((bool)value))
                {
                    bindingContext.ModelState.AddModelError("AreTermsAccepted", "You must accept the terms");
                }
                break;
        }
    }

    protected override void OnModelUpdated(ControllerContext controllerContext, ModelBindingContext bindingContext)
    {
        // call the base implementation
        base.OnModelUpdated(controllerContext, bindingContext);

        // get the model
        var model = bindingContext.Model as Client;

        // perform model level validation
        if (model != null && bindingContext.ModelState.IsValidField("ClientName") && model.ClientName == "Mike")
        {
            bindingContext.ModelState.AddModelError("", "Mike is already registered");
        }
    }
 }

We also need to register our validator in the application global file:

ModelBinders.Binders.Add(typeof(Client), new ValidatingModelBinder());

Next form of validation is applying custom attributes where you can apply your specific validation rules.

 public class IsTrueAttribute : ValidationAttribute
 {
    public override bool IsValid(object value)
    {
        return value is bool && (bool)value;
    }
 }

[IsTrueAttribute(ErrorMessage="You must accept the terms")]
public bool AreTermsAccepted { get; set; }

We can also derive from existing attributes and add additional logic we need.

 public class FutureDateAttribute : RequiredAttribute
 {
    public override bool IsValid(object value)
    {
        return base.IsValid(value) &&
        value is DateTime &&
        ((DateTime)value) > DateTime.Now;
    }
}

We also can apply custom model validation attribute by inheriting from ValidationAttribute. Please not that model validation wont be performed if there are some property level validation errors.

 public class ClientValidatorAttribute : ValidationAttribute
 {
    public ClientValidatorAttribute()
    {
        ErrorMessage = "Mike is already registered";
    }

    public override bool IsValid(object value)
    {
        var client = value as Client;

        if (client == null || string.IsNullOrEmpty(client.ClientName))
        {
            //we don't have right model to validate
            return true;
        }
        else
        {

            return !(client.ClientName == "Mike");
        }
    }
 }

  //in our model class
  [ClientValidatorAttribute]
  public class Client {

Another way of validation is to create self-validating model by inheriting from IValidatableObject interface and overloading Validate function. The validation will be called after all property values has been assigned. This approach has benefit of having all model validation rules in the class definition.

 public class Client : IValidatableObject
 {
    public string ClientName { get; set; }
    [DataType(DataType.Date)]
    public DateTime DateOfBirth { get; set; }
    public bool AreTermsAccepted { get; set; }

    public IEnumerable<ValidationResult> Validate(ValidationContext validationContext)
    {
        List<ValidationResult> errors = new List<ValidationResult>();

        if (string.IsNullOrEmpty(ClientName))
        {
            errors.Add(new ValidationResult("Please enter client name"));
        }

        if (DateTime.Now > DateOfBirth)
        {
            errors.Add(new ValidationResult("Please enter a date in the future"));
        }

        if (errors.Count == 0 && ClientName == "Mike")
        {
            errors.Add(new ValidationResult("Mike is already registered"));
        }

        if (!AreTermsAccepted)
        {
            errors.Add(new ValidationResult("You must accept the terms"));
        }

        return errors;
    }
 }

At the end I will show you how to create custom validation provider. In this approach we inherit from ModelValidatorProvider to use GetValidators method. This will allow us to apply custom validators on the very high level.
We basically check ContainerType to apply property level validation of the specified type and ModelType to apply custom model validator.

 public class CustomValidationProvider : ModelValidatorProvider
 {
    public override IEnumerable<ModelValidator> GetValidators(ModelMetadata metadata, ControllerContext context)
    {
        if (metadata.ContainerType == typeof(Client))
        {
            return new ModelValidator[] { new ClientPropertyValidator(metadata, context)};
        }
        else if (metadata.ModelType == typeof(Client))
        {
            return new ModelValidator[] { new ClientValidator(metadata, context)};
        }

        return Enumerable.Empty<ModelValidator>();
    }
}

Property validation looks like shown below.

 public class ClientPropertyValidator : ModelValidator
 {
    public ClientPropertyValidator(ModelMetadata metadata, ControllerContext context)
        : base(metadata, context)
    {
    }

    public override IEnumerable<ModelValidationResult> Validate(object container)
    {
        var client = container as Client;
        if (client != null)
        {
            switch (Metadata.PropertyName)
            {
                case "ClientName":
                    if (string.IsNullOrEmpty(client.ClientName))
                    {

                        return new ModelValidationResult[] {
                                    new ModelValidationResult {
                                    MemberName = "ClientName",
                                    Message = "Please enter client name"
                                    }};
                    }
                    break;
                   
                case "AreTermsAccepted":
                    if (!client.AreTermsAccepted)
                    {
                        return new ModelValidationResult[] {
                                new ModelValidationResult {
                                MemberName = "AreTermsAccepted",
                                Message = "You must accept the terms"
                                }};
                    }
                    break;
            }
        }

        return Enumerable.Empty<ModelValidationResult>();
    }
 }

Model validator is also very similar. Please note that container value will be null in the Validate function.

 public class ClientValidator : ModelValidator
 {
    public ClientValidator(ModelMetadata metadata, ControllerContext context)
        : base(metadata, context)
    {
    }

    public override void Validate(Client container, IList<ModelValidationResult> errors)
    {
        var client = (Client)Metadata.Model;

        if (client.ClientName == "Mike")
        {
            errors.Add(new ModelValidationResult
            {
                MemberName = "",
                Message = "Mike is already registered"
            });
        }
    }
}

We register our provider in application global file:

ModelValidatorProviders.Providers.Add(new CustomValidationProvider());

As you can see the MVC framework allows us to apply a lot of validation methods that we can use. It should satisfy even the most complicated scenarios. Of course there is also client side validation that I skipped as this can be a topic for the separate article.

1 Star2 Stars3 Stars4 Stars5 Stars (No Ratings Yet)
Loading...Loading...