Creating custom sound wave analysis control
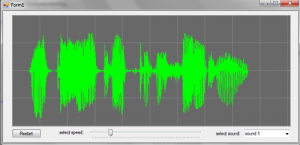
The very common requirement when working with the sound files is to display and analyze the sound wave within the form element. The best way of doing that is to create custom sound wave analysis control that we can reuse throughout the multiple projects.
In this article I will show you how to create control that draws the wave on the form. We will use Open source nAudio dll to load sound files. Then we will perform custom drawings based on the extracted sound samples.
Let’s create CustomWaveViewer class that inherits from UserControl. After that we have to define basic variables, the handlers and the rendering thread. The rendering thread will be used when user subscribe to our event handler wanting to take control over the rendering speed. Otherwise the control will render immediately and no additional thread is needed.
 public class CustomWaveViewer : UserControl
 {
   public delegate void OnLineDrawHandler(Point point1, Point point2);
   public event OnLineDrawHandler OnLineDrawEvent;
   private WaveStream waveStream;
   private Thread RenderThread;
    .....
}
When initiating the control we will set double buffer and basic variables. When user will call InitControl, control will be recalculated to fit to our window size.
  public CustomWaveViewer()
 {
    // This call is required by the Windows.Forms Form Designer.
    InitializeComponent();

    //use double buffer to avoid flickering
    this.DoubleBuffered = true;

    this.PenColor = Color.Lime;
    this.PenWidth = 1;
 }

 public void InitControl()
 {
    if (waveStream == null) return;

    var samples = (int)(waveStream.Length / bytesPerSample);
    startPosition = 0;
    SamplesPerPixel = samples / this.Width;
}
After the sound file is loaded we need to calculate bytesPerSample variable that depends on BitsPerSample value and the number of channels.
 public WaveStream WaveStream
 {
    get
    {
        return waveStream;
    }
    set
    {
        waveStream = value;
        if (waveStream != null)
        {
            bytesPerSample = (waveStream.WaveFormat.BitsPerSample / 8) * waveStream.WaveFormat.Channels;
        }
        this.Invalidate();
    }
}
Before we will render the lines we want to create grid lines by using following method:
 private void DrawImageGrid(System.Drawing.Graphics gfx)
 {
    int numOfCells = 30; int cellSize = (int)(gfx.ClipBounds.Height / 4);

    for (int y = 0; y < numOfCells; ++y)
    {
        gfx.DrawLine(new System.Drawing.Pen(System.Drawing.Color.Gray, 1), 0, y * cellSize, numOfCells * cellSize, y * cellSize);
    }

    for (int x = 0; x < numOfCells; ++x)
    {
        gfx.DrawLine(new System.Drawing.Pen(System.Drawing.Color.Gray, 1), x * cellSize, 0, x * cellSize, numOfCells * cellSize);
    }
}
The main method that renders the lines is the OnPaint method of our custom control. In that method we either draw the lines immediately or pass it to the other thread that user can control from the UI. See the in-line comments:
 protected override void OnPaint(PaintEventArgs e)
 {
    try
    {
        //draw grid before drawing the wave
        DrawImageGrid(e.Graphics);

        if (waveStream != null)
        {
            int bytesRead;
            var waveData = new byte[samplesPerPixel * bytesPerSample];
            waveStream.Position = startPosition + (e.ClipRectangle.Left * bytesPerSample * samplesPerPixel);
            ControlPoints.Clear();// clear points

            using (var linePen = new Pen(PenColor, PenWidth))
            {
                for (var x = e.ClipRectangle.X; x < e.ClipRectangle.Right; x += 1)
                {
                    short low = 0;
                    short high = 0;

                    bytesRead = waveStream.Read(waveData, 0, samplesPerPixel * bytesPerSample);

                    if (bytesRead == 0) { break; }

                    for (var n = 0; n < bytesRead; n += 2)
                    {
                        var sample = BitConverter.ToInt16(waveData, n);
                        if (sample < low) { low = sample; }
                        if (sample > high) { high = sample; }
                    }

                    //calculate min and max values for the current line
                    var lowPercent = ((((float)low) - short.MinValue) / ushort.MaxValue);
                    var highPercent = ((((float)high) - short.MinValue) / ushort.MaxValue);

                    var point1 = new Point(x, (int)(this.Height * lowPercent));
                    var point2 = new Point(x, (int)(this.Height * highPercent));

                    //if event is not hoocked in, then render wave instantly
                    if (OnLineDrawEvent == null)
                    {
                        e.Graphics.DrawLine(linePen, point1, point2);
                    }
                    else
                    {
                        //save points to be used in the rendering thread
                        ControlPoints.Add(point1, point2);
                    }
                }
            }

            //abort current thead if sound has been reloaded
            if (RenderThread != null && RenderThread.IsAlive)
            {
                RenderThread.Abort();
            }

            //start rendering thread
            RenderThread = new Thread(TriggerDrawing);
            RenderThread.IsBackground = true;
            RenderThread.Start();
        }
    }
    catch (Exception)
    {
    }

    base.OnPaint(e);
}
When we pass the rendering to other thread, we simply need to trigger OnLineDrawEvent event for each line stored in our buffer (ControlPoints variable). The UI will then receive the event with the line data.
 void TriggerDrawing()
 {
    //check if the event is attached
    if (OnLineDrawEvent != null)
    {
        foreach (var pointSet in ControlPoints)
        {
            OnLineDrawEvent(pointSet.Key, pointSet.Value);//trigger event and pass the points to the UI
            Thread.Sleep(RenderDelay); //set custom delay
        }
    }
}
Our main UI methods will look as follows. After dropping our custom control on the form, we need to configure it by passing sound wave file path and attach rendering method. The RenderDelay variable will also be used by slider to dynamically control rendering speed.
 private void Form1_Load(object sender, EventArgs e)
 {
    comboBox1.SelectedIndex = 0;//select first sound

    //Attach draw event otherwise the control will render instantly
    customWaveViewer1.OnLineDrawEvent += new CustomWaveViewer.OnLineDrawHandler(customWaveViewer1_OnLineDrawEvent);

    //set initial speed - it can be configured using UI slider
    customWaveViewer1.RenderDelay = 20;

    LoadWaive();//init control
 }

 void LoadWaive()
 {
    var path = "../../sounds/" + comboBox1.Text.Last<char>().ToString() + ".wav";

    customWaveViewer1.WaveStream = new WaveFileReader(path);
    customWaveViewer1.InitControl();
 }

 //Draw the lines when the points arrive from the background thread event
 void customWaveViewer1_OnLineDrawEvent(Point point1, Point point2)
 {
    using (var gr = customWaveViewer1.CreateGraphics())
    {
        using (var linePen = new Pen(Color.Lime, 1))
        {
            gr.DrawLine(linePen, point1, point2);
        }
    }
 }
I have attached working example below for your tests. You may also use other nAudio methods to play the sound file while it’s being rendered.


