Social media Sentiment Analysis using C# API

Sentiment Analysis in Social media has become very important for many companies over the last few years as more and more people use this communication channel not only to exchange the messages, but also to express their opinions about the products and services they use or used in the past.

In order to start proper sentiment analysis, we need to use correct Text Analytics and Text Mining techniques. The fastest way is to use external API to get the information we need and then import that data on the daily basis to our system database, where we can visualize and track the results.

In this article I will show you, how you can convert unstructured data e.g. tweets using text2data.org API, into structured information that you can use to track sentiment towards the brand, product or company.

First step is to register in the service and get the private key to be used in your API calls. Next, you need to download API SDK from here

The code below, will just create request object containing your information and post that to platform using json or xml format. The response object will have information you need: Detected Entities, Themes, Keywords, Citations, Slang words and abbreviations. For each of these you can get sentiment result as double, polarity and score (positive, negative or neutral). Received information can be formatted the way you want. Below is complete sample (except for private key):

  static void Main(string[] args)
   {
        var inputText = "I am not negative about the LG brand.";
        var privateKey = "-------------"; //add your private key here (you can find it in the admin panel once you sign-up)
        var secret = ""; //this should be set-up in admin panel as well.

       var doc = new Document()
       {
          DocumentText = inputText,
          IsTwitterContent = false,
          PrivateKey = privateKey,
          Secret = secret
       };

       var docResult = API.GetDocumentAnalysisResult(doc); //execute request

       if (docResult.Status == (int)DocumentResultStatus.OK) //check status
       {
        //display document level score
        Console.WriteLine(string.Format("This document is: {0}{1} {2}", docResult.DocSentimentPolarity, docResult.DocSentimentResultString, docResult.DocSentimentValue.ToString("0.000")));

        if (docResult.Entities != null && docResult.Entities.Any())
        {
         Console.WriteLine(Environment.NewLine + "Entities:");
         foreach (var entity in docResult.Entities)
         {
           Console.WriteLine(string.Format("{0} ({1}) {2}{3} {4}", entity.Text, entity.KeywordType, entity.SentimentPolarity, entity.SentimentResult, entity.SentimentValue.ToString("0.0000")));
          }
       }
 
      if (docResult.Keywords != null && docResult.Keywords.Any())
      {
         Console.WriteLine(Environment.NewLine + "Keywords:");
         foreach (var keyword in docResult.Keywords)
          {
             Console.WriteLine(string.Format("{0} {1}{2} {3}", keyword.Text, keyword.SentimentPolarity, keyword.SentimentResult, keyword.SentimentValue.ToString("0.0000")));
            }
        }

        //display more information below if required 

      }
      else
      {
          Console.WriteLine(docResult.ErrorMessage);
      }

       Console.ReadLine();
  }

You can always validate results by checking the demo site (on text2data.org platform)

sentiment-analysis

Enjoy 🙂

Social-Media-Icons

1 Star2 Stars3 Stars4 Stars5 Stars (1 votes, average: 5.00 out of 5)
Loading...Loading...

Creating custom WCF message router – load balancer

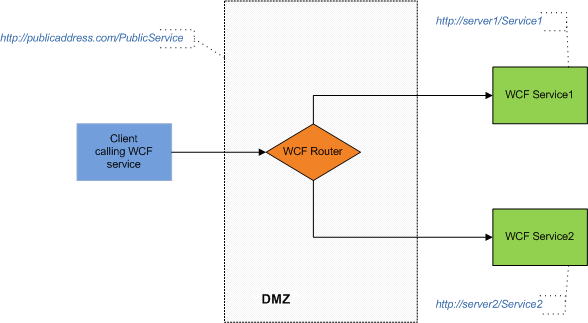
The very common requirement is to route WCF messages from the publicly exposed front-end service (perimeter network) to other services sitting within the local network. This is the good security model that lets us implement routing or load balancer if needed. The front-end service will also act as a firewall in this scenario. The routing may be performed based on the requested service method, content or custom algorithm.

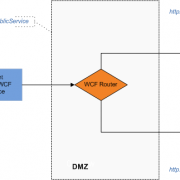
The image below shows typical hight level service infrastructure within the organization.

wcf_router

Let’s start with defining our service that the client will use to send requests. The “Calculate” method will be used to perform time consuming operation that will require more CPU usage.

  [ServiceContract]
    public interface IMessageService
    {
        [OperationContract]
        string SendMessage(string value);

        [OperationContract]
        int Calculate(string value); 
    }

  public class MessageService : IMessageService
  {
        public string SendMessage(string value)
        {
            return string.Format("You have sent: {0}", value);
        }

        public int Calculate(string value)
        {
            //do calculation
            return 999;
        }
    }

Next, we need to define IRouter interface. In our example we will use two methods: RouteMessage, that will process and route the messages and AddAvailableEndPoints, that will be used to assign available endpoints for the requests to be routed to. Please note that our router will not be using service contracts which is very useful as we don’t want to recompile router service each time our message service interface changes. You may also implement function to assign routing rules, in our example we will hard-code the rules for better clarity.

  [ServiceContract]
    public interface IRouter
    {
        [OperationContract(Action = "*", ReplyAction = "*")]
        Message RouteMessage(Message message);

        void AddAvailableEndPoints(List<EndpointAddress> addressList);        
    }

Let’s create our router class now. Please note that we are using static constructor as we will only use one instance of the service (creating and destroying channel factory is very costly operation).

 static IChannelFactory<IRequestChannel> factory;
 List<EndpointAddress> addressList;
 int routeCount;

  //create only one instance
  static Router()
  {
    try
    {
        var binding = new BasicHttpBinding();
        factory = binding.BuildChannelFactory<IRequestChannel>(binding);

        factory.Open();
    }
    catch (Exception e)
    {
        Console.WriteLine("Exception: {0}", e.Message);
    }
  }

Now we need to implement the actual routing algorithm. In our case, when message arrives we will check the action method that proxy object will use to execute on the target service. We have hard-coded the method “Calculate” to be routed to service2, the other request will be routed equally among available services. You can also use XmlDocument class to parse message content if needed.
Of course in the production environment you may want to pass in routing rules as a object and examine that when processing arrived message prior routing it to appropriate service.

 public Message RouteMessage(Message message)
 {
    IRequestChannel channel = null;
    Console.WriteLine("Action {0}", message.Headers.Action);
    try
    {
        //Route based on custom conditions
        if (message.Headers.Action.ToLower().EndsWith("calculate")) //or use custom routing table stored in other location
        {
            //use second endpoint as it has more resources for time consuming operations
            channel = factory.CreateChannel(this.addressList.Skip(1).First());
            Console.WriteLine("Routed to: {0}\n", this.addressList.Skip(1).First().Uri);
        }
        else
        {
            //or
            #region Route other requests equally
            //we assume only 2 endpoints for this example 
            if (routeCount % 2 == 0)
            {
                channel = factory.CreateChannel(this.addressList.First());
                Console.WriteLine("Routed to: {0}\n", this.addressList.First().Uri);
            }
            else
            {
                channel = factory.CreateChannel(this.addressList.Skip(1).First());
                Console.WriteLine("Routed to: {0}\n", this.addressList.Skip(1).First().Uri);
            }
            //reset route counter
            if (routeCount > 10000) { routeCount = 0; } else { routeCount++; }
            #endregion           
        }

        //remove context as the message will be redirected
        message.Properties.Remove("ContextMessageProperty");

        channel.Open();

        var reply = channel.Request(message);

        channel.Close();

        return reply;
    }
    catch (Exception e)
    {
        Console.WriteLine(e.Message);
        return null;
    }
}

At this time, we can create client application that will call our front-end service(router) multiple times for our test.

 static void Main(string[] args)
 {
    Console.Write("Press enter to send multiple messages");
    Console.ReadLine();

    var baseFrontOfficeAddress = new Uri("https://localhost:81/FrontOffice");

    try
    {
        var binding = new BasicHttpBinding();
        var endpoint = new EndpointAddress(baseFrontOfficeAddress);

        var factory = new ChannelFactory<IMessageService>(binding, endpoint);
        var channel = factory.CreateChannel();

        //simulate multiple requests
        for (var i = 0; i < 10; i++)
        {
            var reply = channel.SendMessage("test message");
            Console.WriteLine(reply);

            var replyCalulated = channel.Calculate("test message");
            Console.WriteLine("Calculated value: " + replyCalulated);
        }

        Console.ReadLine();
        factory.Close();
    }
    catch (Exception ex)
    {
        Console.WriteLine(ex.Message);
        Console.ReadLine();
    }
}

In order to receive client requests we need to start our services. In our example we will host router and available services within the same application. Normally we would deploy router service within DMZ zone and target services on the separate computers withing our local network. For security reasons, only router service would be exposed to public network.

 static void Main(string[] args)
 {
    //execute this first using cmd (win7)
    //netsh http add urlacl url=https://+:81/FrontOffice user=Domain(or PC name)\UserName
    //netsh http add urlacl url=https://+:81/service1 user=Domain(or PC name)\UserName
    //netsh http add urlacl url=https://+:81/service2 user=Domain(or PC name)\UserName

    //front office endpoint - all clients will call this address before requests will be routed
    var baseFrontOfficeAddress = new Uri("https://localhost:81/FrontOffice");

    #region Target service endpoints that requests can be routed to (can be more than 2)
    var baseEndPointAddress1 = new Uri("https://localhost:81/service1");
    var baseEndPointAddress2 = new Uri("https://localhost:81/service2");

    var endPoint1 = new EndpointAddress(baseEndPointAddress1);
    var endPoint2 = new EndpointAddress(baseEndPointAddress2); 
    #endregion

    #region These services should normally be deployed to different servers within the organization
    //start service 1
    var hostService1 = new ServiceHost(typeof(MessageService1), baseEndPointAddress1);
    hostService1.AddServiceEndpoint(typeof(IMessageService), new BasicHttpBinding(), "");
    hostService1.Open();
    Console.WriteLine("MessageService1 service running");

    //start service 2
    var hostService2 = new ServiceHost(typeof(MessageService2), baseEndPointAddress2);
    hostService2.AddServiceEndpoint(typeof(IMessageService), new BasicHttpBinding(), "");
    hostService2.Open();
    Console.WriteLine("MessageService2 service running");        
    #endregion

    #region Start router service
    var router = new Router();

    //add available service enpoints
    router.AddAvailableEndPoints(new List<EndpointAddress>() { endPoint1, endPoint2 });

    var routerHost = new ServiceHost(router);
    routerHost.AddServiceEndpoint(typeof(IRouter), new BasicHttpBinding(), baseFrontOfficeAddress);
    routerHost.Open();

    Console.WriteLine("Router service running");           
    #endregion           
    
    Console.WriteLine("---Run client to send messages---");  
    Console.ReadLine(); 
}

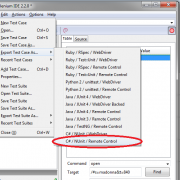
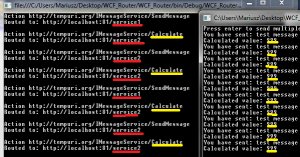
The results of our test is shown below. In this example we chose to route all requests for “Caluculate” method to “service2” (as it located on faster machine within the network), the other requests are routed equally to service1 or service2.

routed_messages

Above way of routing messages is very flexible as it is implemented on the very low level. The other way of routing messages is to use RoutingService class. In this approach you would define the routing table, endpoints and filters in your configuration file. Based on these settings you would add service behavior that will use RoutingService class to route messages.

I have attached project files below for your tests. Please execute below commands before testing it:

netsh http add urlacl url=https://+:81/FrontOffice user=Domain(or PC name)\UserName”
netsh http add urlacl url=https://+:81/service1 user=Domain(or PC name)\UserName
netsh http add urlacl url=https://+:81/service2 user=Domain(or PC name)\UserName

WCF_Router

1 Star2 Stars3 Stars4 Stars5 Stars (No Ratings Yet)
Loading...Loading...

Integrating automated Selenium tests with TeamCity

Automated tests are crucial these days to achieve high quality software products as they are being prone to errors especially during agile process where changes can occur at any stage causing our solution to stop functioning properly. Apart from standard testing using TDD, Mocking etc. there is always a need to perform interface tests simulating an user using our website. The ideal solution in that case are automated Selenium tests.


Selenium tests give us possibility to create user case scenarios that we can test either on our dev applications or live websites deployed to the clients. This will give us a chance to test all cases after the build will happen either on demand or when we deploy live version of our product.

Selenium tests can be created by the developer or business analyst or testers as this not requires programming skills. In order to start creating tests we need to download Selenium IDE plug-in for Firefox: https://docs.seleniumhq.org/download/

Creating tests is similar to recording macros in Excel, all we need to do is to record our actions that we want to test, image below shows the example:


selenium-ide

Please note that you need to install Firefox version 21.0 the newer version is not working with selenium (Firefox bug).

After our test is created, we need to export it to .cs C# file as pictured below:

selenium-export

The next step is to create small library project application. We will use this project to compile our test files exported from the Selenium IDE. After we have the project created, we simply need to copy our exported .cs file to our project and compile dll.

selenium-project-files

If we want to integrate Selenium tests with the TeamCity server, we can do it by including previously created project into our development project files. After that, we can configure TeamCity build step to run our Selenium tests on every triggered build. To configure build step, we need to choose NUnit runner type (or other test framework of your choice)

buildstep

If we have configured everything correctly, the test will run on every application change. Of course Selenium tests must be run at the end, when project is compiled and deployed on the server (if this is our local dev environment).

When tests finish, we can check the status in TeamCity admin panel or configure email notification or use TeamCity Tray Notifier to track the results.

test-results

The final thing that needs to be set-up is the Selenium server. You can run the Selenium server locally by turning it on when needed and then running NUnit application to check the test locally. In our case we want the Selenium to be running on the server as a Windows Service.

After downloading Selenium RC https://docs.seleniumhq.org/projects/remote-control/ we unpack the files to following location C:\Selenium\selenium-server-1.0.3 You not necessarily need all that files as it also includes web drivers for other languages. Anyway, our folder structure should look similar to following:

selenium-files

We also need to download nssm-2.16 (“Non-Sucking Service Manager”), we will use it to install Windows Service running our Selenium server. When we run run-server-manually.bat, the Selenium server will be launched, it will stop after you close console window – this will help when testing on your local machine.
The script looks like this:

 java -jar selenium-server-standalone-2.33.0.jar -port 4444

I have also created 2 scripts: install-windows-service.bat and remove-windows-service.bat that install and remove Windows Service on the target server. The logic is as follows:

//install Windows Service
C:\Selenium\selenium-server-1.0.3\nssm-2.16\win64\nssm.exe install Selenium-Server "C:\Program Files (x86)\Java\jre7\bin\java.exe" "-jar C:\Selenium\selenium-server-1.0.3\selenium-server-standalone-2.33.0.jar"

//Uninstall Windows Service
C:\Selenium\selenium-server-1.0.3\nssm-2.16\win64\nssm.exe remove Selenium-Server

After installing Windows Service, please make sure it is running by going to Control panel > Administrative Tools > Services. You also need to remember to check java path as it differs for x64 systems.
That’s it. I have included configuration files that may help you. Hope you will be successful with your configuration 🙂

Selenium-VisualStudioApp

1 Star2 Stars3 Stars4 Stars5 Stars (1 votes, average: 5.00 out of 5)
Loading...Loading...

Auto creating installers using WIX (Open source) and CI server

Creating installer packages has become more complicated recently as the Microsoft decided to not to support installation projects (.vdproj) in VS 2012 upwards. On the top of that there is additional difficulty if we want to auto-create installers on the server that hasn’t got commercial Visual Studio installed – we just cannot do it 🙁

The perfect solution for that is to use WIX installer (Open source). WIX enables you to build installation packages from xml files without relying on Visual Studio. The only component required is to install WIX toolset on the build server (wixtoolset.org)

The main WIX file is the .wixproj file that builds the required package either from inside Visual Studio or from command line – without VS. In that project file we can find some commands that use WIX heat, candle and light modules to create required msi files. See sample below:

Harvesting module will create dynamic list of all files that need to be included into installer. This list is gathered after our website app is published to the local folder:

  <Exec Command="&quot;$(WixPath)heat.exe&quot; dir $(PublishF) -dr INSTALLLOCATION -ke -srd -cg MyWebWebComponents -var var.publishDir -gg -out WebSiteContent.wxs" ContinueOnError="false" WorkingDirectory="." />

After harvesting, we can finally build installer. Please note that we can pass in custom parameters when triggering candle module, the parameters must be preceded with the letter “d” e.g. -dMyParam. In our sample we will use this to pass in command line arguments that will define our installer’s name, version, website root etc.

 <Exec Command="&quot;$(WixPath)candle.exe&quot; -ext WixIISExtension -ext WixUtilExtension -ext WiXNetFxExtension -dProductName=$(ProductName) -dWebFolderName=$(WebFolderName) -dProductVersion=$(ProductVersion) -dUpgradeCode=$(UpgradeCode) -dProductCode=$(ProductCode) -dpublishDir=$(PublishF) -dMyWebResourceDir=. @(WixCode, ' ')" ContinueOnError="false" WorkingDirectory="." />

 <Exec Command="&quot;$(WixPath)light.exe&quot; -ext WixUIExtension -ext WixIISExtension -ext WixUtilExtension -ext WiXNetFxExtension -out $(MsiOut) @(WixObject, ' ')" ContinueOnError="false" WorkingDirectory="." />

For the purpose of this article we will create very simple installer without configuring IIS settings, deploying sql scripts etc. All installer’s basic configuration can be found in UIDialogs.wxs, MyWebUI.wxs, IisConfiguration.wxs – you may want to adjust it for your needs. The file Product.wxs is the main entry point where you can define installation folders, actions, validations etc.

Please note that adding UpgradeCode and MajorUpgrade configuration elements will result in any older installed version to be automatically un-installed prior the installation. Also, any custom params you want to use inside your installer configuration must be used like this $(var.MyParamName).

 <Product Id="$(var.ProductCode)" 
			 Name="$(var.ProductName)" 
			 Language="1033" 
			 Version="$(var.ProductVersion)" 
			 Manufacturer="MyCompany" 
			 UpgradeCode="$(var.UpgradeCode)" >
 <MajorUpgrade DowngradeErrorMessage="A newer version of Product Name Removed is already installed."/> 
 
 .....

After defining our WIX configuration files, we can finally build our installer. We can do it by using batch or Power Shell script, or use Visual Studio to do it. It is because the .wixproj file it’s just normal ms-build file.

When using CI server we can simply run power-shell installation process by passing in our version number (build number, revision etc.) and other parameters we need.

This is how we can run it with PS:
WIX_installer-powershell

We can still use Visual Studio to do the same, as presented below:
WIX_installer-visualstudio

I have attached working sample below. Please don’t forget to install WIX toolset before running it. Also please check if all paths to WIX and msbuild folders are the same on your server (or use environment variables instead).

Enjoy!
MyWebsite

1 Star2 Stars3 Stars4 Stars5 Stars (1 votes, average: 5.00 out of 5)
Loading...Loading...