Claims based authentication on Windows Azure

Claims based authentication can greatly improve user’s experience by allowing them to login to our site using external trusted providers such as Google, Yahoo etc. In this article I will show you how to integrate claims based authentication with existing membership provider. This is common scenario if you don’t have any on premises applications using Active Directory needing to connect to the cloud. If this is the case we would have to use WIF (Windows Identity Foundation) authentication modules and Active Directory Federation Services installed on premises.

In our simple example we will use DotNetOpenAuth to perform claims based authentication along side default membership provider. In order to successfully authenticate the user we will have to correlate user data stored in membership table with the UserID received from external claims callback, in our case we will receive email address as a user-name from Google.

Following diagram presents high level overview of our solution:
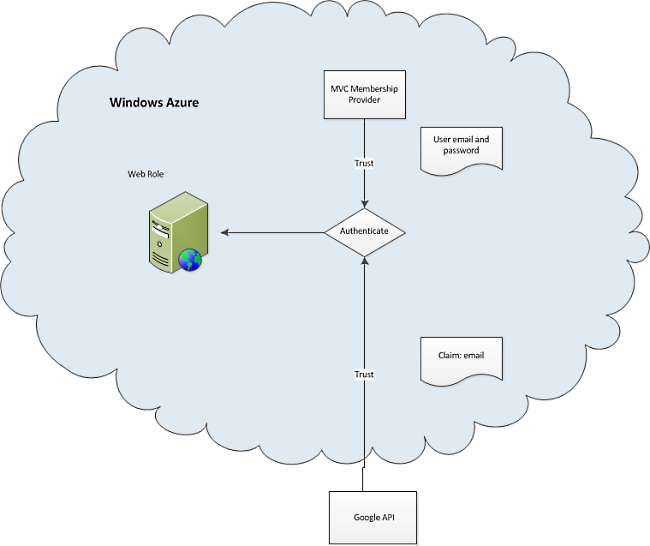
claims_authentication

How it works:
User can login to our site as normal using standard login button. If he wishes to login using eg. Google account he will have to click the button below saying ‘Log in with Google’.
After clicking that button, user is redirected to Google’s login page. If the Google login is successful then user is redirected back to our site. Our generic handler validates the claims stored in the response context. If the validation is successful, we are getting email address that we will use to login the user. Before doing that we need to first find the user in our database by email address and get his data.

google_login

Let’s start implementation.

In the Global.asax file we need to attach UserAuthenticated event. We will use it to get callback response from Google containing claimed userID.

 public void RegisterEvents()
 {
    //attach login event from the generic handler
    GoogleLoginHandler.UserAuthenticated += new EventHandler<EventArgs<string>>(GoogleLoginHandler_UserAuthenticated);
 }

 void GoogleLoginHandler_UserAuthenticated(object sender, EventArgs<string> e)
 {
    var accountController = new Controllers.AccountController();
    accountController.LogOnUsingOpenId(e.Data); //pass in email address of the user to be logged in
 }

 protected void Application_Start()
 {
    AreaRegistration.RegisterAllAreas();

    RegisterGlobalFilters(GlobalFilters.Filters);
    RegisterRoutes(RouteTable.Routes);
    RegisterEvents();
 }

Next, lets add following handler GoogleLoginHandler.ashx to our project. In that handler we will redirect to Google login page and read the response after login is successful. See in-line comments:

  public void ProcessRequest(HttpContext context)
 {
	using (var openid = new OpenIdRelyingParty())
	{
		openid.Behaviors.Add(new AXFetchAsSregTransform());

		var response = openid.GetResponse();
		if (response == null)
		{
			// Check if already logged in
			var request = openid.CreateRequest(GoogleOPIdentifier);
			request.AddExtension(new UIRequest { Mode = UIModeDetectSession });
			request.Mode = AuthenticationRequestMode.Immediate;
			request.AddExtension(new ClaimsRequest { Email = DemandLevel.Require });
			request.RedirectToProvider();
		}
		else
		{
			if (response.Status == AuthenticationStatus.Authenticated)
			{
				var claims = response.GetExtension<ClaimsResponse>();
				var userEmail = claims.Email;

				if (UserAuthenticated != null)
				{
					//Log user in
					UserAuthenticated(this, new EventArgs<string>(userEmail));
				}

				context.Response.Redirect(context.Request["ReturnUrl"]);
			}
			else if (response.Status == AuthenticationStatus.SetupRequired)
			{
				var request = openid.CreateRequest(GoogleOPIdentifier);
				request.AddExtension(new ClaimsRequest { Email = DemandLevel.Require });
				request.RedirectToProvider();
			}
			else
			{
				context.Response.Redirect(context.Request["ReturnUrl"]);
			}
		}
	}
 }

We will use following function to redirect to login page and back to destination by reading the ReturnUrl param:

 public static void TryToLogin(string defaultRedirection = "/Home/Index")
{
    //extract return url if exists
    var returnUrl = HttpContext.Current.Request.UrlReferrer != null && HttpContext.Current.Request.UrlReferrer.ToString().Contains("ReturnUrl=") ?
        HttpContext.Current.Request.UrlReferrer.ToString().Split(new string[] { "ReturnUrl=" }, StringSplitOptions.None)[1] : defaultRedirection;
    
    if (returnUrl.Trim().Length == 0) { returnUrl = defaultRedirection; } //enforce default if empty

    HttpContext.Current.Response.Redirect("~/GoogleLoginHandler.ashx?ReturnUrl=" + returnUrl);
}

Our generic handler and declarations will look as follows:

 public class GoogleLoginHandler : IHttpHandler
 {
    public static event EventHandler<EventArgs<string>> UserAuthenticated;

    private const string GoogleOPIdentifier = "https://www.google.com/accounts/o8/id";
    private const string UIModeDetectSession = "x-has-session";

We will also extend EventArgs class to accept generic param that we will use in our callback handler.

 namespace System
 {
    public class EventArgs<T> : EventArgs
    {
        public EventArgs()
        {
        }

        public EventArgs(T data)
        {
            this.Data = data;
        }

        public T Data { get; set; }
    }
}

And finally we call following function to authenticate user containing verified email address that matches email address in our membership table.

/// <summary>
/// Private login method for openId
/// </summary>
/// <param name="emailAddress"></param>
/// <returns></returns>
[Authorize]
internal ActionResult LogOnUsingOpenId(string emailAddress)
{
    var userName = Membership.GetUserNameByEmail(emailAddress);
    if (userName != null)
    {
        FormsAuthentication.SetAuthCookie(userName, true);
    }

    return View();
}

I have included project files below so you can see it working and adjust it to your requirements 🙂

Claims Authentication

1 Star2 Stars3 Stars4 Stars5 Stars (No Ratings Yet)
Loading...Loading...

SHA1 and MD5 hashing algorithms

When storing passwords in database, it is considered a good practice to hash them first. The most common way to do that is to use MD5 or SHA hashing algorithms. Hashing passwords is more secure because after creating a hash from the user’s password theoretically there is not way to get the password back from it. In reality MD5 is more vulnerable to “collision attacks” as it uses 128 bit value while SHA1 uses 160 bits which makes it harder to crack.

The disadvantage of hashing passwords is the fact that if an users forgets his password, we cannot send him a reminder. We will have to reset it first.

Theoretically if someone will steal our database, it is possible to use bruit force attack to find the original passwords by trying different combinations of words and numbers. To prevent that we can add our custom string to the user’s string before hashing. This makes it more difficult to crack the passwords having only database without our application files where the custom string is being stored.

 class Program
    {
        static void Main(string[] args)
        {
            string md5 = CreateMD5Hash("test");
            //result: CY9rzUYh03PK3k6DJie09g==

            string sha1 = CreateSHA1Hash("test");
            //result: qUqP5cyxm6YcTAhz05Hph5gvu9M
        }

        /// <summary>
        /// Creates MD5 hash of text
        /// </summary>
        public static string CreateMD5Hash(string clearText)
        {
            return Convert.ToBase64String(MD5.Create().ComputeHash(UnicodeEncoding.UTF8.GetBytes(clearText)));
        }

        /// <summary>
        /// Creates SHA1 hash of text
        /// </summary>
        public static string CreateSHA1Hash(string clearText)
        {
            return Convert.ToBase64String(SHA1.Create().ComputeHash(UnicodeEncoding.UTF8.GetBytes(clearText))).TrimEnd('=');
        }
    }

1 Star2 Stars3 Stars4 Stars5 Stars (No Ratings Yet)
Loading...Loading...

Encrypting Url parameters with DES

When reading and validating URL parameters you probably came across the situation that you wanted to hide some values for security reasons. Such a situations happen very often eg. when confirming email address of an user by sending validation link or by validating payment callback etc.

One of the solutions is to encrypt Url parameters using DES algorithm. DES it’s a symmetric algorithm that allows you to encrypt and decrypt values using shared public key. It is advisable to change public key from time to time for security reasons.

Below are two helper methods needed to encrypt and decrypt values:

    /// <summary>
    /// Encrypts an string using provided public key (DES)
    /// </summary>
    /// <param name="stringToEncrypt">String to be encrypted</param>
    /// <param name="sEncryptionKey">Public key</param>
    /// <returns>string</returns>
    public static string DES_encrypt(string stringToEncrypt, string sEncryptionKey)
    {
     if (stringToEncrypt.Length <= 3) { throw new Exception("Invalid input string"); }

     byte[] key = { };
     byte[] IV = { 10, 20, 30, 40, 50, 60, 70, 80 }; //defining vectors
     byte[] inputByteArray;
     key = Encoding.UTF8.GetBytes(sEncryptionKey.Substring(0, 8));
     using (var des = new DESCryptoServiceProvider())
     {
        inputByteArray = Encoding.UTF8.GetBytes(stringToEncrypt);
        using (var ms = new MemoryStream())
        {
            using (var cs = new CryptoStream(ms, des.CreateEncryptor(key, IV), CryptoStreamMode.Write))
            {
                cs.Write(inputByteArray, 0, inputByteArray.Length);
                cs.FlushFinalBlock();
                return Convert.ToBase64String(ms.ToArray());
            }
        }
      }
   }

and

    /// <summary>
    /// Decrypts an string using provided public key (DES)
    /// </summary>
    /// <param name="stringToDecrypt">String to be decrypted</param>
    /// <param name="sEncryptionKey">Public key</param>
    /// <returns>string</returns>
    public static string DES_decrypt(string stringToDecrypt, string sEncryptionKey)
    {
     if (stringToDecrypt.Length <= 3) { throw new Exception("Invalid input string"); }

     byte[] key = { };
     byte[] IV = { 10, 20, 30, 40, 50, 60, 70, 80 };//defining vectors
     byte[] inputByteArray = new byte[stringToDecrypt.Length];
     key = Encoding.UTF8.GetBytes(sEncryptionKey.Substring(0, 8));
     using (var des = new DESCryptoServiceProvider())
     {
        inputByteArray = Convert.FromBase64String(stringToDecrypt.Replace(" ", "+"));
        using (var ms = new MemoryStream())
        {
            using (CryptoStream cs = new CryptoStream(ms, des.CreateDecryptor(key, IV), CryptoStreamMode.Write))
            {
                cs.Write(inputByteArray, 0, inputByteArray.Length);
                cs.FlushFinalBlock();
                var encoding = Encoding.UTF8;
                return encoding.GetString(ms.ToArray());
            }
        }
     }
   }

In real life scenario when sending validation email we are simply encrypting our parametrized string the way shown bellow:

  var urlParam = txtEmail.Text + ";" + userID + ";" + DateTime.Now.ToString();

  var encryptedParam = Encryption.DES_encrypt(urlParam, "12345678");

  //send confirmation email with link: https://www.myadress.com/validate.aspx?sid=encryptedParam

When someone clicks the link and comes to our page we need to decrypt values and read the data.

   var encryptedParam = Request["sid"];

   var decryptedParam = Encryption.DES_decrypt(encryptedParam, "12345678");

   var email = decryptedParam.Split(';')[0];
   var userID = decryptedParam.Split(';')[1];
   var dateSent = DateTime.Parse(decryptedParam.Split(';')[2]);

As you probably have noticed, we use same public key to encrypt and decrypt values. In our situation the public key is safe because it is only stored on our server and is not being sent across the network.

For the above functions to be fully functional you need implement basic validation. It is also a good practice to add timestamp date to encrypted string so we can ensure the data was sent within defined time frame, lets say within last 5 minutes. After that the data will expire and wont be accepted by our application.

DES it’s quite save and efficient algorithm that you can use in your daily programming. It should be suitable in most case scenarios, unless you are building banking system 🙂

1 Star2 Stars3 Stars4 Stars5 Stars (No Ratings Yet)
Loading...Loading...