Posts

Auto publishing reports to Tableau Server

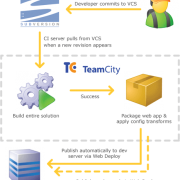
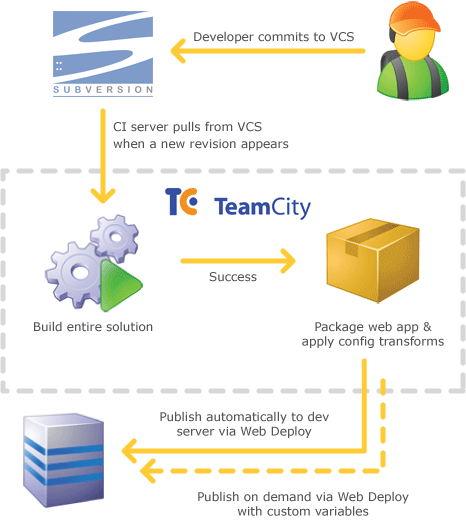
Tableau it’s a great tool for data visualization, however if you are using it a lot, you may want to automate some stuff. One of them is publishing/updating reports to Tableau Server. This is when Tableau Utility Command comes in handy, you can install it on your development server and use in the power-shell script. One of the solutions is to use CI server for auto deployments, you only need to give the git/svn access for users changing the reports or adding new ones.

tableau

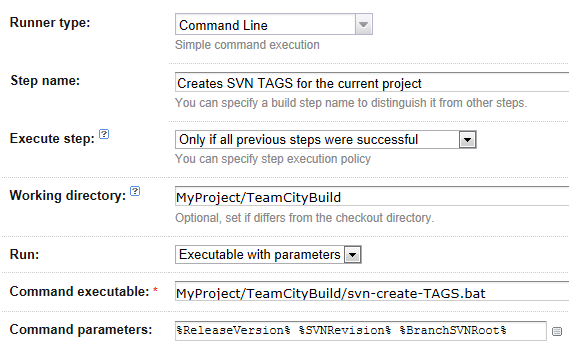
Following script can be run as build step in TeamCity to detect workbooks that have been changed recently and publish them automatically to Tableau server. Parent folder of each workbook will be used as project name when publishing. In order to run it, just pass in email notification list and server password – of course you need to configure the params (server url, smtp etc.).

param (
[string]$cmddir = "C:\Program Files\Tableau\Tableau Server\8.2\extras\Command Line Utility", #location where tabcmd has been installed
[string]$server = "https://tableau:81", #this is url of the Tableau server 
[string]$currentDir = (split-path -parent $MyInvocation.MyCommand.Definition) +"\", #current script location
[string]$notificationEmailList = "test1@test.com,test2@test.com", #send email notifications if successful
[string]$admin = "user", #admin account for the server
[string]$pass = "" #to be passed in as param
)
 
function SendEmail($emailTo,$title,$body)
{ 
   $smtp=new-object Net.Mail.SmtpClient("my_smtp_server"); $smtp.Send("sentAs@mydomain.com", $emailTo, $title, $body);
}
 
$global:temp_ = "";
 
#login to Tableau
cd  $cmddir
.\tabcmd login -s $server -u $admin -p $pass
 
 get-childitem -Path $currentDir –recurse |  where-object { 
    $_.LastWriteTime -gt (get-date).AddMinutes(-10) -and $_.FullName.EndsWith(".twb")
  } | 
  Foreach-Object {
 
       [string]$projectName = [System.IO.DirectoryInfo]$_.Directory.Name;
        $global:temp_ += [string][System.IO.Path]::GetFileName($_.FullName) + " | ";
 
       #publish or overwrite workbook on the server
       .\tabcmd publish $_.FullName -r $projectName  -o  
  } 
 
 
#more commands
#.\tabcmd publish "workbook.twbx" -r "project name" -n "Workbook Name" --db-user "" --db-password "" -o
 
 
#log out to release the session
.\tabcmd logout
 
if(-not $global:temp_ -eq "")
{
   SendEmail $notificationEmailList "Tableau report published" "Following report(s) has just been successfully published to Tableau Server: $global:temp_"
}

enjoy!

1 Star2 Stars3 Stars4 Stars5 Stars (No Ratings Yet)
Loading...Loading...

Getting data from TeamCity Rest API – PowerShell

Simple script that gets build data from TeamCity server rest api. When executed as a build step, you can pass in current build id to it. Having that, we can get the previous build and it’s data. Having that data we can proceed with further processing which can be for example gathering documentation, statistics etc. Please make sure you have enabled running ps scripts on your server.

Enjoy!

teamcity_api

 param (
[int]$BuildId = 2274,
)

#gets last build date by build id
Function GetLastBuildDateByBuildId($LastBuildId_)
{
  $secpasswd = ConvertTo-SecureString "mypassword" -AsPlainText -Force
  $cred = New-Object System.Management.Automation.PSCredential("username", $secpasswd)

  $build = (Invoke-RestMethod -Credential $cred -Uri "https://teamcity:88/httpAuth/app/rest/builds/id:$LastBuildId_").build;
  return [DateTime]::ParseExact($build.startdate.split("T")[0],'yyyyMMdd', $null) 
}

#get last build date
$lastBuildDate = GetLastBuildDateByBuildId  ($BuildId -1)

$lastBuildDate
1 Star2 Stars3 Stars4 Stars5 Stars (No Ratings Yet)
Loading...Loading...

AutoBuilds and deployment using TeamCity CI server

When developing software solutions sometimes there is a need to automate process of builds, deployments and testing tasks. One of the possible solutions is the TeamCity server. This Continuous Integration server is especially useful when managing multiple SVN branches that need to be deployed to multiple web applications when any predefined change occurs.

One of the triggers that we can use to start the build and deployment is SVN change. In this article I will show you how to configure auto build and deployment of .net web application triggered by SVN changes.

After we have installed TeamCity, we need to create project and add VCS root (I won’t be describing that as it is quite straightforward). After that we will have to define SVN trigger that detects repo changes and triggers the build. Configuration below triggers build when one of 3 developers will commit his/her changes (to the main trunk).

svntrigger

Next thing to do is to configure Visual Studio project file .csproj to auto build and deploy application on AfterBuild event task. To do it please open .csproj in notepad and add the code below:

 <PropertyGroup>
    <DeployTarget>0</DeployTarget>
    <DeployTargetFolder>\\TestServer\MyApplication</DeployTargetFolder>
    <PublishTarget>0</PublishTarget>
    <PublishFolder>..\Deployment\MyApplication</PublishFolder>
  </PropertyGroup>
  <Target Name="PublishProperties">
    <CreateProperty Value="$(PublishFolder)">
      <Output TaskParameter="Value" PropertyName="WebProjectOutputDir" />
    </CreateProperty>
    <CreateProperty Value="$(PublishFolder)\bin\">
      <Output TaskParameter="Value" PropertyName="OutDir" />
    </CreateProperty>
  </Target>
  <Target Name="WebPublish" DependsOnTargets="BeforeBuild;PublishProperties">
    <RemoveDir Directories="$(PublishFolder)" ContinueOnError="true" />
    <CallTarget Targets="ResolveReferences;_CopyWebApplication" />
  </Target>
  <Target Name="Deploy" DependsOnTargets="WebPublish">
    <CreateProperty Value="$(DeployTargetFolder)" Condition="$(DeployFolder) == ''">
      <Output TaskParameter="Value" PropertyName="DeployFolder" />
    </CreateProperty>
    <RemoveDir Directories="$(DeployFolder)" Condition="$(CleanDeploy) == 1" />
    <ItemGroup>
      <DeploymentFiles Include="$(PublishFolder)\**\*.*" />
    </ItemGroup>
    <Copy SourceFiles="@(DeploymentFiles)" DestinationFolder="$(DeployFolder)\%(RecursiveDir)" />
  </Target>
  <Target Name="AfterBuild">
    <CallTarget Targets="WebPublish" Condition="$(PublishTarget) == 1" />
    <CallTarget Targets="Deploy" Condition="$(DeployTarget) == 1" />
  </Target>

You can notice that in the PropertyGroup there are some params the build will be configured with. In our case we configure DeployTarget and PublishTarget to 0 becase we want to avoid visual studio to trigger the deployment each time we hit F5. We will override this params from the TeamCity triggered build. See the configuration below:

autobuildconfig

The whole process illustrates this diagram:
ci-build-and-deploy

P.S. If you want to run FxCop as build step, additional change is required. After installing FxCop you need to manually adjust the build agent properties in following location: C:\TeamCity\buildAgent\conf\buildAgent.properties

Following configuration needs to be added:

 system.FxCopRoot=C\:\\Program Files (x86)\\Microsoft Fxcop 10.0
 system.FxCopCmdFileVersion=10.0.30319.1
 system.WindowsSDK7.1

Otherwise you will get “no suitable Build Agent” error

Good luck with your configuration 🙂

1 Star2 Stars3 Stars4 Stars5 Stars (No Ratings Yet)
Loading...Loading...

Auto creating SVN tags and custom release installers

Automation within the software development company allows to save tremendous amount of time in the long run. The time spend for initial configuration of the automated tasks is almost nothing compared to running all processes manually. In this article I will show you how to configure auto SVN tagging and creating custom installation files each time after the TeamCity build is performed.

In our scenario we want to copy our current branch files to the https://svn.mycompany.com/Releases/Tags/ReleaseVersion location and from that location we want to create installation file that we want to deploy on the client server.

The first step is to create new TeamCity build configuration and as a first build step define following configuration:

svn_tags

Let’s create our svn-create-TAGS.bat file. The implementation is quite simple. There are 3 parameters that we will pass in from the TeamCity step: ReleaseVersion (%1), SVNRevision (%2), BranchSVNRoot (%3). Based on that we will trigger script below.

Because subversion copy function doesn’t have replace functionality that we can use, we then decide to delete current tag if exists. If the tag doesn’t exist then we will get svn error that could be passed to TeamCity Log. In our case we will use -q param to not display any error messages as this script will be run multiple times so each time the tags will have to replaced if the same release version is used.

After running this script we will have following tag created eg. https://svn.mycompany.com/Releases/Tags/Release.2.8.0.3″

 echo version %1
 echo revision %2
 echo branch path %3

  echo delete first if exists as there is no overwrite function for svn copy
  "C:\Program Files\TortoiseSVN\bin\svn.exe" delete "https://svn.mycompany.com/Releases/Tags/Release.%1" -q 
    -m "TeamCity generated: Deleting TAG branch for the release: %1" 

 echo copy to tag
 "C:\Program Files\TortoiseSVN\bin\svn.exe" copy -r%2 "%3/MyMainProjectFolder" "https://svn.mycompany.com/Releases/Tags/Release.%1" 
   -m "TeamCity generated: Creating TAG branch for the release: %1"

We also need to configure TeamCity parameters as follows:
svntags_params

When we have release tag created, we can now make release installer that can be deployed to the client. To do that we will define new build step (configuration is similar as the step above – script name and params will only be different).

Let’s create Installer_build.bat script then. We will pass in 2 parameters ReleaseVersion (%1), SVNRevision (%2). The script will create folder structure in Windows Temp location that we will use to import and compress our release files to. After we done with it we will clear that location and move executable file to our final release file location.

The script is basically importing files from the tag we created earlier, then the files are being compressed using 7za.exe command line utility. We can re-build the project in between but in our case project was built already by the other TeamCity process before it was moved to the release tag. After creating zip package we can build custom installer based on that file. This depends on your custom solution. In our example we will simply output the final zip file to be deployed to the client. Please see in-line comments for detailed information:

 echo params
 echo version %1
 echo revision %2

 echo top level folder stucture
 set root=%TEMP%\MyProjectBuild
 set export="%root%\Export"
 set build=%root%\Build
 set installer=%root%\Installer

 echo make sure nothing already exists
 rmdir /s /q "%root%"

 mkdir "%root%"
 mkdir "%build%"

 echo Create the installer
 echo %installer%
 mkdir %installer%

 svn export -r%2 "https://svn.mycompany.com/Releases/Tags/Release.%1/" "%export%"

 echo you may build you project here or proceed
 set MSBUILD_PATH=C:\Windows\Microsoft.NET\Framework\v4.0.30319\MSBuild.exe

 echo Copy files ready to be compressed
 set InstallerFiles=%build%

 echo copy from export filder to the final build folder
 xcopy "%export%\*.*" "%InstallerFiles%\" /E /Y

 echo set tools location that contains your compressor file, set path the same as the executing batch file
 set Tools="%~dp0"
 set BuildZip=%installer%\MyProject.%1.zip

 echo current path %Tools%

 echo build your custom installer or export just zip file
 set FinalExecutable=%BuildZip%
 %Tools%\7za.exe a -tzip -r "%BuildZip%" "%build%\*.*

 echo copy it to the releases location and clear up
 set Releases=C:\Installers

 copy "%installer%\%FinalExecutable%" "%Releases%\%FinalExecutable%"

 if exist "%Releases%\%FinalExecutable%" (
	rmdir /s /q "%root%"
	echo The build is complete.
 ) else (
	echo Unable to copy to final destination. The installer is here: %installer%\%FinalExecutable%
 )

After creating above TeamCity build steps we can configure the release installer build to be triggered on successful main project build.

svntag_build_trigger

In order to get above scripts to work you need to adjust it to your requirements as I took it from the running solution I have created and for obvious reasons had to change the paths and names.
I hope this will help you to be more productive in your daily programming 🙂

1 Star2 Stars3 Stars4 Stars5 Stars (No Ratings Yet)
Loading...Loading...