Posts

Auto creating installers using WIX (Open source) and CI server

Creating installer packages has become more complicated recently as the Microsoft decided to not to support installation projects (.vdproj) in VS 2012 upwards. On the top of that there is additional difficulty if we want to auto-create installers on the server that hasn’t got commercial Visual Studio installed – we just cannot do it 🙁

The perfect solution for that is to use WIX installer (Open source). WIX enables you to build installation packages from xml files without relying on Visual Studio. The only component required is to install WIX toolset on the build server (wixtoolset.org)

The main WIX file is the .wixproj file that builds the required package either from inside Visual Studio or from command line – without VS. In that project file we can find some commands that use WIX heat, candle and light modules to create required msi files. See sample below:

Harvesting module will create dynamic list of all files that need to be included into installer. This list is gathered after our website app is published to the local folder:

  <Exec Command="&quot;$(WixPath)heat.exe&quot; dir $(PublishF) -dr INSTALLLOCATION -ke -srd -cg MyWebWebComponents -var var.publishDir -gg -out WebSiteContent.wxs" ContinueOnError="false" WorkingDirectory="." />

After harvesting, we can finally build installer. Please note that we can pass in custom parameters when triggering candle module, the parameters must be preceded with the letter “d” e.g. -dMyParam. In our sample we will use this to pass in command line arguments that will define our installer’s name, version, website root etc.

 <Exec Command="&quot;$(WixPath)candle.exe&quot; -ext WixIISExtension -ext WixUtilExtension -ext WiXNetFxExtension -dProductName=$(ProductName) -dWebFolderName=$(WebFolderName) -dProductVersion=$(ProductVersion) -dUpgradeCode=$(UpgradeCode) -dProductCode=$(ProductCode) -dpublishDir=$(PublishF) -dMyWebResourceDir=. @(WixCode, ' ')" ContinueOnError="false" WorkingDirectory="." />

 <Exec Command="&quot;$(WixPath)light.exe&quot; -ext WixUIExtension -ext WixIISExtension -ext WixUtilExtension -ext WiXNetFxExtension -out $(MsiOut) @(WixObject, ' ')" ContinueOnError="false" WorkingDirectory="." />

For the purpose of this article we will create very simple installer without configuring IIS settings, deploying sql scripts etc. All installer’s basic configuration can be found in UIDialogs.wxs, MyWebUI.wxs, IisConfiguration.wxs – you may want to adjust it for your needs. The file Product.wxs is the main entry point where you can define installation folders, actions, validations etc.

Please note that adding UpgradeCode and MajorUpgrade configuration elements will result in any older installed version to be automatically un-installed prior the installation. Also, any custom params you want to use inside your installer configuration must be used like this $(var.MyParamName).

 <Product Id="$(var.ProductCode)" 
			 Name="$(var.ProductName)" 
			 Language="1033" 
			 Version="$(var.ProductVersion)" 
			 Manufacturer="MyCompany" 
			 UpgradeCode="$(var.UpgradeCode)" >
 <MajorUpgrade DowngradeErrorMessage="A newer version of Product Name Removed is already installed."/> 
 
 .....

After defining our WIX configuration files, we can finally build our installer. We can do it by using batch or Power Shell script, or use Visual Studio to do it. It is because the .wixproj file it’s just normal ms-build file.

When using CI server we can simply run power-shell installation process by passing in our version number (build number, revision etc.) and other parameters we need.

This is how we can run it with PS:
WIX_installer-powershell

We can still use Visual Studio to do the same, as presented below:
WIX_installer-visualstudio

I have attached working sample below. Please don’t forget to install WIX toolset before running it. Also please check if all paths to WIX and msbuild folders are the same on your server (or use environment variables instead).

Enjoy!
MyWebsite

1 Star2 Stars3 Stars4 Stars5 Stars (1 votes, average: 5.00 out of 5)
Loading...Loading...

Deploying website files to multiple folders with exclusions

When automating deployments it is sometimes needed to create copy of your website/folder in different locations with some excluded files e.g. configuration files or temp folders.

The script below will help you to achieve that. It can be triggered automatically on your post-deployment action (possibly in your CI server) or executed manually. Script just copies all files from source folder into multiple locations, except for the files and sub-folders you specify. Files with the same names will be overridden in target locations.

Copy_websites

param (
##main paths
[string]$Source_wwwroot = "c:\inetpub\wwwroot\sourceApp",
[string]$Copy1_wwwroot = "c:\inetpub\wwwroot\copy1App",
[string]$Copy2_wwwroot = "c:\inetpub\wwwroot\copy2App",
##copy exceptions
$exclude = @("Web.config","Web.Debug.config","Web.Release.config"),
$excludeMatch = @("TempFiles","TempImages","obj")
)

if(-not(Test-Path $Source_wwwroot)) { "Source folder not found!"; return;}
if(-not(Test-Path $Copy1_wwwroot)) { "Copy1 folder not found!"; return;}
if(-not(Test-Path $Copy2_wwwroot)) { "Copy2 folder not found!"; return;}

If (-NOT ([Security.Principal.WindowsPrincipal][Security.Principal.WindowsIdentity]::GetCurrent()).IsInRole([Security.Principal.WindowsBuiltInRole] "Administrator"))
{ 
  "You need to run this script as admin!";
  sleep 3000
  return;
}

Write-Host "`n#######################`nThis script will copy files from: `n$Source_wwwroot `nto: `n$Copy1_wwwroot and`n$Copy2_wwwroot `n";

Write-Host "except files: $exclude";
Write-Host "except folders: $excludeMatch";

Read-host -prompt "`n#######################`nPress enter to start copying the files"

function CopyFiles($from, $to){
    [regex] $excludeMatchRegEx = ‘(?i)‘ + (($excludeMatch |foreach {[regex]::escape($_)}) –join “|”) + ‘’
    Get-ChildItem -Path $from -Recurse -Exclude $exclude | 
     where { $excludeMatch -eq $null -or $_.FullName.Replace($from, "") -notmatch $excludeMatchRegEx} |
     Copy-Item -Destination {
      if ($_.PSIsContainer) {
       Join-Path $to $_.Parent.FullName.Substring($from.length)
      } else {
       Join-Path $to $_.FullName.Substring($from.length)
      }
     } -Force -Exclude $exclude
 }

 "copying files for copy1..."
 CopyFiles $Source_wwwroot $Copy1_wwwroot

 "copying files for copy2..."
 CopyFiles $Source_wwwroot $Copy2_wwwroot

"Done!";
sleep 10000

Enjoy!
Copy_websites

1 Star2 Stars3 Stars4 Stars5 Stars (No Ratings Yet)
Loading...Loading...

Using Windows Azure Service Management REST API in automated tasks

Windows Azure platform gives us a lot of new possibilities starting from the ability to auto scale instances of the deployed application to performing an on demand automated changes. When handling multiple applications deployed to the cloud there is a need to automate daily processes in order to save the development time.

In this article I will show you how to automate process of creating new cloud service using Windows Azure REST API. In our example we will create custom Api helper to instantiate our request object that will be then used to invoke the Azure RestFul API procedure.

In order to access WA Api the Azure subscription password and user name is not required, all you need is the subscription ID and the management certificate. This creates the possibility to give some administrative tasks to other people in the company not necessarily having access to the subscription account.

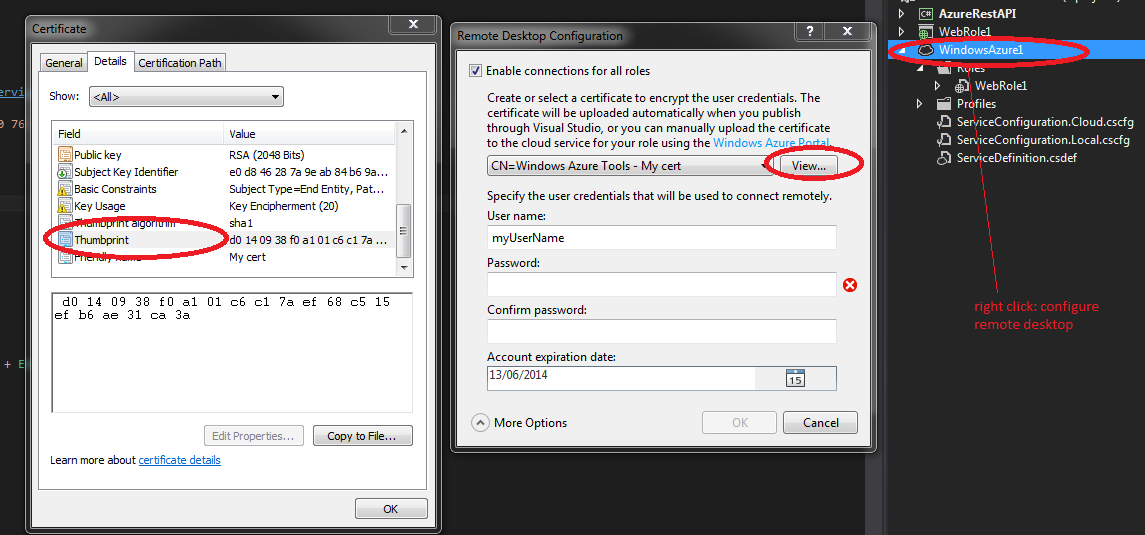
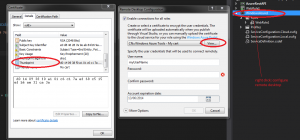
First thing to do is to create and upload management certificate into WA Management Portal. One of the ways to create certificate is to do it from within Visual Studio. In order to do that, we need to right click on our cloud project and open remote desktop configuration wizard. Next we need to select “create new” from the menu. After our certificate is created we can view it and export it to the .cer file. At this stage we also need to read the certificate’s thumb-print that will be used to find it in the local store.

The image below shows the process of configuring new RDP connection and creating new certificate

cert-config-azure

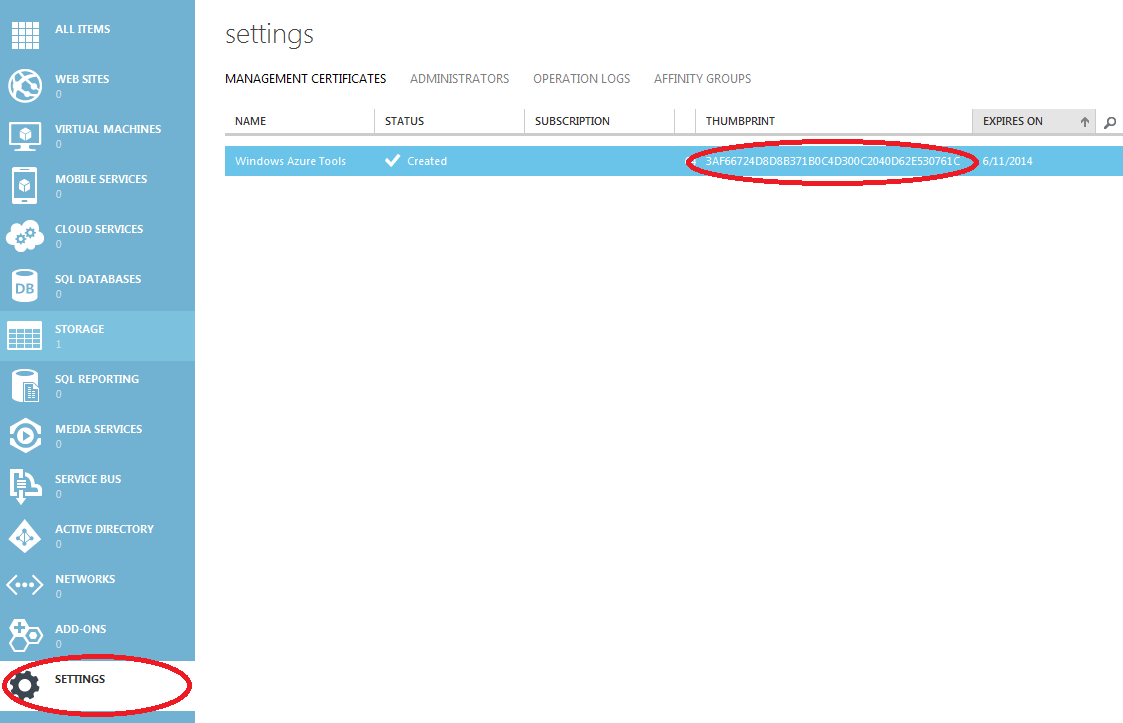
After we have created and exported certificate to the file, we can upload it to the WA Management Portal as shown below

azure-management-certificate

Please note that certificate thumb-print is the same as our local one.

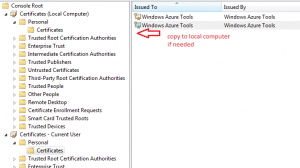
We also need to make sure that our Api helper will find the certificate in our local store. In order to check it’s location, please open Windows Management Console (mmc) and add snap-in for the current user and local computer certificates. Next you need to copy it as depicted below

certificates

At this stage we can start implementing our Api request helper. Let’s create custom PayLoadSettings class first that we will use to hold the basic request settings.

 public class PayLoadSettings
 {
    public string CloudServiceUrlFormat { get; set; }
    public string SubscriptionId { get; set; }
    public string Thumbprint { get; set; }
    public string ServiceName { get; set; }
    public string Label { get; set; }
    public string Description { get; set; }
    public string Location { get; set; }
    public string AffinityGroup { get; set; }
    public string VersionId { get; set; }
 }

Next let’s create function that retrieves our newly created (and uploaded to the WAM portal) certificate from the local machine store

/// <summary>
/// Get certificate from the local machine by thumbprint
/// </summary>
/// <returns></returns>
private X509Certificate2 GetX509Certificate()
{
    X509Certificate2 x509Certificate = null;
    var certStore = new X509Store(StoreName.My, StoreLocation.LocalMachine);
    try
    {
        certStore.Open(OpenFlags.ReadOnly);

        var x509CertificateCollection = certStore.Certificates.Find(X509FindType.FindByThumbprint, this.PayLoadSettings.Thumbprint, false);

        x509Certificate = x509CertificateCollection[0];
    }
    finally
    {
        certStore.Close();
    }

    return x509Certificate;
 }

Next, we want to create function that inserts our cert into new request object to be sent to execute remote action. We also need to set the requested Api version (not required though).

/// <summary>
/// Create http request object with the certificate added
/// </summary>
/// <param name="uri"></param>
/// <param name="httpWebRequestMethod"></param>
/// <returns></returns>
private HttpWebRequest CreateHttpWebRequest(Uri uri, string httpWebRequestMethod)
{
    var x509Certificate = GetX509Certificate();
    var httpWebRequest = (HttpWebRequest)HttpWebRequest.Create(uri);

    httpWebRequest.Method = httpWebRequestMethod;
    httpWebRequest.Headers.Add("x-ms-version", this.PayLoadSettings.VersionId);

    httpWebRequest.ClientCertificates.Add(x509Certificate);
    httpWebRequest.ContentType = "application/xml";

    return httpWebRequest;
}

Next step is to create payload document object containing the operation parameters that we want to execute. The names are self-explanatory.

/// <summary>
/// Create payload document
/// </summary>
/// <returns></returns>
private XDocument CreatePayload()
{
    var base64LabelName = Convert.ToBase64String(Encoding.UTF8.GetBytes(this.PayLoadSettings.Label));

    var xServiceName = new XElement(azureNamespace + "ServiceName", this.PayLoadSettings.ServiceName);
    var xLabel = new XElement(azureNamespace + "Label", base64LabelName);
    var xDescription = new XElement(azureNamespace + "Description", this.PayLoadSettings.Description);
    var xLocation = new XElement(azureNamespace + "Location", this.PayLoadSettings.Location);
    var xAffinityGroup = new XElement(azureNamespace + "AffinityGroup", this.PayLoadSettings.AffinityGroup);
    var createHostedService = new XElement(azureNamespace + "CreateHostedService");

    createHostedService.Add(xServiceName);
    createHostedService.Add(xLabel);
    createHostedService.Add(xDescription);
    createHostedService.Add(xLocation);
    createHostedService.Add(xAffinityGroup);

    var payload = new XDocument();
    payload.Add(createHostedService);

    payload.Declaration = new XDeclaration("1.0", "UTF-8", "no");

    return payload;
}

Having payload document created, we can send our request and retrieve request id if operation is successful.

/// <summary>
/// Invoke Api operation by sending payload object
/// </summary>
/// <param name="uri"></param>
/// <param name="payload"></param>
/// <returns></returns>
private string InvokeAPICreateRequest(string uri, XDocument payload)
{
    string requestId;
    var operationUri = new Uri(uri);

    var httpWebRequest = CreateHttpWebRequest(operationUri, "POST");

    using (var requestStream = httpWebRequest.GetRequestStream())
    {
        using (var streamWriter = new StreamWriter(requestStream, UTF8Encoding.UTF8))
        {
            payload.Save(streamWriter, SaveOptions.DisableFormatting);
        }
    }

    using (var response = (HttpWebResponse)httpWebRequest.GetResponse())
    {
        requestId = response.Headers["x-ms-request-id"];
    }

    return requestId;
}

The final function just puts it all together as follows

/// <summary>
/// Execute create cloud service request
/// </summary>
/// <returns></returns>
public string CreateCloudService()
{
    var cloudServiceUrl = string.Format(this.PayLoadSettings.CloudServiceUrlFormat, this.PayLoadSettings.SubscriptionId);
    
    var payload = CreatePayload();

    var requestId = InvokeAPICreateRequest(cloudServiceUrl, payload);

    return requestId;
}

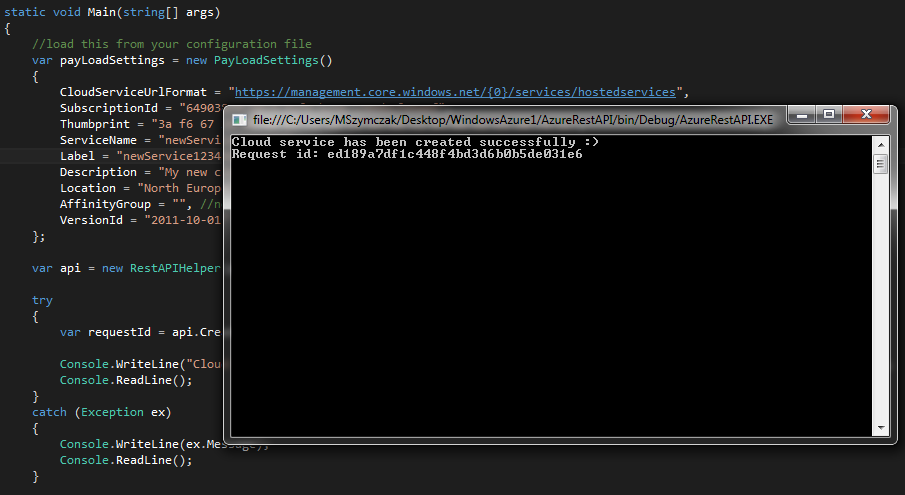
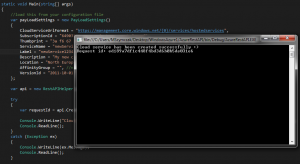
If we will invoke the code from the console, the code should look as below

 static void Main(string[] args)
 {
    //load this from your configuration file
    var payLoadSettings = new PayLoadSettings()
    {
        CloudServiceUrlFormat = "https://management.core.windows.net/{0}/services/hostedservices",
        SubscriptionId = "92533879-88c9-41fe-b24e-5251bcf49a8f",//fake subscription id - please provide yours
        Thumbprint = "3a f6 67 24 d8 d8 b3 71 b0 c4 d3 00 c2 04 0d 62 e5 30 76 1c", //fake cert thumbprint - please provide yours
        ServiceName = "newService1234567",//name your new service
        Label = "newService1234567", //give it a tracking label
        Description = "My new cloud service", //service description
        Location = "North Europe",//select centre
        AffinityGroup = "", //not created yet
        VersionId = "2011-10-01"//api version
    };

    var api = new RestAPIHelper(payLoadSettings);

    try
    {
        var requestId = api.CreateCloudService();

        Console.WriteLine("Cloud service has been created successfully :)" + Environment.NewLine + "Request id: " + requestId);
        Console.ReadLine();
    }
    catch (Exception ex)
    {
        Console.WriteLine(ex.Message);
        Console.ReadLine();
    }
}

Let’s run the console application now

cloud-service-created

After executing above we can check in WA Management Portal if the cloud service is created. This should look like image below

newcloudservice

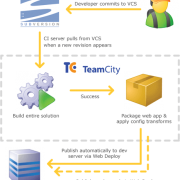
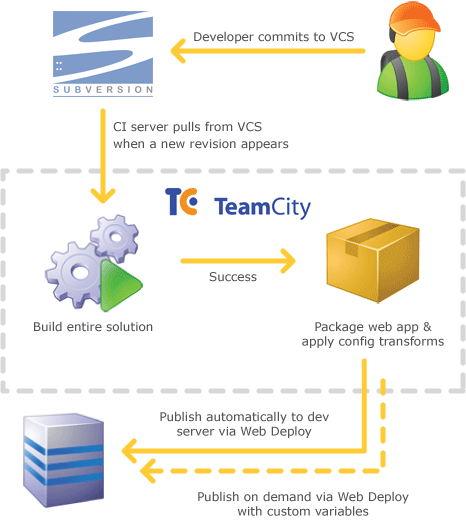
I have attached project files for your tests. Please note that you need to set your own configuration settings for it to be working. You can also use above example to create your own automated tasks for Windows Azure – simply implement other operations in similar way. You can then use for example TeamCity to run it automatically when needed. This gives you a lot of possibilities and simply saves your precious development time.

AzureRestAPI

1 Star2 Stars3 Stars4 Stars5 Stars (No Ratings Yet)
Loading...Loading...

AutoBuilds and deployment using TeamCity CI server

When developing software solutions sometimes there is a need to automate process of builds, deployments and testing tasks. One of the possible solutions is the TeamCity server. This Continuous Integration server is especially useful when managing multiple SVN branches that need to be deployed to multiple web applications when any predefined change occurs.

One of the triggers that we can use to start the build and deployment is SVN change. In this article I will show you how to configure auto build and deployment of .net web application triggered by SVN changes.

After we have installed TeamCity, we need to create project and add VCS root (I won’t be describing that as it is quite straightforward). After that we will have to define SVN trigger that detects repo changes and triggers the build. Configuration below triggers build when one of 3 developers will commit his/her changes (to the main trunk).

svntrigger

Next thing to do is to configure Visual Studio project file .csproj to auto build and deploy application on AfterBuild event task. To do it please open .csproj in notepad and add the code below:

 <PropertyGroup>
    <DeployTarget>0</DeployTarget>
    <DeployTargetFolder>\\TestServer\MyApplication</DeployTargetFolder>
    <PublishTarget>0</PublishTarget>
    <PublishFolder>..\Deployment\MyApplication</PublishFolder>
  </PropertyGroup>
  <Target Name="PublishProperties">
    <CreateProperty Value="$(PublishFolder)">
      <Output TaskParameter="Value" PropertyName="WebProjectOutputDir" />
    </CreateProperty>
    <CreateProperty Value="$(PublishFolder)\bin\">
      <Output TaskParameter="Value" PropertyName="OutDir" />
    </CreateProperty>
  </Target>
  <Target Name="WebPublish" DependsOnTargets="BeforeBuild;PublishProperties">
    <RemoveDir Directories="$(PublishFolder)" ContinueOnError="true" />
    <CallTarget Targets="ResolveReferences;_CopyWebApplication" />
  </Target>
  <Target Name="Deploy" DependsOnTargets="WebPublish">
    <CreateProperty Value="$(DeployTargetFolder)" Condition="$(DeployFolder) == ''">
      <Output TaskParameter="Value" PropertyName="DeployFolder" />
    </CreateProperty>
    <RemoveDir Directories="$(DeployFolder)" Condition="$(CleanDeploy) == 1" />
    <ItemGroup>
      <DeploymentFiles Include="$(PublishFolder)\**\*.*" />
    </ItemGroup>
    <Copy SourceFiles="@(DeploymentFiles)" DestinationFolder="$(DeployFolder)\%(RecursiveDir)" />
  </Target>
  <Target Name="AfterBuild">
    <CallTarget Targets="WebPublish" Condition="$(PublishTarget) == 1" />
    <CallTarget Targets="Deploy" Condition="$(DeployTarget) == 1" />
  </Target>

You can notice that in the PropertyGroup there are some params the build will be configured with. In our case we configure DeployTarget and PublishTarget to 0 becase we want to avoid visual studio to trigger the deployment each time we hit F5. We will override this params from the TeamCity triggered build. See the configuration below:

autobuildconfig

The whole process illustrates this diagram:
ci-build-and-deploy

P.S. If you want to run FxCop as build step, additional change is required. After installing FxCop you need to manually adjust the build agent properties in following location: C:\TeamCity\buildAgent\conf\buildAgent.properties

Following configuration needs to be added:

 system.FxCopRoot=C\:\\Program Files (x86)\\Microsoft Fxcop 10.0
 system.FxCopCmdFileVersion=10.0.30319.1
 system.WindowsSDK7.1

Otherwise you will get “no suitable Build Agent” error

Good luck with your configuration 🙂

1 Star2 Stars3 Stars4 Stars5 Stars (No Ratings Yet)
Loading...Loading...