Posts

Creating custom sound wave analysis control

The very common requirement when working with the sound files is to display and analyze the sound wave within the form element. The best way of doing that is to create custom sound wave analysis control that we can reuse throughout the multiple projects.

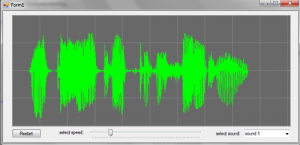
In this article I will show you how to create control that draws the wave on the form. We will use Open source nAudio dll to load sound files. Then we will perform custom drawings based on the extracted sound samples.

soundwave_analysis

Let’s create CustomWaveViewer class that inherits from UserControl. After that we have to define basic variables, the handlers and the rendering thread. The rendering thread will be used when user subscribe to our event handler wanting to take control over the rendering speed. Otherwise the control will render immediately and no additional thread is needed.

 public class CustomWaveViewer : UserControl
 {
   public delegate void OnLineDrawHandler(Point point1, Point point2);
   public event OnLineDrawHandler OnLineDrawEvent;
   private WaveStream waveStream;
   private Thread RenderThread;
    .....
}

When initiating the control we will set double buffer and basic variables. When user will call InitControl, control will be recalculated to fit to our window size.

  public CustomWaveViewer()
 {
    // This call is required by the Windows.Forms Form Designer.
    InitializeComponent();

    //use double buffer to avoid flickering
    this.DoubleBuffered = true;

    this.PenColor = Color.Lime;
    this.PenWidth = 1;
 }

 public void InitControl()
 {
    if (waveStream == null) return;

    var samples = (int)(waveStream.Length / bytesPerSample);
    startPosition = 0;
    SamplesPerPixel = samples / this.Width;
}

After the sound file is loaded we need to calculate bytesPerSample variable that depends on BitsPerSample value and the number of channels.

 public WaveStream WaveStream
 {
    get
    {
        return waveStream;
    }
    set
    {
        waveStream = value;
        if (waveStream != null)
        {
            bytesPerSample = (waveStream.WaveFormat.BitsPerSample / 8) * waveStream.WaveFormat.Channels;
        }
        this.Invalidate();
    }
}

Before we will render the lines we want to create grid lines by using following method:

 private void DrawImageGrid(System.Drawing.Graphics gfx)
 {
    int numOfCells = 30; int cellSize = (int)(gfx.ClipBounds.Height / 4);

    for (int y = 0; y < numOfCells; ++y)
    {
        gfx.DrawLine(new System.Drawing.Pen(System.Drawing.Color.Gray, 1), 0, y * cellSize, numOfCells * cellSize, y * cellSize);
    }

    for (int x = 0; x < numOfCells; ++x)
    {
        gfx.DrawLine(new System.Drawing.Pen(System.Drawing.Color.Gray, 1), x * cellSize, 0, x * cellSize, numOfCells * cellSize);
    }
}

The main method that renders the lines is the OnPaint method of our custom control. In that method we either draw the lines immediately or pass it to the other thread that user can control from the UI. See the in-line comments:

 protected override void OnPaint(PaintEventArgs e)
 {
    try
    {
        //draw grid before drawing the wave
        DrawImageGrid(e.Graphics);

        if (waveStream != null)
        {
            int bytesRead;
            var waveData = new byte[samplesPerPixel * bytesPerSample];
            waveStream.Position = startPosition + (e.ClipRectangle.Left * bytesPerSample * samplesPerPixel);
            ControlPoints.Clear();// clear points 

            using (var linePen = new Pen(PenColor, PenWidth))
            {
                for (var x = e.ClipRectangle.X; x < e.ClipRectangle.Right; x += 1)
                {
                    short low = 0;
                    short high = 0;

                    bytesRead = waveStream.Read(waveData, 0, samplesPerPixel * bytesPerSample);

                    if (bytesRead == 0) { break; }

                    for (var n = 0; n < bytesRead; n += 2)
                    {
                        var sample = BitConverter.ToInt16(waveData, n);
                        if (sample < low) { low = sample; }
                        if (sample > high) { high = sample; }
                    }

                    //calculate min and max values for the current line
                    var lowPercent = ((((float)low) - short.MinValue) / ushort.MaxValue);
                    var highPercent = ((((float)high) - short.MinValue) / ushort.MaxValue);

                    var point1 = new Point(x, (int)(this.Height * lowPercent));
                    var point2 = new Point(x, (int)(this.Height * highPercent));

                    //if event is not hoocked in, then render wave instantly
                    if (OnLineDrawEvent == null)
                    {
                        e.Graphics.DrawLine(linePen, point1, point2);
                    }
                    else
                    {
                        //save points to be used in the rendering thread
                        ControlPoints.Add(point1, point2);
                    }
                }
            }

            //abort current thead if sound has been reloaded
            if (RenderThread != null && RenderThread.IsAlive)
            {
                RenderThread.Abort();
            }

            //start rendering thread
            RenderThread = new Thread(TriggerDrawing);
            RenderThread.IsBackground = true;
            RenderThread.Start();
        }
    }
    catch (Exception)
    {
    }

    base.OnPaint(e);
}

When we pass the rendering to other thread, we simply need to trigger OnLineDrawEvent event for each line stored in our buffer (ControlPoints variable). The UI will then receive the event with the line data.

 void TriggerDrawing()
 {
    //check if the event is attached
    if (OnLineDrawEvent != null)
    {
        foreach (var pointSet in ControlPoints)
        {
            OnLineDrawEvent(pointSet.Key, pointSet.Value);//trigger event and pass the points to the UI
            Thread.Sleep(RenderDelay); //set custom delay
        }
    }
}

Our main UI methods will look as follows. After dropping our custom control on the form, we need to configure it by passing sound wave file path and attach rendering method. The RenderDelay variable will also be used by slider to dynamically control rendering speed.

 private void Form1_Load(object sender, EventArgs e)
 {
    comboBox1.SelectedIndex = 0;//select first sound

    //Attach draw event otherwise the control will render instantly
    customWaveViewer1.OnLineDrawEvent += new CustomWaveViewer.OnLineDrawHandler(customWaveViewer1_OnLineDrawEvent);

    //set initial speed - it can be configured using UI slider
    customWaveViewer1.RenderDelay = 20;

    LoadWaive();//init control
 }

 void LoadWaive()
 {
    var path = "../../sounds/" + comboBox1.Text.Last<char>().ToString() + ".wav";

    customWaveViewer1.WaveStream = new WaveFileReader(path);
    customWaveViewer1.InitControl();
 }

 //Draw the lines when the points arrive from the background thread event
 void customWaveViewer1_OnLineDrawEvent(Point point1, Point point2)
 {
    using (var gr = customWaveViewer1.CreateGraphics())
    {
        using (var linePen = new Pen(Color.Lime, 1))
        {
            gr.DrawLine(linePen, point1, point2);
        }
    }
 }

I have attached working example below for your tests. You may also use other nAudio methods to play the sound file while it’s being rendered.

SoundAnalysis

1 Star2 Stars3 Stars4 Stars5 Stars (No Ratings Yet)
Loading...Loading...

Ext.js custom loaders

If you are building applications using JavaScript frameworks and server side call-backs, you probably know how important is to show loading message to the users, especially for time consuming requests. In this article I will show you some basic methods to create custom loaders when using Ext.js.

extjs_loading

First of all we can nicely indicate loading process when starting ext.js application. It’s very simple as all we need to do is to put loading div inside the html body. When ext.js will finish loading scripts, then we simply remove that div from the page. In order to do that, we need to apply removal logic on Ext.ready event.

  // html file
 <body>
    <div id="loading-mask"></div>
    <div id="loading">
        <div class="loading-indicator">
            Loading...
        </div>
    </div>
</body>

 Ext.onReady(function () {
    setTimeout(function () { 
        Ext.get('loading').remove();  //remove element
        //fade out to get better UI experience
        Ext.get('loading-mask').fadeOut({ remove: true }); 
    }, 1250); //simulate long running process
 });

Now, let’s create basic method that applies loading mask to the element passed in

  setLoading: function (element, start, styles) {
    if (!styles) { styles = "loadingBox"; } //set default styles if not set

    if (start) {
      element.loadingMask = new Ext.LoadMask(element, { msg: "Loading...", msgCls: styles });
      element.loadingMask.show();
     }
    else {
      element.loadingMask.hide();
    }
  },

And finally, if we want to show loading message when for instance clicking the button, the following code can be applied:

{
 xtype: 'button',
 text: 'start loading',
 width: 150,
 height: 50,
 style: 'margin:50px',
 handler: function () {
    var el = this;
    me.setLoading(el, true);//show loading message

    //do you stuff here

    setTimeout(function () {
        me.setLoading(el, false); //turn it off
    }, 1000);
  }
},          

Also if you want to customize it a bit, you can do it following way:

   //simple fade-In/Out function
   fade: function (element, fadeOut) {
        if (fadeOut) {
            Ext.get(element.id).fadeOut({
                opacity: 0,
                easing: 'easeOut',
                duration: 1000,
                remove: false,
                useDisplay: false
            });
        }
        else {
            Ext.get(element.id).fadeIn({
                opacity: 1,
                easing: 'easeOut',
                duration: 1000
            });
        }
    },
  {
    xtype: 'button',
    text: 'start loading with custom styles',
    width: 250,
    height: 50,
    id: 'button2',
    style: 'margin:50px',
    handler: function () {
        var el = Ext.get('mainPanel'); //render to main panel
        me.setLoading(el, true, 'customLoader');//show loading message
        me.fade(el, true); //fade out

        //do you stuff here

        setTimeout(function () {
            me.setLoading(el, false); //turn it off
            me.fade(el, false); //fade in
        }, 1000);
    }
},

There is a lot of other ways to show custom loading messages that you can apply. I have attached sample solution for you to test different scenarios based on my example.
Ext_loading

1 Star2 Stars3 Stars4 Stars5 Stars (No Ratings Yet)
Loading...Loading...

MVC Custom View Editor Templates

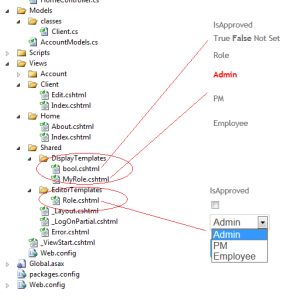
When creating MVC3 razor website it is often necessary to apply custom templates on classes or properties within the objects to be displayed seamlessly throughout your application. There is number of ways to apply custom templates, one of them is to create folders in ~/Shared/DisplayTemplates/, ~/Shared/EditorTemplates/ and create partial views based on model objects we want to style. Lets start with creating basic class structure that we will work on:

custom-templates

  public partial class Client
    {
        public int ClientId { get; set; }
        public string FirstName { get; set; }
        public string LastName { get; set; }
        public DateTime BirthDate { get; set; }
        public Address HomeAddress { get; set; }

        [UIHint("bool")]
        public bool IsApproved { get; set; }

        [UIHint("Enum")]
        public Role Role { get; set; }
    }

    public enum Role
    {
        Admin, PM, Employee
    }

    public partial class Address
    {
        public string Street { get; set; }
        public string City { get; set; }
        public string Country { get; set; }
    }

As you can see there are two properties marked with the UIHint attribute. This is one of the ways to map properties with the templates.

When displaying form we can also specify template name if we want to apply template only for selected pages.

  <div class="editor-field">
        @Html.EditorFor(model => model.IsApproved)
        @Html.ValidationMessageFor(model => model.IsApproved)
    </div>

    <div class="editor-field">
        @Html.EditorFor(model => model.Role)
        @Html.ValidationMessageFor(model => model.Role)
    </div>

This is similar when creating display templates. We can also mix the ways of assigning templates by choosing the properties attributes and template names if required.

 <div class="display-field">
        @Html.DisplayFor(model => model.IsApproved)
    </div>
    <div class="display-label">
        Role</div>
    <div class="display-field">
        @Html.DisplayFor(model => model.Role, "MyRole")
    </div>

Our editor template implementation is quite simple. For each enum value in our Role class we create list item to be shown in drop down list. We also need to ensure that we give it a proper name Role.cshtml in order for the view engine to be able to correctly identify our template.

 @model Models.classes.Role
           
   <select id="Role" name="Role">
    @foreach (Models.classes.Role value in Enum.GetValues(typeof(Models.classes.Role)))
    {
        <option value="@value" @(Model == value ? "selected=\"selected\"" : "")>@value
        </option>
    }
  </select>

Display template contains the code below. We simply mark in red the current Role value. Of course it’s only a quick sample.

 @model Models.classes.Role
 @foreach (Models.classes.Role value in Enum.GetValues(typeof(Models.classes.Role)))
 {
    if (Model == value)
    {
      <p><b style="color:Red;">@value.ToString()</b></p>;
    }
    else
    {
       <p>@value.ToString()</p>
    }
 }

If we want to override the templates located in the Shared folder, we can create folder in the view (~/Views//EditorTemplates) containing different implementation. This gives us a little bit more flexibility if we have specific requirements for an single view.

We can also create generic templates to override default rendering of build-in types like bool? We apply it also by giving the attribute to the property of our object. Following implementation displays in bold one of the 3 possible object states.

    @model bool?

    @if (ViewData.ModelMetadata.IsNullableValueType && Model == null)
    {
        @:True False <b>Not Set</b>
    }
    else if (Model.Value)
    {
        @:<b>True</b> False Not Set
    }
    else
    {
        @:True <b>False</b> Not Set
    }

MVC framework gives us a chance to override and customize pretty much of everything. We can also create our own View Engine and change the way of model binding etc.

I have included project sample below for you tests.
MVC-Custom-display-templates

1 Star2 Stars3 Stars4 Stars5 Stars (No Ratings Yet)
Loading...Loading...

Implementing MVC3 Custom Model Binders

MVC model binders simply map Http browser requests to model objects. Normally if action invoker is unable to find the proper binder of the provided type, it uses built-in binder class: DefaultModelBinder. Default model binder is using following sources to bind to model object: Request.Form, RouteData.Values, Request.QueryString, Request.Files. The search for values is also done in same order.

We can include and exclude bindings for some object properties in action method or in class attribute.

 public ActionResult Create([Bind(Include="FirstName, LastName")] Client client) {

 //or in our class
 [Bind(Exclude="IsApproved")]
 public class Client {

In our example we will bind the model manually. This gives us more controls on how the model objects are instantiated and helps if we are using dependency resolver.

 [HttpPost]
  public ActionResult Edit(int id, FormCollection collection)
  {
        try
        {
            // TODO: Add update logic here
            //client client = (client)DependencyResolver.Current.GetService(typeof(client));
            var client = new Client();

            UpdateModel(client, collection);

            return RedirectToAction("Index");
        }
        catch
        {
            return View();
        }
    }

Below is our custom model binder implementation. Please note that the binder class needs to inherit from IModelBinder interface. In the example, we simple check if model exists or use dependency resolver to provide one. Next we are getting prefixes and values from BindingContext.ValueProvider property, that gives us all consolidates value providers we can read from. Please note that we didn’t include any validation logic.

  public class ClientModelBinder : IModelBinder
  {

   public object BindModel(ControllerContext controllerContext, ModelBindingContext bindingContext)
    {
        // check if model to update exists and create one if not
        Client model = (Client)bindingContext.Model ?? (Client)DependencyResolver.Current.GetService(typeof(Client));

        // check if the value provider has the required prefix
        bool hasPrefix = bindingContext.ValueProvider.ContainsPrefix(bindingContext.ModelName);

        string searchPrefix = (hasPrefix && !string.IsNullOrEmpty(bindingContext.ModelName)) ? bindingContext.ModelName + "." : "";

        // populate the fields of the model object
        model.ClientId = int.Parse(GetValue(bindingContext, searchPrefix, "ClientId"));
        model.FirstName = GetValue(bindingContext, searchPrefix, "FirstName");
        model.LastName = GetValue(bindingContext, searchPrefix, "LastName");
        model.BirthDate = DateTime.Parse(GetValue(bindingContext, searchPrefix, "BirthDate"));
        model.IsApproved = GetCheckedValue(bindingContext, searchPrefix, "IsApproved");
        model.Role = (Role)Enum.Parse(typeof(Role), GetValue(bindingContext, searchPrefix, "Role"));

        return model;
    }
 }

Next step is to register our custom binder. We can do it either in the global file or by giving attribute to our Client class.

  protected void Application_Start()
  {
        AreaRegistration.RegisterAllAreas();

        ModelBinders.Binders.Add(typeof(Client), new ClientModelBinder());

        RegisterGlobalFilters(GlobalFilters.Filters);
        RegisterRoutes(RouteTable.Routes);
    }

  //or
  [ModelBinder(typeof(ClientModelBinder))]
  public class Client
   {

You can also implement your own model binder provider which is very useful when handling multiple custom class binders.

 public class CustomModelBinderProvider : IModelBinderProvider 
 {
   public IModelBinder GetBinder(Type modelType) 
   {
      //return or apply the switch with other model type binders
      return modelType == typeof(Client) ? new ClientModelBinder() : null;
   }
 }

 //you can register provider in global app start method
 ModelBinderProviders.BinderProviders.Add(new CustomModelBinderProvider());

I have included application sample, so you can test how it works by setting the break point in the binding function and see how the model values are being retrieved.
CustomModelBinder

1 Star2 Stars3 Stars4 Stars5 Stars (No Ratings Yet)
Loading...Loading...

Creating MVC3 Custom View Engine

MVC it’s so great and flexible framework that even lets you create your own custom view engine if you need to replace Razor’s default rendering. You will probably not need this but we I will show you how to do it.

In our example we simply display all view data that are available during http request. Lets create our debug class that inherits from IView interface. In the Render function we simply use textwriter to display request data. The code looks as follows:

 public class DebugDataView : IView
 {
    public void Render(ViewContext viewContext, TextWriter writer)
    {
        Write(writer, "---Routing Data---");
        foreach (string key in viewContext.RouteData.Values.Keys)
        {
            Write(writer, "Key: {0}, Value: {1}",
            key, viewContext.RouteData.Values[key]);
        }

        Write(writer, "---View Data---");
        foreach (string key in viewContext.ViewData.Keys)
        {
            Write(writer, "Key: {0}, Value: {1}", key,
            viewContext.ViewData[key]);
        }
    }

    private void Write(TextWriter writer, string template, params object[] values)
    {
        writer.Write(string.Format(template, values) + "<p/>");
    }
}

Next we need to create our debug view engine class that inherits from IViewEngine interface. In FindView function, if our view name is found, we simply apply our own view style by passing in the instance of DebugDataView class that we have implemented earlier.

 public class DebugDataViewEngine : IViewEngine
 {
    public ViewEngineResult FindView(ControllerContext controllerContext, string viewName, string masterName, bool useCache)
    {
        if (viewName == "DebugData")
        {
            return new ViewEngineResult(new DebugDataView(), this);
        }
        else
        {
            return new ViewEngineResult(new string[] { "Debug Data View Engine" });
        }
    }

    public ViewEngineResult FindPartialView(ControllerContext controllerContext, string partialViewName, bool useCache)
    {
        return new ViewEngineResult(new string[] { "Debug Data View Engine" });
    }

    public void ReleaseView(ControllerContext controllerContext, IView view)
    {
        // no action here
    }
}

The last step is to register our custom engine in the Application_Start() function.

 protected void Application_Start()
    {
        AreaRegistration.RegisterAllAreas();

        ViewEngines.Engines.Add(new DebugDataViewEngine());

        RegisterGlobalFilters(GlobalFilters.Filters);
        RegisterRoutes(RouteTable.Routes);
    }

Download the sample below to see how it works.
CustomViewEngine

1 Star2 Stars3 Stars4 Stars5 Stars (No Ratings Yet)
Loading...Loading...