Building EXT.JS MVC applications

Exj.js it’s very powerful framework that is based entirely on JavaScript using Ajax, DHTML and DOM scripting. Originally built as YUI extension, ext.js is getting more and more popular recently thanks to cross-browser compatibility and ability to easily implement solutions on mobile devices using Sencha Touch.
To fully unleash the power of Ext.js it needs to be implemented along with one of the well known server side technologies such as asp.net, php etc.

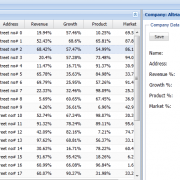
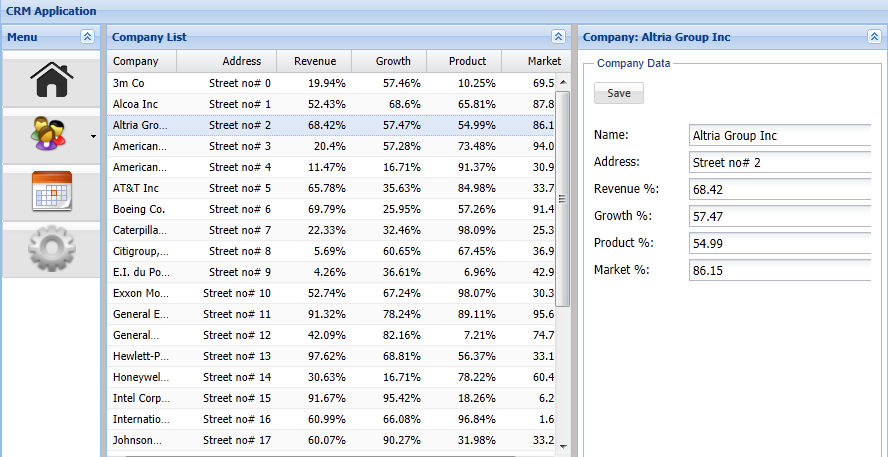
As a example we will build simple CRM application that displays and manages client’s entities.
ext.js_crm

Using Ext.js MVC pattern is very popular in conjunction with asp.net restful services. In this situation Ext.js simply executes ajax requests that are being routed to asp.net controllers that send back json response to be processed on the client side by ext.js.

Lets define basic MVC structure.

extjs_mvc

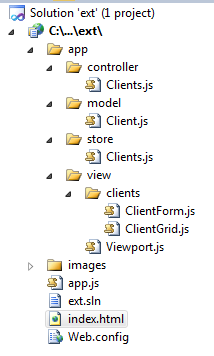
Having MVC structure ready, the first thing to do is to create model, view and controller for the entity we are going to implement. In our case we will implement Client entity. This will allow us to list, add end edit clients that we load to our store.

Let’s define our model by defining property names and it’s types. Non defined type means the the auto type will be applied (the type will be inferred from the property value at runtime).

  Ext.define('ExtMVC.model.Client', {
    extend: 'Ext.data.Model',
    fields: [
        {name: 'name'},
        {name: 'address'},
        {name: 'revenue', type: 'float'},
        {name: 'growth',  type: 'float'},
        {name: 'product', type: 'float'},
        {name: 'market',  type: 'float'}
    ]
});

We will define our client store as array store, so we can quickly add and display client list.

  Ext.define('ExtMVC.store.Clients', {
    extend: 'Ext.data.ArrayStore',
    model: 'ExtMVC.model.Client'
});

In our controller we need to define the model, store and views that we will be referencing.

  Ext.define('ExtMVC.controller.Clients', {
    extend: 'Ext.app.Controller',

    models: ['Client'],

    stores: ['Clients'],

    views: [ 
        'clients.ClientForm'
    ],
    ........

We also need to load controller when application starts. We can also load controller dynamically at any time during application lifetime.

 Ext.application({
    name: 'ExtMVC',

    controllers: [
        'Clients'
    ],

    autoCreateViewport: true
 });

 or

 var controller = Ext.create(this.getModuleClassName('Clients', 'controller'), {
 this.controllers.add(controller);

Last thing to do is to extend view port class and define startup objects to be displayed when application starts.

 Ext.define('ExtMVC.view.Viewport', {
    extend: 'Ext.Viewport',       
    layout: 'fit',   
    requires: [
        'ExtMVC.view.clients.ClientForm',
        'ExtMVC.view.clients.ClientGrid',
    ],
    
    initComponent: function() {
        var me = this;      
        Ext.apply(me, {
            items: [
                {
                    xtype: 'clientform'
                }
            ]
        });
                
        me.callParent(arguments);
    }
 });

ext_mvc

1 Star2 Stars3 Stars4 Stars5 Stars (No Ratings Yet)
Loading...Loading...

Handling DataGrid row events

When creating user interface the common situation is to handle datagrid row event in response to user action. Example of that is changing dropdown list value and refreshing row information without reloading the whole datagrid.
For instance if we have a datagrid with the products containing dropdown list with the clients in each row, we can allow the user to change datagrid row data separately without resetting other datagrid rows.

In our example we will build the simple datagrid with the products that will allow us to select and send voucher codes to the clients with total purchase exceeding certain level in product category.

grid-row-event

Lets start with creating basic class structures:

 public class Client
 {
    public Client(){}
    public int ID { get; set; }
    public string Name { get; set; }
    public IList<Product> Products { get; set; }
 }
  
 public class Product
 {
    public Product() { }
    public int ID { get; set; }
    public int CatID { get; set; }
    public string Name { get; set; }
    public double Price { get; set; }
 }

After creating new asp.net website project with default.aspx page, we need to add some dummy data in page load event (to be replaced with the database data). We cerate product list and assign product categories to it. And finally create client list and assign products they bought.

We use LINQ to quickly load products to client objects “p => p.Price > 10” – this will load products with the price greater than 10.

  protected void Page_Load(object sender, EventArgs e)
   {
        if (!IsPostBack)
        {
            #region mock data
            productList.Clear();
            clientList.Clear();

            productList.Add(new Product() { ID = 1, CatID = 1, Name = "product1", Price = 22 });
            productList.Add(new Product() { ID = 2, CatID = 3, Name = "product2", Price = 32 });
            productList.Add(new Product() { ID = 3, CatID = 1, Name = "product3", Price = 42 });
            productList.Add(new Product() { ID = 4, CatID = 3, Name = "product4", Price = 62 });
            productList.Add(new Product() { ID = 5, CatID = 2, Name = "product5", Price = 12 });
            productList.Add(new Product() { ID = 6, CatID = 2, Name = "product6", Price = 62 });
            productList.Add(new Product() { ID = 7, CatID = 4, Name = "product7", Price = 82 });
            productList.Add(new Product() { ID = 8, CatID = 4, Name = "product8", Price = 22 });

            clientList.Add(new Client() { ID = 1, Name = "client1",
                           Products = productList.Where(p => p.Price > 10).ToList() });
            clientList.Add(new Client() { ID = 2, Name = "client2",
                            Products = productList.Where(p => p.Price > 30).ToList() });
            clientList.Add(new Client() { ID = 3, Name = "client3",
                            Products = productList.Where(p => p.Price > 60).ToList() });
            clientList.Add(new Client() { ID = 4, Name = "client4",
                           Products = productList.Where(p => p.Price > 80).ToList() });
            clientList.Add(new Client() { ID = 5, Name = "client5",
                           Products = productList.Where(p => p.Price > 40).ToList() });
            #endregion

            ///////////////
            gridList.DataSource = productList;
            gridList.DataBind();
        }
    }

Once we have data loaded into our datagrid, we need to create client lists in each row. We will do it in gridList_RowDataBound event. What we do is simply finding the dropdown list in each row and bind the client list to it.
When binding dropdown lists we use custom object created on the fly using LINQ – see my previous articles to get description of that process.

  protected void gridList_RowDataBound(object sender, System.Web.UI.WebControls.GridViewRowEventArgs e)
   {
        if (e.Row.RowType == System.Web.UI.WebControls.DataControlRowType.DataRow)
        {
            var ddlClients = e.Row.FindControl("ddlClients") as DropDownList;

            ddlClients.DataSource = (from obj in clientList
                                     select new
                                     {
                                         ID = obj.ID,
                                         Name = string.Format("{0} [prod. {1}]", obj.Name, obj.Products.Count())
                                     }).ToList().OrderByDescending(a => a.Name).ThenBy(a => a.ID);

            ddlClients.DataTextField = "Name";
            ddlClients.DataValueField = "ID";
            ddlClients.DataBind();

            RenderGridRow(e.Row);
        }
   }

Our next step is to create selected index changed event for the client lists in the datagrid. Every time someone will change the client, the corresponding datagrid row will be updated.

   protected void dropdownlist_SelectedIndexChanged(object sender, EventArgs e)
    {
        GridViewRow gridRow = (GridViewRow)(((System.Web.UI.Control)sender).NamingContainer);
        gridList.SelectedIndex = gridRow.RowIndex;// highlight the current the row

        RenderGridRow(gridRow);
    }

In our case we will render datagrid row as follows:

  void RenderGridRow(GridViewRow row)
    {
        var catID = (row.FindControl("ctrlCatID") as HiddenField).Value;
        var ddlClients = row.FindControl("ddlClients") as DropDownList;
        var ltrTotal = row.FindControl("ltrTotal") as Literal;
        var btnSendVoucher = row.FindControl("btnSendVoucher") as Button;
        ///////////////////
        btnSendVoucher.CommandArgument = ddlClients.SelectedItem.Value.ToString();// we use it as alternative

        var items = clientList.Find(e => e.ID.ToString() == ddlClients.SelectedItem.Value.ToString())
            .Products.Where(p => p.CatID.ToString() == catID.ToString());

        var total = items.Any() ? items.Sum(p => p.Price) : 0;

        ltrTotal.Text = total > 0 ? total.ToString("C") : "no products bought in this category";
    }

The final step is to handle send voucher button event:

  protected void btnSendVoucher_OnClick(object sender, EventArgs e)
   {
        GridViewRow gridRow = (GridViewRow)(((System.Web.UI.Control)sender).NamingContainer);
        //or use
        //var clientID = ((Button)sender).CommandArgument;

        var txtVoucher = gridRow.FindControl("txtVoucher") as TextBox;
        var ddlClients = gridRow.FindControl("ddlClients") as DropDownList;

        var clientID = ddlClients.SelectedItem.Value.ToString();
        var voucher = txtVoucher.Text;

        //send voucher to client here
    }

That’s it. I have attached working example below. Feel free to play with it 🙂
gridViewEvent

1 Star2 Stars3 Stars4 Stars5 Stars (No Ratings Yet)
Loading...Loading...

Silverlight component with chart

If you ever wanted to create your own Silverlight component, this is a good place to start. In this article I will show you how to create simple component displaying salary data on the chart.

In our example the data are being stored in the application but you can easily call a web service to display the it from the different server.

silverligt-component

After creating new silverlight project in Visual Studio we start from creating basic class structure that we will bind to our chart.

  public class NumericItemPair
    {
        public string Name { get; set; }
        public double Value { get; set; }
    }

    public class ProfessionItem
    {
        public string Name { get; set; }
        public double AVG { get; set; }
        public List<NumericItemPair> DataPoints = new List<NumericItemPair>();
    }

In our example we will get some dummy data based on user selection (drop down branch list). This data can be retrieved from database or web service. Please note that we will display aggregates based on 2 deciles; lower and upper and the median value.

  public class MyDataContext
    {
        public static ProfessionItem getData(int branch)
        {
            ProfessionItem itm = new ProfessionItem();
            if (branch == 0)
            {
                itm.AVG = 2332;
                itm.Name = "IT";
                itm.DataPoints = new List<NumericItemPair>();
                itm.DataPoints.Add(new NumericItemPair() { Name = "Lower decile", Value = 1567 });
                itm.DataPoints.Add(new NumericItemPair() { Name = "Median", Value = 1789 });
                itm.DataPoints.Add(new NumericItemPair() { Name = "Upper decile", Value = 2400 });
            }
            else if (branch == 1)
            {
                itm.AVG = 2132;
                itm.Name = "Production";
                itm.DataPoints = new List<NumericItemPair>();
                itm.DataPoints.Add(new NumericItemPair() { Name = "Lower decile", Value = 1267 });
                itm.DataPoints.Add(new NumericItemPair() { Name = "Median", Value = 1589 });
                itm.DataPoints.Add(new NumericItemPair() { Name = "Upper decile", Value = 2700 });
            }
            else
            {
                itm.AVG = 2532;
                itm.Name = "HR";
                itm.DataPoints = new List<NumericItemPair>();
                itm.DataPoints.Add(new NumericItemPair() { Name = "Lower decile", Value = 1167 });
                itm.DataPoints.Add(new NumericItemPair() { Name = "Median", Value = 1289 });
                itm.DataPoints.Add(new NumericItemPair() { Name = "Upper decile", Value = 1900 });
            }
            return itm;
        }
    }

Having done that we need to style our chart and assign bindings.

    ProfessionItem pit = MyDataContext.getData(cmbBranches.SelectedIndex);

    chart1.Title = "Branch: " + pit.Name;
    lblAVG.Content = pit.AVG.ToString("# ###") + " GBP ";

    LineSeries lineSeries = new LineSeries();
    //assign binding
    lineSeries.SetBinding(LineSeries.ItemsSourceProperty, new Binding());
    lineSeries.DependentValueBinding = new Binding("Value");
    lineSeries.IndependentValueBinding = new Binding("Name");

    // hide the legend 
    Style legendStyle = new Style(typeof(Legend));
    legendStyle.Setters.Add(new Setter(Legend.VisibilityProperty, Visibility.Collapsed));
    legendStyle.Setters.Add(new Setter(Legend.WidthProperty, 0));
    legendStyle.Setters.Add(new Setter(Legend.HeightProperty, 0));
    chart1.LegendStyle = legendStyle;

    Style titleStyle = new Style(typeof(Title));
    titleStyle.Setters.Add(new Setter(Title.ForegroundProperty, "#0004BD"));
    titleStyle.Setters.Add(new Setter(Title.FontSizeProperty, 12));
    titleStyle.Setters.Add(new Setter(Title.FontWeightProperty, "bold"));
    titleStyle.Setters.Add(new Setter(Title.HorizontalAlignmentProperty, "left"));
    chart1.TitleStyle = titleStyle;

    // hide the line series data points 
    Style datapointStyle = new Style(typeof(DataPoint));
    datapointStyle.Setters.Add(new Setter(DataPoint.VisibilityProperty, Visibility.Visible));
    datapointStyle.Setters.Add(new Setter(DataPoint.WidthProperty, 10));
    datapointStyle.Setters.Add(new Setter(DataPoint.HeightProperty, 10));
    datapointStyle.Setters.Add(new Setter(DataPoint.DependentValueStringFormatProperty, "{0:# ###} GBP"));

    lineSeries.DataPointStyle = datapointStyle;

    chart1.Series.Add(lineSeries);
    chart1.DataContext = pit.DataPoints;

Next we need to set up our xaml file to position elements within our component. We can do it manually or using Visual Studio design editor.

    <toolkit:Chart HorizontalAlignment="Left" Margin="15,0,0,346" Name="chart1"  Title="" VerticalAlignment="Bottom" Width="480" Height="370" UseLayoutRounding="True" BorderThickness="0" FontSize="11" Grid.ColumnSpan="2" Padding="10" Grid.RowSpan="2">
            <toolkit:Chart.LegendStyle >
                <Style TargetType="toolkit:Legend">
                    <Setter Property="Visibility" Value="Collapsed"/>
                </Style>
            </toolkit:Chart.LegendStyle>
            
            <!--Set X-Axis Format-->
            <toolkit:Chart.Axes>
                <toolkit:LinearAxis Orientation="Y" ShowGridLines="True" Title="Salary [GBP]" >
                    <toolkit:LinearAxis.AxisLabelStyle>
                        <Style TargetType="toolkit:AxisLabel">
                            <Setter Property="StringFormat" Value="{}{0:# ###} GBP"/>
                        </Style>
                    </toolkit:LinearAxis.AxisLabelStyle>
                </toolkit:LinearAxis>

                <toolkit:LinearAxis Orientation="X" ShowGridLines="False" Title="Salary range [%]" >
                    <toolkit:LinearAxis.AxisLabelStyle>
                        <Style TargetType="toolkit:AxisLabel">
                            <Setter Property="StringFormat" Value="{}{0:0%}"/>
                        </Style>
                    </toolkit:LinearAxis.AxisLabelStyle>
                </toolkit:LinearAxis>
            </toolkit:Chart.Axes>
        </toolkit:Chart>

After that we can test our application. I have included working example below. Happy coding 🙂

Silverlight-component

1 Star2 Stars3 Stars4 Stars5 Stars (No Ratings Yet)
Loading...Loading...

Database driven rotating image gallery with jQuery

When building database driven websites sometimes there is a need to display image gallery based on pictures stored in database. Good solution for that is to combine jQuery scripts with asp.net controls. Today I will show you how to build simple database driven gallery with auto rotating pictures.

picture-gallery

In our example the pictures will be stored in application folder, we will only get picture urls from db.

Let’s start with creating simple asp.net website with the default.aspx page. Next we will create Photos class and bind it to the asp.net data list view control.

 public partial class gallery_Default : System.Web.UI.Page
 {
    public List<Photo> Photos = new List<Photo>();// our data source
    //our custom picture class
    public class Photo
    {
        public string Name { get; set; }
        public string Path { get; set; }
        public bool IsDefault { get; set; }
    }

    protected void Page_Load(object sender, EventArgs e)
    {
        if (!IsPostBack)
        {
            //get it from database
            Photos.Add(new Photo() { IsDefault = true, Name = "photo1", Path = "~/images/1.jpg" });
            Photos.Add(new Photo() { Name = "photo2", Path = "~/images/2.jpg" });
            Photos.Add(new Photo() { Name = "photo3", Path = "~/images/3.jpg" });
            Photos.Add(new Photo() { Name = "photo4", Path = "~/images/4.jpg" });
            Photos.Add(new Photo() { Name = "photo5", Path = "~/images/5.jpg" });
            Photos.Add(new Photo() { Name = "photo6", Path = "~/images/6.jpg" });
            /////////////

            gridList.DataSource = Photos;
            gridList.DataBind();
        }
    }
 }

In the page markup we create following structure

  <div class="gallery">
        <div class="thumb-image-frame">
            <span class="thumb-image-wrapper">
                <img id='thumb-large-image' alt="" />
            </span>
        </div>
        <div class="list">
            <asp:ListView runat="server" ID="gridList">
                <LayoutTemplate>
                    <ul class="thumb-list">
                        <asp:PlaceHolder runat="server" ID="itemPlaceHolder" />
                    </ul>
                </LayoutTemplate>
                <ItemTemplate>
                    <li>
                        <a class="thumb-link">
                            <img class="thumb-image" src='<%# ResolveUrl(Eval("Path").ToString()) %>' alt="" title='<%# Eval("Name") %>' />
                        </a>
                    </li>
                </ItemTemplate>
            </asp:ListView>
        </div>
    </div>

Next we need to create jQuery script that will run when page loads. In our example, slides start to rotate with the 5 seconds intervals. Rotating stops when user’s cursor enters the thumbnail area and resumes on mouseleave event. You can configure below script to suit your needs.

 var run = true; //init state rotate or not
 var rotateDelay = 5000; //in milliseconds
 /////////
 var all = 0;
 var c = 1;

$(document).ready(function () {
    $("a.thumb-link").click(thumbClicked);
    $("ul.thumb-list").children("li").first().find("a.thumb-link").click();

    // rotate calls
    $("ul.thumb-list").mouseenter(stopRotate).mouseleave(startRotate); //stop/start rotating on mouse enter/ leave (thumb list)
    all = $("ul.thumb-list").children("li").length; //get total images count

    if (all > 1) { setInterval('Rotate()', rotateDelay); } //if more than one picture start rotating
});

function thumbClicked() {
    var imageSource = $(this).find("img.thumb-image").attr("src");
    $("#thumb-large-image").fadeOut("fast", function () {
        $("#thumb-large-image").attr("src", imageSource);// switch the picture
        $("#thumb-large-image").fadeIn("fast");
    });

    $("ul.thumb-list").children("li").removeClass("selected");
    $(this).parent("li").addClass("selected");//select current thumb
}

function stopRotate() { run = false; }

function startRotate() { run = true; }

function Rotate() {
    if (!run) { return; }//return if turned off
    if (c >= all) { c = 0; } //reset if last picture

    var cnt = 0;
    $("ul.thumb-list").children("li").each(function () {
        if (cnt == c) {
            var el = $(this);
            el.find("a.thumb-link").click();
        }
        cnt = cnt + 1;
    });

    c = c + 1;
 };

At the end we only need to set some css styles for the gallery and we are ready to test it.

 ul.thumb-list { width: 400px; padding:0px; }
 ul.thumb-list li { display:inline-block;  }
 ul.thumb-list li a.thumb-link { display: inline-block; cursor: pointer; }
 ul.thumb-list li a.thumb-link img.thumb-image { width: 110px; height: 90px; padding: 7px; border: 2px  solid white;border-radius: 8px; }
 ul.thumb-list li.selected a.thumb-link img.thumb-image { border-color: #df7777;}
 .thumb-image-frame { width: 400px; min-width: 400px; height: 300px; min-height: 300px; text-align: center; margin-bottom: 10px; }
 .thumb-image-wrapper { line-height: 300px; }
 #thumb-large-image { height: 300px; min-height: 300px; width: 400px; min-width: 400px; vertical-align: middle;border-radius: 8px;}

As you can see creating custom image gallery is quite easy to do using jQuery and asp.net. You can of course create variety of additional functions to it e.g. animations when switching the pictures, custom play and pause menu etc.

I have included working example below. Feel free to adjust it to your needs.

jquery-gallery

1 Star2 Stars3 Stars4 Stars5 Stars (No Ratings Yet)
Loading...Loading...

Finding the distance between two addresses using Google API

There are number of cases when you will need to calculate the distance between two addresses in your application. For example when building an social website or CRM solution. Calculating the distance between the addresses has never been so easy thanks to Google geolocation API. The API is available for free but it has the limit of 2500 requests per day, you can always buy the business version if your service gets more popular.

geolocation

Lets start with building the empty asp.net website. After creating basic UI controls we can implement the back end of our application. We will use Json serialization when getting response from API so we need to prepare serialization function and geolocation response class.

 public static T FromJSON<T>(string json)
 {
     JavaScriptSerializer jss = new JavaScriptSerializer();

     return jss.Deserialize<T>(json);
  }

We will use data contracts to deserialize Json response to our class

 [DataContract(Namespace = "")]
 public class GeocodeResponse
 {
    [DataMember(Name = "status", Order = 1)]
    public string Status { get; set; }

    [DataMember(Name = "result", Order = 2)]
    public List<Result> Results { get; set; }

    [DataContract(Name = "result", Namespace = "")]
    public class Result
    {
        [DataMember(Name = "geometry")]
        public CGeometry Geometry { get; set; }

        [DataContract(Name = "geometry", Namespace = "")]
        public class CGeometry
        {
            [DataMember(Name = "location")]
            public CLocation Location { get; set; }

            [DataContract(Name = "location", Namespace = "")]
            public class CLocation
            {
                [DataMember(Name = "lat", Order = 1)]
                public double Lat { get; set; }
                [DataMember(Name = "lng", Order = 2)]
                public double Lng { get; set; }
            }
        }
    }
 }

To get Json object from API we need to send request and read response from it.

 public static string WebRequestJson(string url)
 {
    var response = string.Empty;

    StreamWriter requestWriter;

    var webRequest = System.Net.WebRequest.Create(url) as HttpWebRequest;
    if (webRequest != null)
    {
        webRequest.Method = "POST";
        webRequest.ServicePoint.Expect100Continue = false;
        webRequest.Timeout = 99000;

        webRequest.ContentType = "application/json";
        //POST the data.
        using (requestWriter = new StreamWriter(webRequest.GetRequestStream()))
        {
            requestWriter.Write("");
        }
    }

    HttpWebResponse resp = (HttpWebResponse)webRequest.GetResponse();
    using (Stream resStream = resp.GetResponseStream())
    {
        using (StreamReader reader = new StreamReader(resStream))
        {
            response = reader.ReadToEnd();
        }
    }

    return response;
 }

In our main function we are getting Json objects from API by making request to Google and passing address in request URL. Having Json objects for each address we deserialize it to our GeocodeResponse class. In this step we can check response if it is valid or contains only one location for one provided address.

 public static double GetDistance(string address1, string address2, DistanceUnit unit)
 {
    //make jason requests to google api
    string json1 = WebRequestJson(
        string.Format("https://maps.googleapis.com/maps/api/geocode/json?address={0}&sensor=false", address1)
        );
    string json2 = WebRequestJson(
        string.Format("https://maps.googleapis.com/maps/api/geocode/json?address={0}&sensor=false", address2)
        );

    //deserialize json to GeocodeResponse object
    var loc1 = FromJSON<GeocodeResponse>(json1);
    var loc2 = FromJSON<GeocodeResponse>(json2);

    //check is response is ok
    if (loc1.Status != "OK" || loc2.Status != "OK") { return -1; }

    //check if only one location found for each address
    //if (loc1.Results.Count > 1 || loc2.Results.Count > 1) { return -2; }

    //copy coordinate values
    var pos1 = new Coordinate()
    {
        Latitude = loc1.Results.First().Geometry.Location.Lat,
        Longitude = loc1.Results.First().Geometry.Location.Lng
    };
    var pos2 = new Coordinate()
    {
        Latitude = loc2.Results.First().Geometry.Location.Lat,
        Longitude = loc2.Results.First().Geometry.Location.Lng
    };

    //return distance in unit
    return CalculateDistance(pos1, pos2, unit);
}

When we have the final coordinates (latitude and longitude) for each address, we can now calculate the distance in the specified unit. We take the earth’s radius into account- the rest it’s just the pure mathematics.

  public static double CalculateDistance(Coordinate pos1, Coordinate pos2, DistanceUnit unit)
    {
        var R = 6371;//default in km

        switch (unit)
        {
            case DistanceUnit.Miles:
                R = 3960; break;
            case DistanceUnit.Kilometers:
                R = 6371; break;
            case DistanceUnit.Meters:
                R = 6371000; break;
        }

        //get location difference and convert to radians
        var dLat = DegreeToRadian(pos2.Latitude - pos1.Latitude);
        var dLon = DegreeToRadian(pos2.Longitude - pos1.Longitude);

        //calculate distance
        var a = Math.Sin(dLat / 2) * Math.Sin(dLat / 2) +
            Math.Cos(DegreeToRadian(pos1.Latitude)) *
            Math.Cos(DegreeToRadian(pos2.Latitude)) *
            Math.Sin(dLon / 2) * Math.Sin(dLon / 2);

        var c = 2 * Math.Asin(Math.Min(1, Math.Sqrt(a)));

        var d = R * c;//convert to unit

        return d;
    }

When we have all implementation done, we can finally test our application. I have included complete working application for your tests.

Geolocation

1 Star2 Stars3 Stars4 Stars5 Stars (No Ratings Yet)
Loading...Loading...

OpenXML Word templates processing

Office Open XML it’s the Microsoft’s zipped-xml based standard for processing Office documents. It allows to create, amend and process MS office files using e.g. .Net platform. In this article I will show you how to replace Word template with text and images using C# based application.

After creating new project we need to add two main references: DocumentFormat.OpenXml from DocumentFormat.OpenXml.dll and WindowsBase (.Net reference). Next, we need to prepare template with placeholders that our application will replace. For texts we will insert placeholder values in the the unique format that we can find parsing the document e.g. [#Project-Name#].

For the images we need to insert image placeholders (other images) and just remember their original names (e.g. myPicture2.jpg). This names needs to be provided in the parameter objects so we can find the placeholders by image name when parsing document.

word-template-300x184

The next step is to create parameters structure that we will use when processing the document. You may want to create your own parameters depending or your requirements.

  public class WordParameter
    {
        public string Name { get; set; }
        public string Text { get; set; }
        public FileInfo Image { get; set; }
    }

We will use them as follows when initiating the objects

    var templ = new WordTemplate();
    //add parameters
    templ.WordParameters.Add(new WordParameter() { Name = "[#Project-Name#]", Text = "Test project 123" });
    templ.WordParameters.Add(new WordParameter() { Name = "[#Features (string[])#]", Text = "Lorem Ipsum is simply dummy text of the printing \n Lorem Ipsum is simply dummy text of the printing \n Lorem Ipsum is simply dummy text of the printing..." });

    //original image names to be replaced with the new ones
    templ.WordParameters.Add(new WordParameter() { Name = "1.jpg", Image = new FileInfo(WordTemplate.GetRootPath() + @"\Images\1.jpg") });
    templ.WordParameters.Add(new WordParameter() { Name = "2.jpg", Image = new FileInfo(WordTemplate.GetRootPath() + @"\Images\2.jpg") });
    templ.WordParameters.Add(new WordParameter() { Name = "3.jpg", Image = new FileInfo(WordTemplate.GetRootPath() + @"\Images\3.jpg") });
    templ.WordParameters.Add(new WordParameter() { Name = "4.jpg", Image = new FileInfo(WordTemplate.GetRootPath() + @"\Images\4.jpg") });
    templ.WordParameters.Add(new WordParameter() { Name = "5.jpg", Image = new FileInfo(WordTemplate.GetRootPath() + @"\Images\5.jpg") });

    templ.ParseTemplate(); //create document from template

Having done that we can create our main function that parses the template and fills our placeholders with texts and images. Please see the inline comments within the function below.

 public void ParseTemplate()
 {
    using (var templateFile = File.Open(templatePath, FileMode.Open, FileAccess.Read)) //read our template
    {
        using (var stream = new MemoryStream())
        {
            templateFile.CopyTo(stream); //copy template

            using (var wordDoc = WordprocessingDocument.Open(stream, true)) //open word document
            {
                foreach (var paragraph in wordDoc.MainDocumentPart.Document.Descendants<Paragraph>().ToList()) //loop through all paragraphs 
                {
                    ReplaceImages(wordDoc, paragraph); //replace images

                    ReplaceText(paragraph); //replace text
                }

                wordDoc.MainDocumentPart.Document.Save(); //save document changes we've made
            }
            stream.Seek(0, SeekOrigin.Begin);//scroll to stream start point

            //save file or overwrite it
            var outPath = WordTemplate.GetRootPath() + @"\Output\DocumentOutput.docx";

            using (var fileStream = File.Create(outPath))
            {
                stream.CopyTo(fileStream);
            }
        }
    }
 }

Function that replaces the images. It gets all Blip objects from the paragraph and changes it’s embed ID that points to the image.

The cool thing about it is fact that you can give your own styles and transformation to the image template and it will be preserved and applied to the new image 🙂

Please see the inline comments.

 void ReplaceImages(WordprocessingDocument wordDoc, Paragraph paragraph)
 {
    // get all images in paragraph
    var imagesToReplace = paragraph.Descendants<A.Blip>().ToList();

    if (imagesToReplace.Any())
    {
        var index = 0;//image index within paragraph

        //find all original image names in paragraph
        var paragraphImageNames = paragraph.Descendants<DocumentFormat.OpenXml.Drawing.Pictures.NonVisualDrawingProperties>().ToList();

        //check all images in the paragraph and replace them if it matches our parameter
        foreach (var imagePlaceHolder in paragraphImageNames)
        {
            //check if we have image parameter that matches paragraph image
            foreach (var param in WordParameters)
            {
                //replace it if found by original image name
                if (param.Image != null && param.Image.Name.ToLower() == imagePlaceHolder.Name.Value.ToLower())
                {
                    var imagePart = wordDoc.MainDocumentPart.AddImagePart(ImagePartType.Jpeg); //add image to document
                    using (FileStream imgStream = new FileStream(param.Image.FullName, FileMode.Open))
                    {
                        imagePart.FeedData(imgStream); //feed it with data
                    }

                    var relID = wordDoc.MainDocumentPart.GetIdOfPart(imagePart); // get relationship ID

                    imagesToReplace.Skip(index).First().Embed = relID; //assign new relID, skip if this is another image in one paragraph
                }
            }
            index += 1;
        }
    }
}

When replacing the texts we check if paragraph contains the text that matches our parameter. If yes, then we check if to include one or multiple lines of text.
Next we create new parameter by copying the old parameter’s OuterXML (this preserves the styles). We also need to replace text that is stored in our parameter.

 void ReplaceText(Paragraph paragraph)
 {
    var parent = paragraph.Parent; //get parent element - to be used when removing placeholder
    var dataParam = new WordParameter();

    if (ContainsParam(paragraph, ref dataParam)) //check if paragraph is on our parameter list
    {
        //insert text list
        if (dataParam.Name.Contains("string[]")) //check if param is a list
        {
            var arrayText = dataParam.Text.Split(Environment.NewLine.ToCharArray()); //in our case we split it into lines

            if (arrayText is IEnumerable) //enumerate if we can
            {
                foreach (var itemData in arrayText)
                {
                    Paragraph bullet = CloneParaGraphWithStyles(paragraph, dataParam.Name, itemData);// create new param - preserve styles
                    parent.InsertBefore(bullet, paragraph); //insert new element
                }
            }
            paragraph.Remove();//delete placeholder
        }
        else
        {
            //insert text line
            var param = CloneParaGraphWithStyles(paragraph, dataParam.Name, dataParam.Text); // create new param - preserve styles
            parent.InsertBefore(param, paragraph);//insert new element

            paragraph.Remove();//delete placeholder
        }
    }
}

Creating the new paragraph object preserving the styles

 public static Paragraph CloneParaGraphWithStyles(Paragraph sourceParagraph, string paramKey, string text)
 {
    var xmlSource = sourceParagraph.OuterXml;

    xmlSource = xmlSource.Replace(paramKey.Trim(), text.Trim());

    return new Paragraph(xmlSource);
 }

Please note that when replacing images, the image placeholder names must be found in the document. Images that don’t match the parameter name, wont be replaced.

Having done that we can finally test our application. I have included complete working application for your tests.
WordTemplates

1 Star2 Stars3 Stars4 Stars5 Stars (No Ratings Yet)
Loading...Loading...

Finding non empty data periods T-SQL

Ever wanted to find non empty periods of data using T-SQL? I this article I will show you how to do it.
Example below shows the periods of days in which there have been at least one order. The days without orders are not being shown. This is very useful when creating advanced sales reports. Having non empty periods we can calculate additional values such as average sales in these ranges etc.

The code below simply gets all distinct dates then creates two partitions and joins them together.
In each partition the data are joined with each other using left and right join. The non null values are next being used in the final inner join.

 with temp(d) as 
 ( 
  select distinct CONVERT(date,OrderDate) d from tblOrders
 )
 select a1.id as id, a1.d as [from], a2.d as [to] from 
 ( 
   select b.d, ROW_NUMBER() over (partition by 1 order by b.d) id from temp a 
   right join temp b on dateadd(day,1,a.d) = b.d 
   where a.d is null 
 )
 a1 
 inner join  
 ( 
   select a.d, ROW_NUMBER() over (partition by 1 order by b.d) id from temp a 
   left join temp b on dateadd(day,1,a.d) = b.d 
   where b.d is null 
 ) 
 a2 on a1.id = a2.id 

sql-periods1

In order to calculate sales data in periods, simply join the final results using found dates. Hope I helped you with this sample. Happy coding 🙂

1 Star2 Stars3 Stars4 Stars5 Stars (No Ratings Yet)
Loading...Loading...

SHA1 and MD5 hashing algorithms

When storing passwords in database, it is considered a good practice to hash them first. The most common way to do that is to use MD5 or SHA hashing algorithms. Hashing passwords is more secure because after creating a hash from the user’s password theoretically there is not way to get the password back from it. In reality MD5 is more vulnerable to “collision attacks” as it uses 128 bit value while SHA1 uses 160 bits which makes it harder to crack.

The disadvantage of hashing passwords is the fact that if an users forgets his password, we cannot send him a reminder. We will have to reset it first.

Theoretically if someone will steal our database, it is possible to use bruit force attack to find the original passwords by trying different combinations of words and numbers. To prevent that we can add our custom string to the user’s string before hashing. This makes it more difficult to crack the passwords having only database without our application files where the custom string is being stored.

 class Program
    {
        static void Main(string[] args)
        {
            string md5 = CreateMD5Hash("test");
            //result: CY9rzUYh03PK3k6DJie09g==

            string sha1 = CreateSHA1Hash("test");
            //result: qUqP5cyxm6YcTAhz05Hph5gvu9M
        }

        /// <summary>
        /// Creates MD5 hash of text
        /// </summary>
        public static string CreateMD5Hash(string clearText)
        {
            return Convert.ToBase64String(MD5.Create().ComputeHash(UnicodeEncoding.UTF8.GetBytes(clearText)));
        }

        /// <summary>
        /// Creates SHA1 hash of text
        /// </summary>
        public static string CreateSHA1Hash(string clearText)
        {
            return Convert.ToBase64String(SHA1.Create().ComputeHash(UnicodeEncoding.UTF8.GetBytes(clearText))).TrimEnd('=');
        }
    }

1 Star2 Stars3 Stars4 Stars5 Stars (No Ratings Yet)
Loading...Loading...

Adaptive Payments with PayPal

When building B2C systems the common scenario is to share the profits among the portal and the business users eg. when renting a house through you website the user pays total amount for the house, lets say 100 USD to the property owner. From that amount the owner will pay share commission to the portal’s website usually a small %.

In order to automate this process we can use PayPal Adaptive payments (chained transaction). The main difference between PayPal chain transaction and parallel transaction is that with the chained transaction the user sees only the total amount that he owns to the house owner. With the parallel transactions the user pays total amount but he sees the list of 2 receivers; the house owner and the portal owner share details.

Although there is a good documentation available on the Paypal website I found it very hard to get a working example of the payment implementation. That’s why I decided to post it here.

Lets start with downloading PayPal SDK. It contains all classes we need to make payment request. I have also included project and SDK at the bottom of this article.

When making a payment request we basically need to create paykey and redirect user to the payment page by passing that key as a parameter.
This simply creates initial payment record on PayPal account. The payment then may be finished or cancelled by the user. We get the paykey after getting response from PayPal with the status “CREATED”.

  if (ap.isSuccess.ToUpper() != "FAILURE")
  {
      if (PResponse.paymentExecStatus == "CREATED")
      {
          return PResponse.payKey;
      }
   }

In the init request we need to include basic parameters such as portal and property owner PayPal accounts, api credentials (sandbox account for testing)

    var OrderID = Guid.NewGuid().ToString();

    var portalPayPalEmail = ConfigurationManager.AppSettings["PORTAL_PAYPAL_EMAIL"];
    payRequest.ipnNotificationUrl = ConfigurationManager.AppSettings["PAYPAL_NOTIFICATION_URL"] + "?custom=" + OrderID; // to be processed later in PayPal-Call-back.ashx handler

    payRequest.cancelUrl = Request.Url.ToString();
    payRequest.returnUrl = Request.Url.ToString();
    payRequest.memo = OrderID;
    payRequest.trackingId = OrderID;

    payRequest.clientDetails = new ClientDetailsType();
    payRequest.clientDetails = ClientInfoUtil.getMyAppDetails();  //helper - gets values from web.config
    payRequest.actionType = "PAY"; // or CREATE
    payRequest.currencyCode = "USD";//set currency to user settings
    payRequest.requestEnvelope = new RequestEnvelope();
    payRequest.requestEnvelope = ClientInfoUtil.getMyAppRequestEnvelope(); //helper - gets values from web.config

This is how the config file should look like (please fill in with your data)

 <appSettings>
    <!-- PayPal configuration settings START-->
    <add key="deviceId" value="testID123"/>
    <add key="ipAddress" value="127.0.0.1"/>
    <add key="TrustAll" value="true"/>
    <add key="ENDPOINT" value="https://svcs.sandbox.paypal.com/"/>
    <add key="PAYPAL_URL" value="https://www.sandbox.paypal.com/"/>
    <add key="PAYPAL_REDIRECT_URL" value="https://www.sandbox.paypal.com/webscr?cmd=_ap-payment&amp;paykey="/>
    <add key="PAYPAL_NOTIFICATION_URL" value="https://your-website-url/PayPal-Call-back.ashx"/>
    <add key="APPLICATION-ID" value="APP-80W284485P5195333"/>
    <add key="API_REQUESTFORMAT" value="SOAP11"/>
    <add key="API_RESPONSEFORMAT" value="SOAP11"/>
    <add key="API_AUTHENTICATION_MODE" value="3TOKEN"/>
    <add key="PORTAL_PAYPAL_EMAIL" value="portal-paypal-email"/>
    <add key="API_USERNAME" value="api-username"/>
    <add key="API_PASSWORD" value="api-password"/>
    <add key="API_SIGNATURE" value="api-signature eg.AFcWxV21C7fd0v3bYYYRCpSSRl31AI0QDNGia62b0stzcLxkJCYRE9JE"/>
    <!-- PayPal configuration settings END-->
  </appSettings>

Next we need to define who will pay the PayPal commission, it can be one of the receivers or sender or all can be paying equally

 payRequest.feesPayer = "EACHRECEIVER"; //SENDER,PRIMARYRECEIVER,SECONDARYONLY

Next step is to create receiver list. It can include up to 6 accounts. In our case we have only portal user and the property owner. The total amount of 100 USD will be split to 80 USD for the property owner and 20 USD for portal (minus PayPal commission taken from both receivers)

    payRequest.receiverList = new Receiver[2];
    //pay the user
    payRequest.receiverList[0] = new Receiver();
    payRequest.receiverList[0].amount = 100;
    payRequest.receiverList[0].primary = IsChainedTransaction;// set to true to switch to chained transaction
    payRequest.receiverList[0].primarySpecified = IsChainedTransaction;// set to true to switch to chained transaction
    payRequest.receiverList[0].paymentType = "SERVICE";
    payRequest.receiverList[0].email = "portal-user-paypal-email";//set user paypal email

    //pay portal share
    payRequest.receiverList[1] = new Receiver();
    payRequest.receiverList[1].amount = 20;
    payRequest.receiverList[1].primary = false;
    payRequest.receiverList[1].primarySpecified = false;
    payRequest.receiverList[1].paymentType = "SERVICE";
    payRequest.receiverList[1].email = portalPayPalEmail;

At the end we need to supply credentials and send payment request.

 AdapativePayments ap = new AdapativePayments();
 ap.APIProfile = ClientInfoUtil.CreateProfile(); //helper - gets values from web.config

 PayResponse PResponse = ap.pay(payRequest);

The last step is to check if payment was successful and process the order in our application. In the web.config we defined PAYPAL_NOTIFICATION_URL as handler page PayPal-Call-back.ashx. So in the handler when we receive an callback we simply validate it by sending back request to PayPal. When the request is validated we can proceed with our order.

 public void ProcessRequest(HttpContext context)
 {
    Request = context.Request;

	//Request["custom"] contains our orderID
    if (IsRequestFromPaypal() && Request["custom"] != null)
    {
        var orderID = Request["custom"];
            
        //check the payment_status is Completed
        //check that orderID has not been previously processed
        //check that receiver_email is your Primary PayPal email
        //check that payment_amount/payment_currency are correct
        //process payment
    }
  }

   //validate request by sending it back to PayPal
   bool IsRequestFromPaypal()
   {
        var validationRequestContent = Request.Form + "&cmd=_notify-validate";
        var validationUrl = System.Configuration.ConfigurationManager.AppSettings["PAYPAL_URL"].TrimEnd('/') + "/cgi-bin/webscr";

        // Create a Web Request:
        var validationRequest = (System.Net.HttpWebRequest)System.Net.WebRequest.Create(validationUrl);
        validationRequest.ContentLength = validationRequestContent.Length;
        validationRequest.ContentType = "application/x-www-form-urlencoded";
        validationRequest.Method = "POST";

        using (var writer = new StreamWriter(validationRequest.GetRequestStream(), System.Text.Encoding.ASCII))
        {
            writer.Write(validationRequestContent);
        }

        // Now send the request and get the response:
        using (var response = validationRequest.GetResponse())
        {
            using (var reader = new StreamReader(response.GetResponseStream()))
            {
                var paypalResponse = reader.ReadToEnd();
                return paypalResponse == "VERIFIED";
            }
        }
    }

I have included working example below so you can use it in your testing. Just fill it in with your data. You also need to be logged in to your sandbox account when testing it.
AdaptivePayments

1 Star2 Stars3 Stars4 Stars5 Stars (No Ratings Yet)
Loading...Loading...

Custom code validator using RichTextBox

Knowing how to format text using RichTextBox control lets you build wide range of tools such as code comparers, validators, chat applications etc. In this article I will show you how to build simple code checker/ validator.

code-checker

We start with creating new win form application and class library that we will read our test methods from. We will then compare these functions to our pattern methods.

Lets create some dummy methods now.

 public class TestClass
 {
        /// <summary>
        /// Test summary1
        /// this is dummy method
        /// </summary>
        public static void Test1()
        {
            throw new NotImplementedException();
        }

        /// <summary>
        /// Test summary2
        /// this is dummy method
        /// </summary>
        public static void Test2()
        {
            var test = new List<string>();
            test.Add("test1");
            test.Clear();
        }

        /// <summary>
        /// Test summary3
        /// this is dummy method
        /// </summary>
        public static void Test3()
        {
            var test = new List<string>();
            test.Add("test1");
            test.Add("test2");
            test.Add("test3");
            test.Add("test4 123456789");
            test.Add("test5");
            test.Add("test6");
            test.Clear();
        }
    }

Next, we will read this methods using reflection and then we bind it to the listbox control.

  var testTypes = typeof(TestClass).Assembly.GetTypes()
                   .Where(t => t.Name.StartsWith("Test")).OrderBy(t => t.Name).ToList();

  var testMethods = testTypes.First().GetMethods().Where(m => m.IsPublic && m.IsStatic).ToArray();

   lstTests.Items.AddRange(testMethods.ToArray());
   lstTests.SelectedIndex = 0;

When reading the summary tags we will use function that will parse text in .cs file in a search of summary tags.

  internal static string GetComment(string file, string methodName)
   {
            var commentContent = string.Empty;
            var buffer = string.Empty;

            foreach (var line in File.ReadAllLines(file))
            {
                buffer += line;

                if (line.ToLower().Contains(methodName.ToLower()))
                {
                    var summaryPositionStart = buffer.LastIndexOf("<summary>", StringComparison.OrdinalIgnoreCase);
                    var summaryPositionEnd = buffer.LastIndexOf("</summary>", StringComparison.OrdinalIgnoreCase);
                    if (buffer.Length <= summaryPositionStart || summaryPositionEnd - summaryPositionStart <= 0) { return ""; }

                    return PrepareSummaryString(buffer.Substring(summaryPositionStart, summaryPositionEnd - summaryPositionStart));
                }
            }

      return "";
   }

The final step is to format RichTextBox line by line giving it appropriate color depending on our requirements.

  public static void InsertColorText(string inString, RichTextBox textbox, Color methodColor)
   {
            textbox.Text = "";
            inString = inString.TrimEnd(' ', '\r', '\n');

            var lines = inString.Split('\n');
            var font = new Font("Courier New", 8f, FontStyle.Regular);

            for (var i = 0; i < lines.Length; i++)
            {
                textbox.SelectionFont = font;
                textbox.SelectionColor = methodColor;

                if (i < 2 || i + 1 >= lines.Length)
                {
                    textbox.SelectionColor = Color.Gray;
                    textbox.SelectedText = TrimLeft(lines[i], 2);
                    continue;
                }

                if (lines[i].Contains("throw new NotImplementedException();"))
                {
                    textbox.SelectionColor = Color.Red;
                    textbox.SelectedText = TrimLeft(lines[i], 4);
                    continue;
                }

                //calculate color for the current line
                if (lines[i].Trim().Length > 20)
                {
                    textbox.SelectionColor = Color.Blue;
                    textbox.SelectedText = TrimLeft(lines[i], 4);
                    continue;
                }

                textbox.SelectedText = TrimLeft(lines[i], 4);
            }
            textbox.SelectedText = "\n";
        }
    }

Whatever you want to build, this example shows you basic RichTextBox formatting implementation you can use in your solution. I have included working example below for your testing.
RichTextBox-Formatting

1 Star2 Stars3 Stars4 Stars5 Stars (No Ratings Yet)
Loading...Loading...