Posts

Multiple object bindings on MVC view

Multiple object bindings in MVC are the common requirement when working with more advanced UI. An example of that can be creating order form with multiple order items being added dynamically by the user.

In such a scenario we can create binding for our “Order” model as normal and create partial view with the structure of our “OrderItem” class separately. By doing this, the user will be able to dynamically preload order items using ajax request, appending created html to div container.

When submitting the form, order items will be automatically bound to the nested property list, provided the html control ids and names will follow the convention: name of the list property, index id and property name; id=’OrderItems_ID__Quantity’

For example:

   <input type="number" id='OrderItems_@(Model.OrderItemId)__Quantity' value="@Model.Quantity" name='OrderItems[@Model.OrderItemId].Quantity'/>
 

MVC-order

Lets create our order and order items classes first

   public class Order
    {
        public int OrderId { get; set; }
        [Required]
        [Display(Name = "Order Person")]
        public string OrderPerson { get; set; }
        [Required]
        [Display(Name = "Delivery Address")]
        public string DeliveryAddress { get; set; }
        public string OrderComments { get; set; }
        public DateTime OrderDate { get; set; }
        public double TotalNet { get; set; }
        public double TotalVAT { get; set; }
        public double TotalAmount { get; set; }
        [Required]
        public List<OrderItem> OrderItems { get; set; }
    }

	public class OrderItem
    {
        public int OrderItemId { get; set; }
        [Required]
        public string ItemName { get; set; }
        [Required]
        public int Quantity { get; set; }
        [Required]
        public double? UnitPrice { get; set; }
        public double VATRate { get; set; }
        public double TotalValue { get; set; }
    }
 

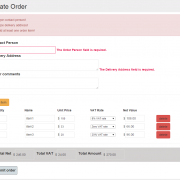
Our Order form will look the standard way, plus extra element for dynamically added elements:

  <div class="form-group">
    <b>@Html.ActionLink("Add item", "LoadBlankItemRow", null, new { id = "addOrderItem", @class = "btn btn-warning" })</b>
     <div style="padding-top: 10px;">
         <p class="itemColumn">Quantity</p>
         <p class="itemColumn">Name</p>
         <p class="itemColumn">Unit Price</p>
         <p class="itemColumn">VAT Rate</p>
         <p class="itemColumn">Net Value</p>
         <p class="itemColumn"></p>
       </div>
     <div id="editorRows">
        @foreach (var itemModel in Model.OrderItems)
         {
            @Html.Partial("_OrderItem", itemModel)
         }
       </div>
   </div>
 

When user clicks the Add item link, the controller action is being invoked returning html structure reflecting the list item model.

   [HttpGet]
   public virtual PartialViewResult LoadBlankItemRow(int id)
   {
     var orderItem = new OrderItem { OrderItemId = id, Quantity = 1 };

     return PartialView("_OrderItem", orderItem);
   }
 

We will use jquery to get the current numbers of items already inserted and define the current index. This will be used to create appropriate control names required for nested model bindings:

   $("#addOrderItem").click(function (e) {
        var itemIndex = $("#editorRows input.iHidden").length;
        $.get("@Url.Action("LoadBlankItemRow", "Order")/" + itemIndex, function (data) {
            $("#editorRows").append(data);
        });
        return false;
    });
 

Each dynamically inserted row will have JavaScript logic to remove the current row and recalculate total values:

    $("a.deleteRow").click(function () {
        $(this).parents("#itemRow").remove();
        calculateTotals();
        return false;
    });

    $('#OrderItems_@(Model.OrderItemId)__Quantity').blur(function () {
        updateTotalValue(@Model.OrderItemId);
    });
    $('#OrderItems_@(Model.OrderItemId)__UnitPrice').blur(function () {
        updateTotalValue(@Model.OrderItemId);
    });
    $('#OrderItems_@(Model.OrderItemId)__VATRate').change(function () {
        updateTotalValue(@Model.OrderItemId);
    });

Finally, scripts included on parent model form will calculate and update controls located outside the partial view, providing Total amount for the entire order.

   function updateTotalValue(id) {
        var qnt = $('#OrderItems_' + id + '__Quantity').val();
        var uprc = $('#OrderItems_' + id + '__UnitPrice').val();

        var vat = parseFloat($('#OrderItems_' + id + '__VATRate').val());
        if (vat == 0) { val = (qnt * uprc); } else { val = (qnt * uprc) * (1 + vat / 100); }
        if (qnt == 0 || uprc == 0) { val = 0; }

        $('#OrderItems_' + id + '__TotalValue').val(val.toFixed(2));
        calculateTotals();
    }

    function calculateTotals() {
        var totalNet = 0.0; var totalVat = 0.0;

        $("#editorRows").children().each(function (index) {
            var qnt = $('#OrderItems_' + index + '__Quantity').val();
            var uprc = $('#OrderItems_' + index + '__UnitPrice').val();
            var vat = parseFloat($('#OrderItems_' + index + '__VATRate').val());
            if (qnt != null && qnt != 'NaN') {
                totalNet += qnt * uprc;
                if (vat != 0) {
                    totalVat += parseFloat((qnt * uprc) * (vat / 100));
                }
            }
        });

        $('#TotalNet').val(totalNet.toFixed(2));
        $('#TotalVAT').val(totalVat.toFixed(2));
        $('#TotalAmount').val((totalNet + totalVat).toFixed(2));
    }

I have included working project below. Enjoy!

MVC OrderForm

1 Star2 Stars3 Stars4 Stars5 Stars (1 votes, average: 5.00 out of 5)
Loading...Loading...

Displaying interactive MS Chart objects in ASP.NET MVC

Displaying charts using MS Chart is usually simple in asp.net webform. The problem exists if we want to use it in Asp.net MVC application without putting it on .aspx page. In this article I will show you how to display interactive chart using purely MVC view.

mschart_mvc

Lets start with creating ChartHelper class that will contain basic logic for creating chart objects. In the function CreateDummyChart() we will just create standard MS Chart object with some dummy data.

 public static Chart CreateDummyChart()
 {
    var chart = new Chart() { Width = 600, Height = 400 };
    chart.Palette = ChartColorPalette.Excel;
    chart.Legends.Add(new Legend("legend1") { Docking = Docking.Bottom });

    var title = new Title("Test chart", Docking.Top, new Font("Arial", 15, FontStyle.Bold), Color.Brown);
    chart.Titles.Add(title);
    chart.ChartAreas.Add("Area 1");

    chart.Series.Add("Series 1");
    chart.Series.Add("Series 2");

    chart.BackColor = Color.Azure;
    var random = new Random();
    
    //add random data: series 1
    foreach (int value in new List<int>() { random.Next(100), random.Next(100), random.Next(100), random.Next(100) })
    {
        chart.Series["Series 1"].Points.AddY(value);

        //attach JavaScript events - it can also be ajax call
        chart.Series["Series 1"].Points.Last().MapAreaAttributes = "onclick=\"alert('value: #VAL, series: #SER');\"";
    }

    //add random data: series 2
    foreach (int value in new List<int>() { random.Next(100), random.Next(100), random.Next(100), random.Next(100) })
    {
        chart.Series["Series 2"].Points.AddY(value);

        //attach JavaScript events - it can also be ajax call
        chart.Series["Series 2"].Points.Last().MapAreaAttributes = "onclick=\"alert('value: #VAL, series: #SER');\"";
    }

    return chart;
 }

Next, we need to create function that takes our newly created chart object and saves it to memory stream. After that we only need to convert the stream to byte array and to base64 string afterwards.

Having image string created, we simply construct html “img” tag to be rendered by our view. Please note that “data:image/png;base64” attributes are necessary to tell the browser to render it as image.

 public static string GetChartImageHtml(Chart chart)
 {
    using (var stream = new MemoryStream())
    {
        var img = "<img src='data:image/png;base64,{0}' alt='' usemap='#" + ImageMap + "'>";

        chart.SaveImage(stream, ChartImageFormat.Png);

        var encoded = Convert.ToBase64String(stream.ToArray());

        return string.Format(img, encoded);
    }
 }

The final thing is to create DisplayChart() method in the view to be used by Html.RenderAction. Apart from chart’s image string, we also need to display chart’s image map in order to enable chart JavaScript events when needed.

public ActionResult DisplayChart()
{  
    var chart = ChartHelper.CreateDummyChart();
   
    var result = new StringBuilder();
    result.Append(ChartHelper.GetChartImageHtml(chart));
    result.Append(chart.GetHtmlImageMap(ChartHelper.ImageMap));

    return Content(result.ToString());
}

And finally this is our view

@{
    ViewBag.Title = "Home Page";
}

<h2>@ViewBag.Message</h2>

@{ Html.RenderAction("DisplayChart"); }

I have attached project files to save your time 🙂

mschart-mvc

1 Star2 Stars3 Stars4 Stars5 Stars (No Ratings Yet)
Loading...Loading...

MVC Custom View Editor Templates

When creating MVC3 razor website it is often necessary to apply custom templates on classes or properties within the objects to be displayed seamlessly throughout your application. There is number of ways to apply custom templates, one of them is to create folders in ~/Shared/DisplayTemplates/, ~/Shared/EditorTemplates/ and create partial views based on model objects we want to style. Lets start with creating basic class structure that we will work on:

custom-templates

  public partial class Client
    {
        public int ClientId { get; set; }
        public string FirstName { get; set; }
        public string LastName { get; set; }
        public DateTime BirthDate { get; set; }
        public Address HomeAddress { get; set; }

        [UIHint("bool")]
        public bool IsApproved { get; set; }

        [UIHint("Enum")]
        public Role Role { get; set; }
    }

    public enum Role
    {
        Admin, PM, Employee
    }

    public partial class Address
    {
        public string Street { get; set; }
        public string City { get; set; }
        public string Country { get; set; }
    }

As you can see there are two properties marked with the UIHint attribute. This is one of the ways to map properties with the templates.

When displaying form we can also specify template name if we want to apply template only for selected pages.

  <div class="editor-field">
        @Html.EditorFor(model => model.IsApproved)
        @Html.ValidationMessageFor(model => model.IsApproved)
    </div>

    <div class="editor-field">
        @Html.EditorFor(model => model.Role)
        @Html.ValidationMessageFor(model => model.Role)
    </div>

This is similar when creating display templates. We can also mix the ways of assigning templates by choosing the properties attributes and template names if required.

 <div class="display-field">
        @Html.DisplayFor(model => model.IsApproved)
    </div>
    <div class="display-label">
        Role</div>
    <div class="display-field">
        @Html.DisplayFor(model => model.Role, "MyRole")
    </div>

Our editor template implementation is quite simple. For each enum value in our Role class we create list item to be shown in drop down list. We also need to ensure that we give it a proper name Role.cshtml in order for the view engine to be able to correctly identify our template.

 @model Models.classes.Role
           
   <select id="Role" name="Role">
    @foreach (Models.classes.Role value in Enum.GetValues(typeof(Models.classes.Role)))
    {
        <option value="@value" @(Model == value ? "selected=\"selected\"" : "")>@value
        </option>
    }
  </select>

Display template contains the code below. We simply mark in red the current Role value. Of course it’s only a quick sample.

 @model Models.classes.Role
 @foreach (Models.classes.Role value in Enum.GetValues(typeof(Models.classes.Role)))
 {
    if (Model == value)
    {
      <p><b style="color:Red;">@value.ToString()</b></p>;
    }
    else
    {
       <p>@value.ToString()</p>
    }
 }

If we want to override the templates located in the Shared folder, we can create folder in the view (~/Views//EditorTemplates) containing different implementation. This gives us a little bit more flexibility if we have specific requirements for an single view.

We can also create generic templates to override default rendering of build-in types like bool? We apply it also by giving the attribute to the property of our object. Following implementation displays in bold one of the 3 possible object states.

    @model bool?

    @if (ViewData.ModelMetadata.IsNullableValueType && Model == null)
    {
        @:True False <b>Not Set</b>
    }
    else if (Model.Value)
    {
        @:<b>True</b> False Not Set
    }
    else
    {
        @:True <b>False</b> Not Set
    }

MVC framework gives us a chance to override and customize pretty much of everything. We can also create our own View Engine and change the way of model binding etc.

I have included project sample below for you tests.
MVC-Custom-display-templates

1 Star2 Stars3 Stars4 Stars5 Stars (No Ratings Yet)
Loading...Loading...

MVC property and model level validation techniques

MVC framework gives us a lot of different techniques for validating model and properties. The simplest way of model validation is to apply property attributes. After applying property attributes the client side validation will be performed automatically using unobtrusive JavaScript. The error message are being displayed in the UI if we provide @Html.ValidationSummary(true) or property level @Html.ValidationMessageFor(m => m…….). The trick is to apply range validation to checkbox as it don’t have a value when is not checked.

   public class Client
    {
        [Required]
        public string ClientName { get; set; }

        [DataType(DataType.Date)]
        [Required(ErrorMessage = "Please enter a date of birth")]
        public DateTime DateOfBirth { get; set; }

        [Range(typeof(bool), "true", "true", ErrorMessage = "You must accept the terms")]
        public bool AreTermsAccepted { get; set; }
    }

One of the easiest validation methods is to validate model explicitly in the action method. We are simply adding the errors to ModelState object to be displayed in the UI when needed.
We can also check if binder was able to assign value by using ModelState.IsValidField. This is perfect for dateTime types. Checking business rules is also very easy with this technique.

[HttpPost]
public ViewResult CreateClient(Client client)
{
    if (string.IsNullOrEmpty(client.ClientName))
    {
        ModelState.AddModelError("ClientName", "Please enter client name");
    }
    
    if (!client.IsTermsAccepted)
    {
        ModelState.AddModelError("IsTermsAccepted", "You must accept the terms to create account");
    }

	if (ModelState.IsValidField("ClientName") && ModelState.IsValidField("IsTermsAccepted") && client.ClientName == "Mike") 
	{
       ModelState.AddModelError("", "Mike is already registered");
    }

    if (ModelState.IsValid)
    {
        repository.SaveClient(client);

        return View("Registered", client);
    }
    else
    {
        return View();
    }
}

Another way of model validation is overriding DefaultModelBinder validation methods. The logic is basically similar to what is described above but it’s gives us the way for separating the validation logic and turning it on/ off when necessary by registering in global app start function.

By overriding the SetProperty function we find each property by name. Next, we check the values before it will be bound to the model. In OnModelUpdated function we perform model validation as this is being called after all model properties has been bound.

 public class ValidatingModelBinder : DefaultModelBinder
 {
    protected override void SetProperty(ControllerContext controllerContext, ModelBindingContext bindingContext, PropertyDescriptor propertyDescriptor, object value)
    {
        // call the base implementation
        base.SetProperty(controllerContext, bindingContext, propertyDescriptor, value);

        // do property level validation
        switch (propertyDescriptor.Name)
        {
            case "ClientName":
                if (string.IsNullOrEmpty((string)value))
                {
                    bindingContext.ModelState.AddModelError("ClientName", "Please enter your name");
                }
                break;
            case "AreTermsAccepted":
                if (!((bool)value))
                {
                    bindingContext.ModelState.AddModelError("AreTermsAccepted", "You must accept the terms");
                }
                break;
        }
    }

    protected override void OnModelUpdated(ControllerContext controllerContext, ModelBindingContext bindingContext)
    {
        // call the base implementation
        base.OnModelUpdated(controllerContext, bindingContext);

        // get the model
        var model = bindingContext.Model as Client;

        // perform model level validation
        if (model != null && bindingContext.ModelState.IsValidField("ClientName") && model.ClientName == "Mike")
        {
            bindingContext.ModelState.AddModelError("", "Mike is already registered");
        }
    }
 }

We also need to register our validator in the application global file:

ModelBinders.Binders.Add(typeof(Client), new ValidatingModelBinder());

Next form of validation is applying custom attributes where you can apply your specific validation rules.

 public class IsTrueAttribute : ValidationAttribute
 {
    public override bool IsValid(object value)
    {
        return value is bool && (bool)value;
    }
 }

[IsTrueAttribute(ErrorMessage="You must accept the terms")]
public bool AreTermsAccepted { get; set; }

We can also derive from existing attributes and add additional logic we need.

 public class FutureDateAttribute : RequiredAttribute
 {
    public override bool IsValid(object value)
    {
        return base.IsValid(value) &&
        value is DateTime &&
        ((DateTime)value) > DateTime.Now;
    }
}

We also can apply custom model validation attribute by inheriting from ValidationAttribute. Please not that model validation wont be performed if there are some property level validation errors.

 public class ClientValidatorAttribute : ValidationAttribute
 {
    public ClientValidatorAttribute()
    {
        ErrorMessage = "Mike is already registered";
    }

    public override bool IsValid(object value)
    {
        var client = value as Client;

        if (client == null || string.IsNullOrEmpty(client.ClientName))
        {
            //we don't have right model to validate
            return true;
        }
        else
        {

            return !(client.ClientName == "Mike");
        }
    }
 }

  //in our model class
  [ClientValidatorAttribute]
  public class Client {

Another way of validation is to create self-validating model by inheriting from IValidatableObject interface and overloading Validate function. The validation will be called after all property values has been assigned. This approach has benefit of having all model validation rules in the class definition.

 public class Client : IValidatableObject
 {
    public string ClientName { get; set; }
    [DataType(DataType.Date)]
    public DateTime DateOfBirth { get; set; }
    public bool AreTermsAccepted { get; set; }

    public IEnumerable<ValidationResult> Validate(ValidationContext validationContext)
    {
        List<ValidationResult> errors = new List<ValidationResult>();

        if (string.IsNullOrEmpty(ClientName))
        {
            errors.Add(new ValidationResult("Please enter client name"));
        }

        if (DateTime.Now > DateOfBirth)
        {
            errors.Add(new ValidationResult("Please enter a date in the future"));
        }

        if (errors.Count == 0 && ClientName == "Mike")
        {
            errors.Add(new ValidationResult("Mike is already registered"));
        }

        if (!AreTermsAccepted)
        {
            errors.Add(new ValidationResult("You must accept the terms"));
        }

        return errors;
    }
 }

At the end I will show you how to create custom validation provider. In this approach we inherit from ModelValidatorProvider to use GetValidators method. This will allow us to apply custom validators on the very high level.
We basically check ContainerType to apply property level validation of the specified type and ModelType to apply custom model validator.

 public class CustomValidationProvider : ModelValidatorProvider
 {
    public override IEnumerable<ModelValidator> GetValidators(ModelMetadata metadata, ControllerContext context)
    {
        if (metadata.ContainerType == typeof(Client))
        {
            return new ModelValidator[] { new ClientPropertyValidator(metadata, context)};
        }
        else if (metadata.ModelType == typeof(Client))
        {
            return new ModelValidator[] { new ClientValidator(metadata, context)};
        }

        return Enumerable.Empty<ModelValidator>();
    }
}

Property validation looks like shown below.

 public class ClientPropertyValidator : ModelValidator
 {
    public ClientPropertyValidator(ModelMetadata metadata, ControllerContext context)
        : base(metadata, context)
    {
    }

    public override IEnumerable<ModelValidationResult> Validate(object container)
    {
        var client = container as Client;
        if (client != null)
        {
            switch (Metadata.PropertyName)
            {
                case "ClientName":
                    if (string.IsNullOrEmpty(client.ClientName))
                    {

                        return new ModelValidationResult[] {
                                    new ModelValidationResult {
                                    MemberName = "ClientName",
                                    Message = "Please enter client name"
                                    }};
                    }
                    break;
                   
                case "AreTermsAccepted":
                    if (!client.AreTermsAccepted)
                    {
                        return new ModelValidationResult[] {
                                new ModelValidationResult {
                                MemberName = "AreTermsAccepted",
                                Message = "You must accept the terms"
                                }};
                    }
                    break;
            }
        }

        return Enumerable.Empty<ModelValidationResult>();
    }
 }

Model validator is also very similar. Please note that container value will be null in the Validate function.

 public class ClientValidator : ModelValidator
 {
    public ClientValidator(ModelMetadata metadata, ControllerContext context)
        : base(metadata, context)
    {
    }

    public override void Validate(Client container, IList<ModelValidationResult> errors)
    {
        var client = (Client)Metadata.Model;

        if (client.ClientName == "Mike")
        {
            errors.Add(new ModelValidationResult
            {
                MemberName = "",
                Message = "Mike is already registered"
            });
        }
    }
}

We register our provider in application global file:

ModelValidatorProviders.Providers.Add(new CustomValidationProvider());

As you can see the MVC framework allows us to apply a lot of validation methods that we can use. It should satisfy even the most complicated scenarios. Of course there is also client side validation that I skipped as this can be a topic for the separate article.

1 Star2 Stars3 Stars4 Stars5 Stars (No Ratings Yet)
Loading...Loading...

Implementing MVC3 Custom Model Binders

MVC model binders simply map Http browser requests to model objects. Normally if action invoker is unable to find the proper binder of the provided type, it uses built-in binder class: DefaultModelBinder. Default model binder is using following sources to bind to model object: Request.Form, RouteData.Values, Request.QueryString, Request.Files. The search for values is also done in same order.

We can include and exclude bindings for some object properties in action method or in class attribute.

 public ActionResult Create([Bind(Include="FirstName, LastName")] Client client) {

 //or in our class
 [Bind(Exclude="IsApproved")]
 public class Client {

In our example we will bind the model manually. This gives us more controls on how the model objects are instantiated and helps if we are using dependency resolver.

 [HttpPost]
  public ActionResult Edit(int id, FormCollection collection)
  {
        try
        {
            // TODO: Add update logic here
            //client client = (client)DependencyResolver.Current.GetService(typeof(client));
            var client = new Client();

            UpdateModel(client, collection);

            return RedirectToAction("Index");
        }
        catch
        {
            return View();
        }
    }

Below is our custom model binder implementation. Please note that the binder class needs to inherit from IModelBinder interface. In the example, we simple check if model exists or use dependency resolver to provide one. Next we are getting prefixes and values from BindingContext.ValueProvider property, that gives us all consolidates value providers we can read from. Please note that we didn’t include any validation logic.

  public class ClientModelBinder : IModelBinder
  {

   public object BindModel(ControllerContext controllerContext, ModelBindingContext bindingContext)
    {
        // check if model to update exists and create one if not
        Client model = (Client)bindingContext.Model ?? (Client)DependencyResolver.Current.GetService(typeof(Client));

        // check if the value provider has the required prefix
        bool hasPrefix = bindingContext.ValueProvider.ContainsPrefix(bindingContext.ModelName);

        string searchPrefix = (hasPrefix && !string.IsNullOrEmpty(bindingContext.ModelName)) ? bindingContext.ModelName + "." : "";

        // populate the fields of the model object
        model.ClientId = int.Parse(GetValue(bindingContext, searchPrefix, "ClientId"));
        model.FirstName = GetValue(bindingContext, searchPrefix, "FirstName");
        model.LastName = GetValue(bindingContext, searchPrefix, "LastName");
        model.BirthDate = DateTime.Parse(GetValue(bindingContext, searchPrefix, "BirthDate"));
        model.IsApproved = GetCheckedValue(bindingContext, searchPrefix, "IsApproved");
        model.Role = (Role)Enum.Parse(typeof(Role), GetValue(bindingContext, searchPrefix, "Role"));

        return model;
    }
 }

Next step is to register our custom binder. We can do it either in the global file or by giving attribute to our Client class.

  protected void Application_Start()
  {
        AreaRegistration.RegisterAllAreas();

        ModelBinders.Binders.Add(typeof(Client), new ClientModelBinder());

        RegisterGlobalFilters(GlobalFilters.Filters);
        RegisterRoutes(RouteTable.Routes);
    }

  //or
  [ModelBinder(typeof(ClientModelBinder))]
  public class Client
   {

You can also implement your own model binder provider which is very useful when handling multiple custom class binders.

 public class CustomModelBinderProvider : IModelBinderProvider 
 {
   public IModelBinder GetBinder(Type modelType) 
   {
      //return or apply the switch with other model type binders
      return modelType == typeof(Client) ? new ClientModelBinder() : null;
   }
 }

 //you can register provider in global app start method
 ModelBinderProviders.BinderProviders.Add(new CustomModelBinderProvider());

I have included application sample, so you can test how it works by setting the break point in the binding function and see how the model values are being retrieved.
CustomModelBinder

1 Star2 Stars3 Stars4 Stars5 Stars (No Ratings Yet)
Loading...Loading...

Creating MVC3 Custom View Engine

MVC it’s so great and flexible framework that even lets you create your own custom view engine if you need to replace Razor’s default rendering. You will probably not need this but we I will show you how to do it.

In our example we simply display all view data that are available during http request. Lets create our debug class that inherits from IView interface. In the Render function we simply use textwriter to display request data. The code looks as follows:

 public class DebugDataView : IView
 {
    public void Render(ViewContext viewContext, TextWriter writer)
    {
        Write(writer, "---Routing Data---");
        foreach (string key in viewContext.RouteData.Values.Keys)
        {
            Write(writer, "Key: {0}, Value: {1}",
            key, viewContext.RouteData.Values[key]);
        }

        Write(writer, "---View Data---");
        foreach (string key in viewContext.ViewData.Keys)
        {
            Write(writer, "Key: {0}, Value: {1}", key,
            viewContext.ViewData[key]);
        }
    }

    private void Write(TextWriter writer, string template, params object[] values)
    {
        writer.Write(string.Format(template, values) + "<p/>");
    }
}

Next we need to create our debug view engine class that inherits from IViewEngine interface. In FindView function, if our view name is found, we simply apply our own view style by passing in the instance of DebugDataView class that we have implemented earlier.

 public class DebugDataViewEngine : IViewEngine
 {
    public ViewEngineResult FindView(ControllerContext controllerContext, string viewName, string masterName, bool useCache)
    {
        if (viewName == "DebugData")
        {
            return new ViewEngineResult(new DebugDataView(), this);
        }
        else
        {
            return new ViewEngineResult(new string[] { "Debug Data View Engine" });
        }
    }

    public ViewEngineResult FindPartialView(ControllerContext controllerContext, string partialViewName, bool useCache)
    {
        return new ViewEngineResult(new string[] { "Debug Data View Engine" });
    }

    public void ReleaseView(ControllerContext controllerContext, IView view)
    {
        // no action here
    }
}

The last step is to register our custom engine in the Application_Start() function.

 protected void Application_Start()
    {
        AreaRegistration.RegisterAllAreas();

        ViewEngines.Engines.Add(new DebugDataViewEngine());

        RegisterGlobalFilters(GlobalFilters.Filters);
        RegisterRoutes(RouteTable.Routes);
    }

Download the sample below to see how it works.
CustomViewEngine

1 Star2 Stars3 Stars4 Stars5 Stars (No Ratings Yet)
Loading...Loading...