Posts

KnockoutJS bindings and observables

KnockoutJS it’s the JavaScript implementation of the MVVM pattern that is based on native JavaScript event management. Implementing knockoutJS both as a standalone solution or in conjunction with other web technologies can greatly improve user experience in our web applications.

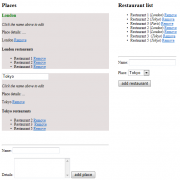
As a example lets create simple list of places and restaurants as below:
knockoutjs

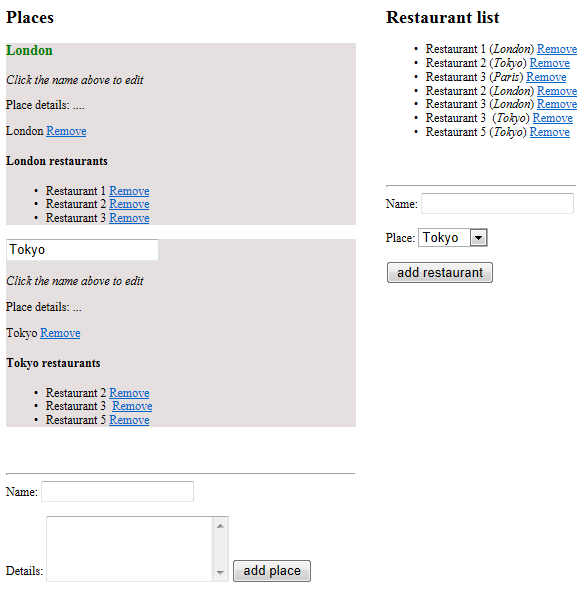
In our example, places can have multiple related restaurants. To make programming more funny lets create two separate view models for our entities. In order to differentiate two models we need to use overloaded applyBindings methods passing in form elements.

 var PVM = new PlacesViewModel();
 var RVM = new RestaurantViewModel()

  ko.applyBindings(PVM, document.getElementById('placesModel'));
  ko.applyBindings(RVM, document.getElementById('restaurantModel'));

Lets define html form for places and it’s template:

  <div id="placesModel" style="float: left; width: 350px;">
        <h2>
            Places</h2>
        <div data-bind="foreach: places">
            <div style="background-color: #e5dfdf;" data-bind="template: { name: 'place-template', data: $data }">
            </div>
        </div>
        <br />
        <br />
        <hr />
        <form data-bind="submit: addPlace">
        Name:
        <input name="name" /><br />
        <br />
        Details:
        <textarea rows="4" name="details" cols="20"></textarea>
        <button type="submit">
            add place</button>
        </form>
    </div>

    //template for places
   <script type="text/html" id="place-template">
        <h3 style="color: green;"><b data-bind="visible: !editing(), text: name, click: $root.edit">&nbsp;</b>
            <input data-bind="visible: editing, value: name, hasfocus: editing" />
        </h3>
        <p><em>Click the name above to edit</em></p>

        <p>Place details: <span data-bind="text: details"></span></p>
        <span data-bind="text: $data.name"></span>&nbsp;<a href="#" data-bind="click: $root.removePlace">Remove</a>

        <h4><span data-bind="text: name"></span>&nbsp;restaurants</h4>

        <ul data-bind="foreach: RVM.restaurants">
            <!--ko if: $data.place.toLowerCase().indexOf($parent.name().toLowerCase()) >= 0 -->
            <li style="">
                <span data-bind="text: $data.name"></span>&nbsp;<a href="#" data-bind="click: RVM.removeRestaurant">Remove</a>
            </li>
            <!--/ko-->
        </ul>
    </script>

At this point we need to define knockout view model and define functions for data binding and observables:

 function PlacesViewModel() {
            var self = this;

            self.places = ko.observableArray([
               { name: ko.observable('London'), details: '....', editing: ko.observable(false) },
            ]);

            self.selectedPlace = ko.observable({ name: ko.observable('London'), details: '....', editing: ko.observable(false) });

            self.removePlace = function (place) {
                self.places.remove(place)
            }

            self.addPlace = function (placeForm) {
                //basic validation
                if (placeForm.name.value.trim().length == 0) {
                    alert('Type the place name!'); return;
                }

                var place = { name: ko.observable(placeForm.name.value), details: placeForm.details.value, editing: ko.observable(false) }
                self.places.push(place);

                placeForm.name.value = ''; placeForm.details.value = ''; //clear form
            }

            self.edit = function (arg) {
                arg.editing(true)
            }
        }

Now, lets create simple restaurant form and controls:

 <div id="restaurantModel" style="float: left; padding-left: 30px;">
        <h2>
            Restaurant list</h2>
        <ul data-bind="foreach: restaurants">
            <li style=""><span data-bind="text: $data.name"></span>&nbsp;(<i><span data-bind="text: $data.place"></span></i>)&nbsp;<a
                href="#" data-bind="click: $parent.removeRestaurant">Remove</a> </li>
        </ul>
        <br />
        <br />
        <hr />
        <form data-bind="submit: addRestaurant">
        Name:
        <input name="name" /><br />
        <br />
        Place:
        <select data-bind="options: PVM.places, optionsValue:'name', optionsText: 'name'"
            name="place">
        </select>
        <br />
        <br />
        <button type="submit">
            add restaurant</button>
        </form>
    </div>

At the end we need implement basic restaurants model functions

 function RestaurantViewModel() {
            var self = this;
            self.restaurants = ko.observableArray([{ name: 'Restaurant 1', place: 'London' }, { name: 'Restaurant 2', place: 'Tokyo' }, { name: 'Restaurant 3', place: 'Paris'}]);

            self.removeRestaurant = function (restaurant) {
                self.restaurants.remove(restaurant)
            }

            self.addRestaurant = function (restaurantForm) {
                //basic validation
                if (restaurantForm.name.value.trim().length == 0) {
                    alert('Type the restaurant name!'); return;
                }

                var restaurant = { name: restaurantForm.name.value, place: restaurantForm.place.value };
                self.restaurants.push(restaurant);

                restaurantForm.name.value = '';  //clear form
            }
        }

I have included sample project to be downloaded below. Please use it to check how binding is working when adding, editing and deleting objects on the page.
knockoutjs

1 Star2 Stars3 Stars4 Stars5 Stars (No Ratings Yet)
Loading...Loading...

jQuery advanced selector and filter methods

Jquery it’s a powerful framework that allows us to apply advanced client side selectors and filters using elegant and readable code. Basic selectors can be applied using following method: $(‘tr’). If we want to apply an filter to our results we can use it like that: $(‘tr:eq(1)’) which gets first tr element with the index 1.

Lets create an example with the table that has currency values we want to convert.

jquery-selectors

In our example we add styles to our existing table, next we set the first row color to red. Next, we append 9 more rows with some values. Next, we give gray color to the even rows with index greater than 1 $(‘tr:even:gt(1)’). After that we set the last row color to be equal the first one (non header row).

Next step is to convert each row value from pounds to dollars using each function. After that we set some styles to the button with value “Reset” and link with text “Add”.

At the end we catch the submit event and display the hidden form value in the confirmation dialog. See the in-line comments below.

 $(document).ready(function () {
    //set the table css
    $('table').addClass('myTable');

    //set first row color to red (after header)
    $('tr:eq(1)').css('background-color', 'red');

    //add some rows to table
    for (var i = 1; i < 10; i++) {
        $('table').append("<tr><td>Client " + i + "</td><td>" + 10 + i + "</td></tr>");
    }

    //set even row background color (with index more than 1)
    $('tr:even:gt(1)').css('background-color', 'silver');

    //set backround of last row to be same as the first row (non header)
    $('tr:last').css('background-color', $('tr:eq(1)').css('background-color'))

    //insert after second child
    $('th:nth-child(2)').text('Total (£)').after('<th>Total ($)</th>');

    //convert each value after second child for each row
    $('td:nth-child(2)').after('<td/>').each(function () {
        $(this).next().text((parseInt($(this).text()) * 1.5).toFixed(0));
    });

    //find the button with value reset and link with text add and give it some styles
    $(':submit[value="Reset"], a:contains("Add")').css('float', 'left').css('margin', '5px').css('color', 'green');

    //catch the submit action and read hidden value
    $('form[action$="/Reset"]').submit(function () {
        var summitName = $(':hidden', this).attr('value');
        return confirm('Are you sure you want to Reset ' + summitName + ' ?');
    });

});

Included sample it’s barely an tip of the iceberg of what we can achieve with jQuery. Please read jQuery documentation if you need more information on this topic. I have included working example below for your tests.
jQuery-selectors-filters

1 Star2 Stars3 Stars4 Stars5 Stars (No Ratings Yet)
Loading...Loading...

Database driven rotating image gallery with jQuery

When building database driven websites sometimes there is a need to display image gallery based on pictures stored in database. Good solution for that is to combine jQuery scripts with asp.net controls. Today I will show you how to build simple database driven gallery with auto rotating pictures.

picture-gallery

In our example the pictures will be stored in application folder, we will only get picture urls from db.

Let’s start with creating simple asp.net website with the default.aspx page. Next we will create Photos class and bind it to the asp.net data list view control.

 public partial class gallery_Default : System.Web.UI.Page
 {
    public List<Photo> Photos = new List<Photo>();// our data source
    //our custom picture class
    public class Photo
    {
        public string Name { get; set; }
        public string Path { get; set; }
        public bool IsDefault { get; set; }
    }

    protected void Page_Load(object sender, EventArgs e)
    {
        if (!IsPostBack)
        {
            //get it from database
            Photos.Add(new Photo() { IsDefault = true, Name = "photo1", Path = "~/images/1.jpg" });
            Photos.Add(new Photo() { Name = "photo2", Path = "~/images/2.jpg" });
            Photos.Add(new Photo() { Name = "photo3", Path = "~/images/3.jpg" });
            Photos.Add(new Photo() { Name = "photo4", Path = "~/images/4.jpg" });
            Photos.Add(new Photo() { Name = "photo5", Path = "~/images/5.jpg" });
            Photos.Add(new Photo() { Name = "photo6", Path = "~/images/6.jpg" });
            /////////////

            gridList.DataSource = Photos;
            gridList.DataBind();
        }
    }
 }

In the page markup we create following structure

  <div class="gallery">
        <div class="thumb-image-frame">
            <span class="thumb-image-wrapper">
                <img id='thumb-large-image' alt="" />
            </span>
        </div>
        <div class="list">
            <asp:ListView runat="server" ID="gridList">
                <LayoutTemplate>
                    <ul class="thumb-list">
                        <asp:PlaceHolder runat="server" ID="itemPlaceHolder" />
                    </ul>
                </LayoutTemplate>
                <ItemTemplate>
                    <li>
                        <a class="thumb-link">
                            <img class="thumb-image" src='<%# ResolveUrl(Eval("Path").ToString()) %>' alt="" title='<%# Eval("Name") %>' />
                        </a>
                    </li>
                </ItemTemplate>
            </asp:ListView>
        </div>
    </div>

Next we need to create jQuery script that will run when page loads. In our example, slides start to rotate with the 5 seconds intervals. Rotating stops when user’s cursor enters the thumbnail area and resumes on mouseleave event. You can configure below script to suit your needs.

 var run = true; //init state rotate or not
 var rotateDelay = 5000; //in milliseconds
 /////////
 var all = 0;
 var c = 1;

$(document).ready(function () {
    $("a.thumb-link").click(thumbClicked);
    $("ul.thumb-list").children("li").first().find("a.thumb-link").click();

    // rotate calls
    $("ul.thumb-list").mouseenter(stopRotate).mouseleave(startRotate); //stop/start rotating on mouse enter/ leave (thumb list)
    all = $("ul.thumb-list").children("li").length; //get total images count

    if (all > 1) { setInterval('Rotate()', rotateDelay); } //if more than one picture start rotating
});

function thumbClicked() {
    var imageSource = $(this).find("img.thumb-image").attr("src");
    $("#thumb-large-image").fadeOut("fast", function () {
        $("#thumb-large-image").attr("src", imageSource);// switch the picture
        $("#thumb-large-image").fadeIn("fast");
    });

    $("ul.thumb-list").children("li").removeClass("selected");
    $(this).parent("li").addClass("selected");//select current thumb
}

function stopRotate() { run = false; }

function startRotate() { run = true; }

function Rotate() {
    if (!run) { return; }//return if turned off
    if (c >= all) { c = 0; } //reset if last picture

    var cnt = 0;
    $("ul.thumb-list").children("li").each(function () {
        if (cnt == c) {
            var el = $(this);
            el.find("a.thumb-link").click();
        }
        cnt = cnt + 1;
    });

    c = c + 1;
 };

At the end we only need to set some css styles for the gallery and we are ready to test it.

 ul.thumb-list { width: 400px; padding:0px; }
 ul.thumb-list li { display:inline-block;  }
 ul.thumb-list li a.thumb-link { display: inline-block; cursor: pointer; }
 ul.thumb-list li a.thumb-link img.thumb-image { width: 110px; height: 90px; padding: 7px; border: 2px  solid white;border-radius: 8px; }
 ul.thumb-list li.selected a.thumb-link img.thumb-image { border-color: #df7777;}
 .thumb-image-frame { width: 400px; min-width: 400px; height: 300px; min-height: 300px; text-align: center; margin-bottom: 10px; }
 .thumb-image-wrapper { line-height: 300px; }
 #thumb-large-image { height: 300px; min-height: 300px; width: 400px; min-width: 400px; vertical-align: middle;border-radius: 8px;}

As you can see creating custom image gallery is quite easy to do using jQuery and asp.net. You can of course create variety of additional functions to it e.g. animations when switching the pictures, custom play and pause menu etc.

I have included working example below. Feel free to adjust it to your needs.

jquery-gallery

1 Star2 Stars3 Stars4 Stars5 Stars (No Ratings Yet)
Loading...Loading...