Posts

Ext.js custom loaders

If you are building applications using JavaScript frameworks and server side call-backs, you probably know how important is to show loading message to the users, especially for time consuming requests. In this article I will show you some basic methods to create custom loaders when using Ext.js.

extjs_loading

First of all we can nicely indicate loading process when starting ext.js application. It’s very simple as all we need to do is to put loading div inside the html body. When ext.js will finish loading scripts, then we simply remove that div from the page. In order to do that, we need to apply removal logic on Ext.ready event.

  // html file
 <body>
    <div id="loading-mask"></div>
    <div id="loading">
        <div class="loading-indicator">
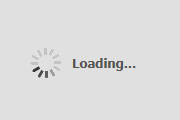
            Loading...
        </div>
    </div>
</body>

 Ext.onReady(function () {
    setTimeout(function () { 
        Ext.get('loading').remove();  //remove element
        //fade out to get better UI experience
        Ext.get('loading-mask').fadeOut({ remove: true }); 
    }, 1250); //simulate long running process
 });

Now, let’s create basic method that applies loading mask to the element passed in

  setLoading: function (element, start, styles) {
    if (!styles) { styles = "loadingBox"; } //set default styles if not set

    if (start) {
      element.loadingMask = new Ext.LoadMask(element, { msg: "Loading...", msgCls: styles });
      element.loadingMask.show();
     }
    else {
      element.loadingMask.hide();
    }
  },

And finally, if we want to show loading message when for instance clicking the button, the following code can be applied:

{
 xtype: 'button',
 text: 'start loading',
 width: 150,
 height: 50,
 style: 'margin:50px',
 handler: function () {
    var el = this;
    me.setLoading(el, true);//show loading message

    //do you stuff here

    setTimeout(function () {
        me.setLoading(el, false); //turn it off
    }, 1000);
  }
},          

Also if you want to customize it a bit, you can do it following way:

   //simple fade-In/Out function
   fade: function (element, fadeOut) {
        if (fadeOut) {
            Ext.get(element.id).fadeOut({
                opacity: 0,
                easing: 'easeOut',
                duration: 1000,
                remove: false,
                useDisplay: false
            });
        }
        else {
            Ext.get(element.id).fadeIn({
                opacity: 1,
                easing: 'easeOut',
                duration: 1000
            });
        }
    },
  {
    xtype: 'button',
    text: 'start loading with custom styles',
    width: 250,
    height: 50,
    id: 'button2',
    style: 'margin:50px',
    handler: function () {
        var el = Ext.get('mainPanel'); //render to main panel
        me.setLoading(el, true, 'customLoader');//show loading message
        me.fade(el, true); //fade out

        //do you stuff here

        setTimeout(function () {
            me.setLoading(el, false); //turn it off
            me.fade(el, false); //fade in
        }, 1000);
    }
},

There is a lot of other ways to show custom loading messages that you can apply. I have attached sample solution for you to test different scenarios based on my example.
Ext_loading

1 Star2 Stars3 Stars4 Stars5 Stars (No Ratings Yet)
Loading...Loading...

Building EXT.JS MVC applications

Exj.js it’s very powerful framework that is based entirely on JavaScript using Ajax, DHTML and DOM scripting. Originally built as YUI extension, ext.js is getting more and more popular recently thanks to cross-browser compatibility and ability to easily implement solutions on mobile devices using Sencha Touch.
To fully unleash the power of Ext.js it needs to be implemented along with one of the well known server side technologies such as asp.net, php etc.

As a example we will build simple CRM application that displays and manages client’s entities.
ext.js_crm

Using Ext.js MVC pattern is very popular in conjunction with asp.net restful services. In this situation Ext.js simply executes ajax requests that are being routed to asp.net controllers that send back json response to be processed on the client side by ext.js.

Lets define basic MVC structure.

extjs_mvc

Having MVC structure ready, the first thing to do is to create model, view and controller for the entity we are going to implement. In our case we will implement Client entity. This will allow us to list, add end edit clients that we load to our store.

Let’s define our model by defining property names and it’s types. Non defined type means the the auto type will be applied (the type will be inferred from the property value at runtime).

  Ext.define('ExtMVC.model.Client', {
    extend: 'Ext.data.Model',
    fields: [
        {name: 'name'},
        {name: 'address'},
        {name: 'revenue', type: 'float'},
        {name: 'growth',  type: 'float'},
        {name: 'product', type: 'float'},
        {name: 'market',  type: 'float'}
    ]
});

We will define our client store as array store, so we can quickly add and display client list.

  Ext.define('ExtMVC.store.Clients', {
    extend: 'Ext.data.ArrayStore',
    model: 'ExtMVC.model.Client'
});

In our controller we need to define the model, store and views that we will be referencing.

  Ext.define('ExtMVC.controller.Clients', {
    extend: 'Ext.app.Controller',

    models: ['Client'],

    stores: ['Clients'],

    views: [ 
        'clients.ClientForm'
    ],
    ........

We also need to load controller when application starts. We can also load controller dynamically at any time during application lifetime.

 Ext.application({
    name: 'ExtMVC',

    controllers: [
        'Clients'
    ],

    autoCreateViewport: true
 });

 or

 var controller = Ext.create(this.getModuleClassName('Clients', 'controller'), {
 this.controllers.add(controller);

Last thing to do is to extend view port class and define startup objects to be displayed when application starts.

 Ext.define('ExtMVC.view.Viewport', {
    extend: 'Ext.Viewport',       
    layout: 'fit',   
    requires: [
        'ExtMVC.view.clients.ClientForm',
        'ExtMVC.view.clients.ClientGrid',
    ],
    
    initComponent: function() {
        var me = this;      
        Ext.apply(me, {
            items: [
                {
                    xtype: 'clientform'
                }
            ]
        });
                
        me.callParent(arguments);
    }
 });

ext_mvc

1 Star2 Stars3 Stars4 Stars5 Stars (No Ratings Yet)
Loading...Loading...