Posts

Using Windows Azure Service Management REST API in automated tasks

Windows Azure platform gives us a lot of new possibilities starting from the ability to auto scale instances of the deployed application to performing an on demand automated changes. When handling multiple applications deployed to the cloud there is a need to automate daily processes in order to save the development time.

In this article I will show you how to automate process of creating new cloud service using Windows Azure REST API. In our example we will create custom Api helper to instantiate our request object that will be then used to invoke the Azure RestFul API procedure.

In order to access WA Api the Azure subscription password and user name is not required, all you need is the subscription ID and the management certificate. This creates the possibility to give some administrative tasks to other people in the company not necessarily having access to the subscription account.

First thing to do is to create and upload management certificate into WA Management Portal. One of the ways to create certificate is to do it from within Visual Studio. In order to do that, we need to right click on our cloud project and open remote desktop configuration wizard. Next we need to select “create new” from the menu. After our certificate is created we can view it and export it to the .cer file. At this stage we also need to read the certificate’s thumb-print that will be used to find it in the local store.

The image below shows the process of configuring new RDP connection and creating new certificate

cert-config-azure

After we have created and exported certificate to the file, we can upload it to the WA Management Portal as shown below

azure-management-certificate

Please note that certificate thumb-print is the same as our local one.

We also need to make sure that our Api helper will find the certificate in our local store. In order to check it’s location, please open Windows Management Console (mmc) and add snap-in for the current user and local computer certificates. Next you need to copy it as depicted below

certificates

At this stage we can start implementing our Api request helper. Let’s create custom PayLoadSettings class first that we will use to hold the basic request settings.

 public class PayLoadSettings
 {
    public string CloudServiceUrlFormat { get; set; }
    public string SubscriptionId { get; set; }
    public string Thumbprint { get; set; }
    public string ServiceName { get; set; }
    public string Label { get; set; }
    public string Description { get; set; }
    public string Location { get; set; }
    public string AffinityGroup { get; set; }
    public string VersionId { get; set; }
 }

Next let’s create function that retrieves our newly created (and uploaded to the WAM portal) certificate from the local machine store

/// <summary>
/// Get certificate from the local machine by thumbprint
/// </summary>
/// <returns></returns>
private X509Certificate2 GetX509Certificate()
{
    X509Certificate2 x509Certificate = null;
    var certStore = new X509Store(StoreName.My, StoreLocation.LocalMachine);
    try
    {
        certStore.Open(OpenFlags.ReadOnly);

        var x509CertificateCollection = certStore.Certificates.Find(X509FindType.FindByThumbprint, this.PayLoadSettings.Thumbprint, false);

        x509Certificate = x509CertificateCollection[0];
    }
    finally
    {
        certStore.Close();
    }

    return x509Certificate;
 }

Next, we want to create function that inserts our cert into new request object to be sent to execute remote action. We also need to set the requested Api version (not required though).

/// <summary>
/// Create http request object with the certificate added
/// </summary>
/// <param name="uri"></param>
/// <param name="httpWebRequestMethod"></param>
/// <returns></returns>
private HttpWebRequest CreateHttpWebRequest(Uri uri, string httpWebRequestMethod)
{
    var x509Certificate = GetX509Certificate();
    var httpWebRequest = (HttpWebRequest)HttpWebRequest.Create(uri);

    httpWebRequest.Method = httpWebRequestMethod;
    httpWebRequest.Headers.Add("x-ms-version", this.PayLoadSettings.VersionId);

    httpWebRequest.ClientCertificates.Add(x509Certificate);
    httpWebRequest.ContentType = "application/xml";

    return httpWebRequest;
}

Next step is to create payload document object containing the operation parameters that we want to execute. The names are self-explanatory.

/// <summary>
/// Create payload document
/// </summary>
/// <returns></returns>
private XDocument CreatePayload()
{
    var base64LabelName = Convert.ToBase64String(Encoding.UTF8.GetBytes(this.PayLoadSettings.Label));

    var xServiceName = new XElement(azureNamespace + "ServiceName", this.PayLoadSettings.ServiceName);
    var xLabel = new XElement(azureNamespace + "Label", base64LabelName);
    var xDescription = new XElement(azureNamespace + "Description", this.PayLoadSettings.Description);
    var xLocation = new XElement(azureNamespace + "Location", this.PayLoadSettings.Location);
    var xAffinityGroup = new XElement(azureNamespace + "AffinityGroup", this.PayLoadSettings.AffinityGroup);
    var createHostedService = new XElement(azureNamespace + "CreateHostedService");

    createHostedService.Add(xServiceName);
    createHostedService.Add(xLabel);
    createHostedService.Add(xDescription);
    createHostedService.Add(xLocation);
    createHostedService.Add(xAffinityGroup);

    var payload = new XDocument();
    payload.Add(createHostedService);

    payload.Declaration = new XDeclaration("1.0", "UTF-8", "no");

    return payload;
}

Having payload document created, we can send our request and retrieve request id if operation is successful.

/// <summary>
/// Invoke Api operation by sending payload object
/// </summary>
/// <param name="uri"></param>
/// <param name="payload"></param>
/// <returns></returns>
private string InvokeAPICreateRequest(string uri, XDocument payload)
{
    string requestId;
    var operationUri = new Uri(uri);

    var httpWebRequest = CreateHttpWebRequest(operationUri, "POST");

    using (var requestStream = httpWebRequest.GetRequestStream())
    {
        using (var streamWriter = new StreamWriter(requestStream, UTF8Encoding.UTF8))
        {
            payload.Save(streamWriter, SaveOptions.DisableFormatting);
        }
    }

    using (var response = (HttpWebResponse)httpWebRequest.GetResponse())
    {
        requestId = response.Headers["x-ms-request-id"];
    }

    return requestId;
}

The final function just puts it all together as follows

/// <summary>
/// Execute create cloud service request
/// </summary>
/// <returns></returns>
public string CreateCloudService()
{
    var cloudServiceUrl = string.Format(this.PayLoadSettings.CloudServiceUrlFormat, this.PayLoadSettings.SubscriptionId);
    
    var payload = CreatePayload();

    var requestId = InvokeAPICreateRequest(cloudServiceUrl, payload);

    return requestId;
}

If we will invoke the code from the console, the code should look as below

 static void Main(string[] args)
 {
    //load this from your configuration file
    var payLoadSettings = new PayLoadSettings()
    {
        CloudServiceUrlFormat = "https://management.core.windows.net/{0}/services/hostedservices",
        SubscriptionId = "92533879-88c9-41fe-b24e-5251bcf49a8f",//fake subscription id - please provide yours
        Thumbprint = "3a f6 67 24 d8 d8 b3 71 b0 c4 d3 00 c2 04 0d 62 e5 30 76 1c", //fake cert thumbprint - please provide yours
        ServiceName = "newService1234567",//name your new service
        Label = "newService1234567", //give it a tracking label
        Description = "My new cloud service", //service description
        Location = "North Europe",//select centre
        AffinityGroup = "", //not created yet
        VersionId = "2011-10-01"//api version
    };

    var api = new RestAPIHelper(payLoadSettings);

    try
    {
        var requestId = api.CreateCloudService();

        Console.WriteLine("Cloud service has been created successfully :)" + Environment.NewLine + "Request id: " + requestId);
        Console.ReadLine();
    }
    catch (Exception ex)
    {
        Console.WriteLine(ex.Message);
        Console.ReadLine();
    }
}

Let’s run the console application now

cloud-service-created

After executing above we can check in WA Management Portal if the cloud service is created. This should look like image below

newcloudservice

I have attached project files for your tests. Please note that you need to set your own configuration settings for it to be working. You can also use above example to create your own automated tasks for Windows Azure – simply implement other operations in similar way. You can then use for example TeamCity to run it automatically when needed. This gives you a lot of possibilities and simply saves your precious development time.

AzureRestAPI

1 Star2 Stars3 Stars4 Stars5 Stars (No Ratings Yet)
Loading...Loading...

Claims based authentication on Windows Azure

Claims based authentication can greatly improve user’s experience by allowing them to login to our site using external trusted providers such as Google, Yahoo etc. In this article I will show you how to integrate claims based authentication with existing membership provider. This is common scenario if you don’t have any on premises applications using Active Directory needing to connect to the cloud. If this is the case we would have to use WIF (Windows Identity Foundation) authentication modules and Active Directory Federation Services installed on premises.

In our simple example we will use DotNetOpenAuth to perform claims based authentication along side default membership provider. In order to successfully authenticate the user we will have to correlate user data stored in membership table with the UserID received from external claims callback, in our case we will receive email address as a user-name from Google.

Following diagram presents high level overview of our solution:

claims_authentication

How it works:
User can login to our site as normal using standard login button. If he wishes to login using eg. Google account he will have to click the button below saying ‘Log in with Google’.
After clicking that button, user is redirected to Google’s login page. If the Google login is successful then user is redirected back to our site. Our generic handler validates the claims stored in the response context. If the validation is successful, we are getting email address that we will use to login the user. Before doing that we need to first find the user in our database by email address and get his data.

google_login

Let’s start implementation.

In the Global.asax file we need to attach UserAuthenticated event. We will use it to get callback response from Google containing claimed userID.

 public void RegisterEvents()
 {
    //attach login event from the generic handler
    GoogleLoginHandler.UserAuthenticated += new EventHandler<EventArgs<string>>(GoogleLoginHandler_UserAuthenticated);
 }

 void GoogleLoginHandler_UserAuthenticated(object sender, EventArgs<string> e)
 {
    var accountController = new Controllers.AccountController();
    accountController.LogOnUsingOpenId(e.Data); //pass in email address of the user to be logged in
 }

 protected void Application_Start()
 {
    AreaRegistration.RegisterAllAreas();

    RegisterGlobalFilters(GlobalFilters.Filters);
    RegisterRoutes(RouteTable.Routes);
    RegisterEvents();
 }

Next, lets add following handler GoogleLoginHandler.ashx to our project. In that handler we will redirect to Google login page and read the response after login is successful. See in-line comments:

  public void ProcessRequest(HttpContext context)
 {
	using (var openid = new OpenIdRelyingParty())
	{
		openid.Behaviors.Add(new AXFetchAsSregTransform());

		var response = openid.GetResponse();
		if (response == null)
		{
			// Check if already logged in
			var request = openid.CreateRequest(GoogleOPIdentifier);
			request.AddExtension(new UIRequest { Mode = UIModeDetectSession });
			request.Mode = AuthenticationRequestMode.Immediate;
			request.AddExtension(new ClaimsRequest { Email = DemandLevel.Require });
			request.RedirectToProvider();
		}
		else
		{
			if (response.Status == AuthenticationStatus.Authenticated)
			{
				var claims = response.GetExtension<ClaimsResponse>();
				var userEmail = claims.Email;

				if (UserAuthenticated != null)
				{
					//Log user in
					UserAuthenticated(this, new EventArgs<string>(userEmail));
				}

				context.Response.Redirect(context.Request["ReturnUrl"]);
			}
			else if (response.Status == AuthenticationStatus.SetupRequired)
			{
				var request = openid.CreateRequest(GoogleOPIdentifier);
				request.AddExtension(new ClaimsRequest { Email = DemandLevel.Require });
				request.RedirectToProvider();
			}
			else
			{
				context.Response.Redirect(context.Request["ReturnUrl"]);
			}
		}
	}
 }

We will use following function to redirect to login page and back to destination by reading the ReturnUrl param:

 public static void TryToLogin(string defaultRedirection = "/Home/Index")
{
    //extract return url if exists
    var returnUrl = HttpContext.Current.Request.UrlReferrer != null && HttpContext.Current.Request.UrlReferrer.ToString().Contains("ReturnUrl=") ?
        HttpContext.Current.Request.UrlReferrer.ToString().Split(new string[] { "ReturnUrl=" }, StringSplitOptions.None)[1] : defaultRedirection;
    
    if (returnUrl.Trim().Length == 0) { returnUrl = defaultRedirection; } //enforce default if empty

    HttpContext.Current.Response.Redirect("~/GoogleLoginHandler.ashx?ReturnUrl=" + returnUrl);
}

Our generic handler and declarations will look as follows:

 public class GoogleLoginHandler : IHttpHandler
 {
    public static event EventHandler<EventArgs<string>> UserAuthenticated;

    private const string GoogleOPIdentifier = "https://www.google.com/accounts/o8/id";
    private const string UIModeDetectSession = "x-has-session";

We will also extend EventArgs class to accept generic param that we will use in our callback handler.

 namespace System
 {
    public class EventArgs<T> : EventArgs
    {
        public EventArgs()
        {
        }

        public EventArgs(T data)
        {
            this.Data = data;
        }

        public T Data { get; set; }
    }
}

And finally we call following function to authenticate user containing verified email address that matches email address in our membership table.

/// <summary>
/// Private login method for openId
/// </summary>
/// <param name="emailAddress"></param>
/// <returns></returns>
[Authorize]
internal ActionResult LogOnUsingOpenId(string emailAddress)
{
    var userName = Membership.GetUserNameByEmail(emailAddress);
    if (userName != null)
    {
        FormsAuthentication.SetAuthCookie(userName, true);
    }

    return View();
}

I have included project files below so you can see it working and adjust it to your requirements 🙂

Claims Authentication

1 Star2 Stars3 Stars4 Stars5 Stars (No Ratings Yet)
Loading...Loading...

C# 5.0 Async Programming and Caller Information

Since the release of .Net 4.5 Framework there are new, very useful features added that I want you to get familiar with. Because the C# language evolves along the .Net Framework, I have created chart that will help you to see all major changes that have been introduced over the last 10 years. I still remember myself starting my programming adventure with VS 2002 🙂

c_versions_history

Let’s focus on the new C# 5.0 features now.

Async Framework introduced in C# 5.0 will probably change the the way we do our programming on the .net platform. The idea is to apply standard async procedures in the background while allowing developer to minimize amount of code required.

The new Async logic seems to be incorporated into standard synchronous functions with only a few keywords added (eg. await, async). When marked async, methods are executed synchronously until the first await statement. At this same time the control is given back to the caller allowing executing thread to function correctly (will not freeze UI).

In our example we will call WCF service using async framework. This is mostly accurate real live scenario whether you will use windows forms or WPF application to boost user experience within the UI layer.

async_programming1

After our WCF service is started (self hosting) we are implementing code as follows.

 private async void btnSendWCF_Click(object sender, EventArgs e)
 {
    Task<string> responseTask = SendWCFMessage("test message");

    await Task.Delay(3000); //give it more time

    var response = await responseTask;

    txtResult.Text = response;
}

After executing this methods we are awaiting for the responseTask result while main thread is returned to the caller and UI is fully responsive.

SendWCFMessage method returns task string result. We will use Factory.StartNew to wrap-up our WCF request and return it. See in-line comments.

 Task<string> SendWCFMessage(string message)
 {
    return Task<string>.Factory.StartNew(() =>
    {
        try
        {
            //use TCP when sending message on the same computer or within the trusted network
            var binding = new NetTcpBinding();
            var endpoint = new EndpointAddress(hostEndPointAddress);

            var factory = new ChannelFactory<IServiceHost>(binding, endpoint);
            var channel = factory.CreateChannel();

            //send entered message using created channel
            var result = channel.SendMessage(message);

            //Trace caller information
            TraceMessage(result);

            //return value from the task
            return result;
        }
        catch (Exception ex)
        {
            return ex.Message;
        }
    });
}

As a second example we will use WebRequest class and reuse existing async functionality – the methods GetResponseAsync and CopyToAsync. In both examples we will also display caller trace information.

 private async void btnSendHttpReq_Click(object sender, EventArgs e)
{
    var request = WebRequest.Create(txtUri.Text.Trim());
    var content = new MemoryStream();

    Task<WebResponse> responseTask = request.GetResponseAsync();

    using (var response = await responseTask)
    {
        using (var responseStream = response.GetResponseStream())
        {
            Task copyTask = responseStream.CopyToAsync(content);

            await Task.Delay(3000);//give it more time

            //wait until finished (release main thread in the meantime)
            await copyTask;
        }
    }

    txtResult.Text = string.Format("Response length {0}", content.Length);

    //Trace caller information
    TraceMessage(txtResult.Text);
}

Please notice that in Caller Information “member name” is btnSendHttpReq_Click for webrequest and TraceMessage for WCF as the method is invoked from different thread.

I have attached project files below so you can do your tests as well.

AsyncProgramming

1 Star2 Stars3 Stars4 Stars5 Stars (No Ratings Yet)
Loading...Loading...

Creating WCF custom transport channel

Primary purpose of using WCF within organization is to wrap-up existing components into service oriented architecture (SOA) that can be then easily reused and maintained. When communicating within the local network or between the local components, you may want to implement your own WCF transport channel satisfying your specific requirements.

In this article I will show you how to write your own transport channel to be used without the contract bindings.

wcf_custom_channel

Lets’s start from the CustomBinding class that needs to implement Binding base. One thing to remember is that in CreateBindingElements method the transport element must be the last in the collection, otherwise you will get exception.

 public class CustomBinding : Binding
 {
    readonly MessageEncodingBindingElement messageElement;
    readonly CustomChannelBindingElement transportElement;

    public CustomBinding()
    {
        this.messageElement = new TextMessageEncodingBindingElement();
        this.transportElement = new CustomChannelBindingElement(); //must be the last in collection
    }

    public override BindingElementCollection CreateBindingElements()
    {
        return new BindingElementCollection(new BindingElement[] {
            this.messageElement,
            this.transportElement
        });
    }

    public override string Scheme
    {
        get { return this.transportElement.Scheme; }
    }
}

Next we need to create CustomChannelBindingElement that inherits from TransportBindingElement class. The implementation is quite simple. The scheme may be any prefix you like “http” or “myHttp”. In build channel and listener methods we are simply creating new instances of CustomChannelFactory and CustomChannelListener objects.

 public class CustomChannelBindingElement : TransportBindingElement
 {
    public CustomChannelBindingElement() { }

    public CustomChannelBindingElement(CustomChannelBindingElement clone) { }

    public override string Scheme
    {
        get { return "myprotocol"; }
    }

    public override bool CanBuildChannelFactory<TChannel>(BindingContext context)
    {
        return typeof(TChannel) == typeof(IRequestChannel);
    }

    public override bool CanBuildChannelListener<TChannel>(BindingContext context)
    {
        return typeof(TChannel) == typeof(IReplyChannel);
    }

    public override IChannelFactory<TChannel> BuildChannelFactory<TChannel>(BindingContext context)
    {
        if (context == null)
        {
            throw new ArgumentNullException("context");
        }
        if (!CanBuildChannelFactory<TChannel>(context))
        {
            throw new ArgumentException(String.Format("Unsupported channel type: {0}.", typeof(TChannel).Name));
        }
        return (IChannelFactory<TChannel>)(object)new CustomChannelFactory(this, context);
    }

    public override IChannelListener<TChannel> BuildChannelListener<TChannel>(BindingContext context)
    {
        if (context == null)
        {
            throw new ArgumentNullException("context");
        }
        if (!CanBuildChannelListener<TChannel>(context))
        {
            throw new ArgumentException(String.Format("Unsupported channel type: {0}.", typeof(TChannel).Name));
        }
        return (IChannelListener<TChannel>)(object)new CustomChannelListener(this, context);
    }

    public override BindingElement Clone()
    {
        return new CustomChannelBindingElement(this);
    }
}

Next, we need to create CustomChannelFactory class passing in transportElement and BindingContext to the constructor. Please note the context.BindingParameters.Remove method removes binding element before the validation takes place in async calls. Then, based on MessageEncodingBindingElement we create encoder factory.

 class CustomChannelFactory : ChannelFactoryBase<IRequestChannel>
 {
    readonly MessageEncoderFactory encoderFactory;

    public CustomChannelFactory(CustomChannelBindingElement transportElement, BindingContext context)
        : base(context.Binding)
    {
        var messageElement = context.BindingParameters.Remove<MessageEncodingBindingElement>();
        this.encoderFactory = messageElement.CreateMessageEncoderFactory();
    }

    protected override IRequestChannel OnCreateChannel(EndpointAddress address, Uri via)
    {
        return new CustomRequestChannel(this, encoderFactory, address, via);
    }

    protected override IAsyncResult OnBeginOpen(TimeSpan timeout, AsyncCallback callback, object state)
    {
        throw new NotImplementedException();
    }

    protected override void OnEndOpen(IAsyncResult result)
    {
        throw new NotImplementedException();
    }

    protected override void OnOpen(TimeSpan timeout)
    {

    }
}

Next step is to create CustomChannelListener inheriting from ChannelListenerBase. In this class I have also implemented some methods needed when working with async calls.

 class CustomChannelListener : ChannelListenerBase<IReplyChannel>
 {
    #region privates
    readonly Uri uri;
    readonly MessageEncoderFactory encoderFactory;
    CustomReplyChannel innerChannel;
    delegate IReplyChannel AsyncOnAcceptCaller(TimeSpan timeout);
    AsyncOnAcceptCaller asyncOnAcceptCaller; 
    #endregion

    public CustomChannelListener(CustomChannelBindingElement transportElement, BindingContext context)
        : base(context.Binding)
    {
        this.uri = new Uri(context.ListenUriBaseAddress, context.ListenUriRelativeAddress);
        var messageElement = context.BindingParameters.Remove<MessageEncodingBindingElement>();

        this.encoderFactory = messageElement.CreateMessageEncoderFactory();
        this.asyncOnAcceptCaller = new AsyncOnAcceptCaller(this.OnAcceptChannel);
    }

    protected override IReplyChannel OnAcceptChannel(TimeSpan timeout)
    {
        var address = new EndpointAddress(this.Uri);
        innerChannel = new CustomReplyChannel(this, encoderFactory, address);

        return innerChannel;
    }

    protected override IAsyncResult OnBeginAcceptChannel(TimeSpan timeout, AsyncCallback callback, object state)
    {
        return asyncOnAcceptCaller.BeginInvoke(timeout, callback, state);
    }

    protected override IReplyChannel OnEndAcceptChannel(IAsyncResult result)
    {
        return asyncOnAcceptCaller.EndInvoke(result);
    }

    protected override IAsyncResult OnBeginWaitForChannel(TimeSpan timeout, AsyncCallback callback, object state)
    {
        throw new NotImplementedException();
    }

    protected override bool OnEndWaitForChannel(IAsyncResult result)
    {
        throw new NotImplementedException();
    }

    protected override bool OnWaitForChannel(TimeSpan timeout)
    {
        throw new NotImplementedException();
    }

    public override Uri Uri
    {
        get { return this.uri; }
    }

    protected override void OnAbort()
    {
        throw new NotImplementedException();
    }

    protected override IAsyncResult OnBeginClose(TimeSpan timeout, AsyncCallback callback, object state)
    {
        throw new NotImplementedException();
    }

    protected override IAsyncResult OnBeginOpen(TimeSpan timeout, AsyncCallback callback, object state)
    {
        throw new NotImplementedException();
    }

    protected override void OnClose(TimeSpan timeout)
    {
        throw new NotImplementedException();
    }

    protected override void OnEndClose(IAsyncResult result)
    {
        throw new NotImplementedException();
    }

    protected override void OnEndOpen(IAsyncResult result)
    {
        throw new NotImplementedException();
    }

    protected override void OnOpen(TimeSpan timeout)
    {

    }
}

Let’s create our channelbase now. Please note that you need to pass in ChannelManagerBase to the constructor. Our read and write message methods will simply create new messages with the data as a string passed in from the request and reply channels. Depending on your requirements you may want to implement your own mechanism of creating messages eg. read from files etc.

 public abstract class CustomChannelBase : ChannelBase
 {
    #region privates
    readonly EndpointAddress address;
    readonly MessageEncoder encoder;
    readonly ChannelManagerBase manager;

    #endregion

    public EndpointAddress RemoteAddress
    {
        get { return this.address; }
    }

    public CustomChannelBase(ChannelManagerBase manager, MessageEncoderFactory encoderFactory, EndpointAddress addres)
        : base(manager)
    {
        this.address = address;
        this.manager = manager;
        this.encoder = encoderFactory.CreateSessionEncoder();
    }

    public Message ReadMessage(string data)
    {
        return Message.CreateMessage(MessageVersion.Default, "fault", data);
    }

    public Message WriteMessage(string data)
    {
        return Message.CreateMessage(MessageVersion.Default, "fault", data);
    }

    protected override void OnAbort()
    {
        throw new NotImplementedException();
    }

    protected override IAsyncResult OnBeginClose(TimeSpan timeout, AsyncCallback callback, object state)
    {
        throw new NotImplementedException();
    }

    protected override IAsyncResult OnBeginOpen(TimeSpan timeout, AsyncCallback callback, object state)
    {
        throw new NotImplementedException();
    }

    protected override void OnClose(TimeSpan timeout)
    {

    }

    protected override void OnEndClose(IAsyncResult result)
    {
        throw new NotImplementedException();
    }

    protected override void OnEndOpen(IAsyncResult result)
    {
        throw new NotImplementedException();
    }

    protected override void OnOpen(TimeSpan timeout)
    {

    }
}

Finally, we can create our reply channel that will be used to reply to incoming requests. In this example we will use tcpListener to communicate with the client. In this case WCF service will serve as a wrapper for the underlying TCP communication. In the method WaitForRequest we are simply waiting for incoming message and returning true. After that, the method IReplyChannel.ReceiveRequest is triggered. In that method we simply read the message from the TCP client passing it to the request context.

 public class CustomReplyChannel : CustomChannelBase, IReplyChannel
{
    #region privates
    readonly EndpointAddress localAddress;
    readonly object readLock;
    readonly MessageEncoderFactory encoderFactory;
    delegate IReplyChannel AsyncOnAcceptCaller(TimeSpan timeout);
    AsyncOnAcceptCaller asyncOnAcceptCaller;

    TcpListener tcpListener;
    TcpClient tcpClient;
    #endregion

    public EndpointAddress LocalAddress
    {
        get { return this.localAddress; }
    }

    public CustomReplyChannel(ChannelManagerBase manager, MessageEncoderFactory encoderFactory, EndpointAddress address)
        : base(manager, encoderFactory, address)
    {
        this.encoderFactory = encoderFactory;
        this.localAddress = address;
        this.asyncOnAcceptCaller = new AsyncOnAcceptCaller(this.OnAcceptChannel);

        //start listener
        if (this.tcpListener == null)
        {
            this.tcpListener = new TcpListener(address.Uri.Port);
        }

        tcpListener.Start();
    }

    protected IReplyChannel OnAcceptChannel(TimeSpan timeout)
    {
        var address = new EndpointAddress(this.localAddress.Uri);

        return new CustomReplyChannel(this.Manager, this.encoderFactory, address);
    }

    #region IReplyChannel Members

    IAsyncResult IReplyChannel.BeginReceiveRequest(TimeSpan timeout, AsyncCallback callback, object state)
    {
        throw new NotImplementedException();
    }

    IAsyncResult IReplyChannel.BeginReceiveRequest(AsyncCallback callback, object state)
    {
        throw new NotImplementedException();
    }

    IAsyncResult IReplyChannel.BeginTryReceiveRequest(TimeSpan timeout, AsyncCallback callback, object state)
    {
        return asyncOnAcceptCaller.BeginInvoke(timeout, callback, state);
    }

    IAsyncResult IReplyChannel.BeginWaitForRequest(TimeSpan timeout, AsyncCallback callback, object state)
    {
        throw new NotImplementedException();
    }

    RequestContext IReplyChannel.EndReceiveRequest(IAsyncResult result)
    {
        throw new NotImplementedException();
    }

    bool IReplyChannel.EndTryReceiveRequest(IAsyncResult result, out RequestContext context)
    {
        context = ((IReplyChannel)this).ReceiveRequest(DefaultReceiveTimeout);
        return true;
    }

    bool IReplyChannel.EndWaitForRequest(IAsyncResult result)
    {
        throw new NotImplementedException();
    }

    EndpointAddress IReplyChannel.LocalAddress
    {
        get { throw new NotImplementedException(); }
    }

    RequestContext IReplyChannel.ReceiveRequest(TimeSpan timeout)
    {
        ThrowIfDisposedOrNotOpen();

        try
        {
            var clientStream = tcpClient.GetStream();

            var message = new byte[4096];
            var enc = new ASCIIEncoding();

            var bytesRead = clientStream.Read(message, 0, 4096);
            var response = enc.GetString(message, 0, bytesRead);

            var buffer = enc.GetBytes("Message received");

            clientStream.Write(buffer, 0, buffer.Length);
            clientStream.Flush();

            return new CustomRequestContext(this.ReadMessage(response), this);
        }
        catch (SocketException ex)
        {
            return new CustomRequestContext(this.ReadMessage(ex.Message), this);
        }
        catch (Exception ex)
        {
            return new CustomRequestContext(this.ReadMessage(ex.Message), this);
        }
    }

    RequestContext IReplyChannel.ReceiveRequest()
    {
        throw new NotImplementedException();
    }

    bool IReplyChannel.TryReceiveRequest(TimeSpan timeout, out RequestContext context)
    {
        throw new NotImplementedException();
    }

    bool IReplyChannel.WaitForRequest(TimeSpan timeout)
    {
        ThrowIfDisposedOrNotOpen();

        //blocks until a client has sent a message
        this.tcpClient = tcpListener.AcceptTcpClient();

        return true;
    }

    #endregion

    #region IChannel Members

    T IChannel.GetProperty<T>()
    {
        T channel = encoderFactory.Encoder.GetProperty<T>();
        if (channel != null)
        {
            return channel;
        }

        if (typeof(T) == typeof(MessageVersion))
        {
            return (T)(object)encoderFactory.Encoder.MessageVersion;
        }

        return base.GetProperty<T>();
    }

    #endregion

    #region ICommunicationObject Members

    void ICommunicationObject.Abort()
    {
        throw new NotImplementedException();
    }

    IAsyncResult ICommunicationObject.BeginClose(TimeSpan timeout, AsyncCallback callback, object state)
    {
        throw new NotImplementedException();
    }

    IAsyncResult ICommunicationObject.BeginClose(AsyncCallback callback, object state)
    {
        throw new NotImplementedException();
    }

    IAsyncResult ICommunicationObject.BeginOpen(TimeSpan timeout, AsyncCallback callback, object state)
    {
        throw new NotImplementedException();
    }

    IAsyncResult ICommunicationObject.BeginOpen(AsyncCallback callback, object state)
    {
        throw new NotImplementedException();
    }

    void ICommunicationObject.Close()
    {
        throw new NotImplementedException();
    }

    event EventHandler ICommunicationObject.Closed
    {
        add { throw new NotImplementedException(); }
        remove { throw new NotImplementedException(); }
    }

    event EventHandler ICommunicationObject.Closing
    {
        add { throw new NotImplementedException(); }
        remove { throw new NotImplementedException(); }
    }

    void ICommunicationObject.EndClose(IAsyncResult result)
    {
        throw new NotImplementedException();
    }

    void ICommunicationObject.EndOpen(IAsyncResult result)
    {
        throw new NotImplementedException();
    }

    event EventHandler ICommunicationObject.Faulted
    {
        add { throw new NotImplementedException(); }
        remove { throw new NotImplementedException(); }
    }

    event EventHandler ICommunicationObject.Opened
    {
        add { throw new NotImplementedException(); }
        remove { throw new NotImplementedException(); }
    }

    event EventHandler ICommunicationObject.Opening
    {
        add { throw new NotImplementedException(); }
        remove { throw new NotImplementedException(); }
    }

    CommunicationState ICommunicationObject.State
    {
        get { throw new NotImplementedException(); }
    }

    #endregion
}

The request channel is quite straightforward as it simply sends messages using TCP client. We are also reading reply to confirm that our message has been delivered.

 public class CustomRequestChannel : CustomChannelBase, IRequestChannel
 {
    readonly Uri via;

    public Uri Via
    {
        get { return this.via; }
    }

    public CustomRequestChannel(ChannelManagerBase manager, MessageEncoderFactory encoderFactory, EndpointAddress address, Uri via)
        : base(manager, encoderFactory, address)
    {
        this.via = via;
    }

    public Message Request(Message message, TimeSpan timeout)
    {
        ThrowIfDisposedOrNotOpen();

        try
        {
            using (var tcpClient = new TcpClient(this.Via.Host, this.Via.Port))
            {
                var clientStream = tcpClient.GetStream();

                tcpClient.ReceiveTimeout = timeout.Seconds;
                tcpClient.SendTimeout = timeout.Seconds;

                var msg = new byte[4096];
                var encoder = new ASCIIEncoding();

                //get string value from message body
                var messageBody = message.GetBody<string>();
                var buffer = encoder.GetBytes(messageBody);

                //send message
                clientStream.Write(buffer, 0, buffer.Length);
                clientStream.Flush();

                //read reply
                var bytesRead = clientStream.Read(msg, 0, 4096);
                var response = encoder.GetString(msg, 0, bytesRead);

                return this.ReadMessage(response);
            }
        }
        catch (SocketException ex)
        {
            return this.ReadMessage(ex.Message);
        }
        catch (Exception ex)
        {
            return this.ReadMessage(ex.Message);
        }
    }

    public Message Request(Message message)
    {
        return this.Request(message, DefaultReceiveTimeout);
    }

    public IAsyncResult BeginRequest(Message message, TimeSpan timeout, AsyncCallback callback, object state)
    {
        throw new NotImplementedException();
    }

    public IAsyncResult BeginRequest(Message message, AsyncCallback callback, object state)
    {
        throw new NotImplementedException();
    }

    public Message EndRequest(IAsyncResult result)
    {
        throw new NotImplementedException();
    }
}

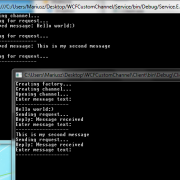
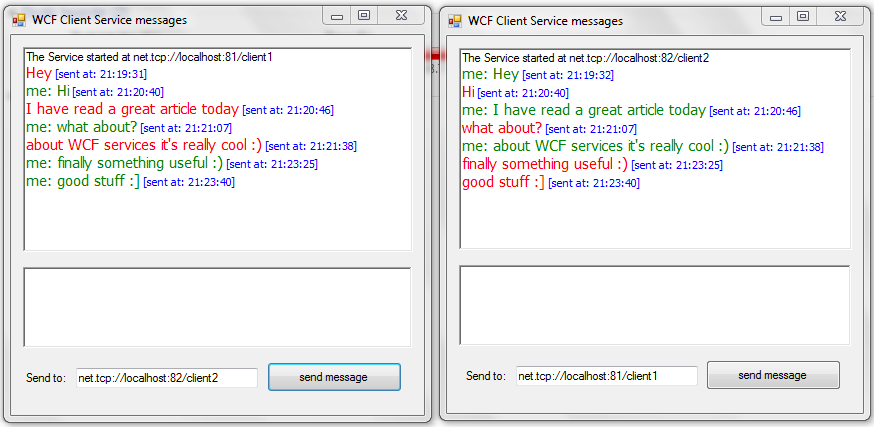
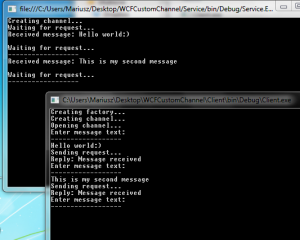
Finally we can test our server service

 static void StartService()
    {
        var binding = new WCFCustomChannelLib.CustomBinding();
        var uri = new Uri("myProtocol://localhost:81/x");

        var listener = binding.BuildChannelListener<IReplyChannel>(uri, new BindingParameterCollection());

        listener.Open(TimeSpan.FromSeconds(5));

        Console.Write("Creating channel...");
        Console.Write(Environment.NewLine);

        var channel = listener.AcceptChannel(TimeSpan.FromSeconds(5));
        channel.Open(TimeSpan.FromSeconds(5));

        Console.Write("Waiting for request...");
        Console.Write(Environment.NewLine);

        while (channel.WaitForRequest(TimeSpan.FromMinutes(1)))
        {
            using (var context = channel.ReceiveRequest(TimeSpan.FromSeconds(5)))
            {
                using (var message = context.RequestMessage)
                {
                    Console.WriteLine("Received message: {0}", message.GetBody<string>());
                    Console.Write(Environment.NewLine);

                    var replyMessage = Message.CreateMessage(MessageVersion.Default, "fault", "Message received");

                    context.Reply(replyMessage, TimeSpan.FromSeconds(5));
                }
            }
            Console.Write("Waiting for request...");
            Console.Write(Environment.NewLine + "------------------" + Environment.NewLine);
        }

        Console.WriteLine("terminated");
        channel.Close(TimeSpan.FromSeconds(5));
    }
}

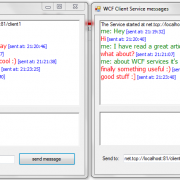
And the client service

 static void Main(string[] args)
    {
        Console.Write("Creating factory...");

        var binding = new WCFCustomChannelLib.CustomBinding();

        var factory = binding.BuildChannelFactory<IRequestChannel>();
        factory.Open(TimeSpan.FromSeconds(5));

        Console.Write(Environment.NewLine);
        Console.Write("Creating channel...");

        var uri = new Uri("myProtocol://localhost:81/x");
        var channel = factory.CreateChannel(new EndpointAddress(uri));

        Console.Write(Environment.NewLine);
        Console.Write("Opening channel...");
        Console.Write(Environment.NewLine);

        channel.Open(TimeSpan.FromSeconds(5));
           
        while (true)
        {
            Console.Write("Enter message text: ");
            Console.Write(Environment.NewLine + "------------------" + Environment.NewLine);

            var messageText = Console.ReadLine();
            if (messageText == null) { break; }

            Console.Write("Sending request...");
            Console.Write(Environment.NewLine);

            var requestMessage = Message.CreateMessage(MessageVersion.Default, "fault", messageText);
            var replyMessage = channel.Request(requestMessage, TimeSpan.FromSeconds(5));
               
            using (replyMessage)
            {
                if (replyMessage != null)
                {
                    Console.WriteLine("Reply: {0}", replyMessage.GetBody<string>());
                }
            }
        }

        channel.Close(TimeSpan.FromSeconds(5));
        factory.Close();
    }
}

I have included working sample that you can download and test on your own. Feel free to play with it 🙂

WCFCustomChannel

1 Star2 Stars3 Stars4 Stars5 Stars (No Ratings Yet)
Loading...Loading...

Creating LAN messenger using WCF Message Inspector

WCF self-hosting service can be really useful for messaging within the single or multiple tiers. Communication may involve sending execution tasks to other components or sending simple messages to be displayed on remote computer.

When sending system massages we can use Message Queuing (MSMQ) and transactions to ensure that the task will be executed even if the service if temporary off-line by storing it in the queue for planned execution. This approach makes the system loosely coupled to it’s components.

Self hosted WCF service can also be used to send and receive simple messages. In this article I will show you how to implement simple LAN messenger.

wcfLMessenger1

The interesting feature of WCF services is the ability to intercept messages as they arrive through the message channel. By using Message Inspector we can preview or change the message that we have intercepted.
We can hook in our Message Inspector by creating and adding custom service behavior. Lets start with the MyServiceBehavior class:

  public class MyServiceBehavior : IServiceBehavior
   {
      public void AddBindingParameters(ServiceDescription serviceDescription, ServiceHostBase serviceHostBase, 
           System.Collections.ObjectModel.Collection<ServiceEndpoint> endpoints, BindingParameterCollection bindingParameters)
       {
       }

      public void ApplyDispatchBehavior(ServiceDescription serviceDescription, ServiceHostBase serviceHostBase)
      {
           //note that ChannelDispatchers are available only after service is open
          foreach (ChannelDispatcher channelDispatcher in serviceHostBase.ChannelDispatchers) 
          {
             foreach (EndpointDispatcher epDisp in channelDispatcher.Endpoints)
             {
                   //attach message interceptor
                   epDisp.DispatchRuntime.MessageInspectors.Add(new MyMessageInspector()); 
               }
            }
       }

       public void Validate(ServiceDescription serviceDescription, ServiceHostBase serviceHostBase)
       {
       }
   }

Now we need to create Message Interceptor class that will intercept the massages and in our case send it to the UI to be displayed. Code below simply extracts the message value from the SOAP message received.

 public class MyMessageInspector : IDispatchMessageInspector
 {
	public object AfterReceiveRequest(ref System.ServiceModel.Channels.Message request, IClientChannel channel, InstanceContext instanceContext)
	{
		foreach (var form in Application.OpenForms)
		{
			if (form is ClientServiceForm)
			{
				var mainForm = form as ClientServiceForm;

				var message = request.ToString();

				//simple string extraction (we assume only one interface method)
				var startPos = message.LastIndexOf("<value>");
				var endPos = message.LastIndexOf("</value>");
				message = message.Substring(startPos + 7, endPos - startPos - 7);

				mainForm.AddMessage("\n" + message, ""); //send message to be displayed

				return null;
			}
		}
		return null;
  }

Next step is to start self-hosted service when application starts. Code below creates ServiceHost instance, adds TCP endpoint and our custom behavior class. Please note that service will remain open as long as the window Form is not closed (Windows Service wcf host should be implemented instead if required).

 void StartService()
 {
    var baseAddress = new Uri(HostEndPointAddress);

    hostService = new ServiceHost(typeof(MessageService), baseAddress);

    hostService.AddServiceEndpoint(typeof(IServiceHost), new NetTcpBinding(), "");
    hostService.Description.Behaviors.Add(new WCFClient.AppService.MyServiceBehavior());

    hostService.Open();

    txtClientReceivedMessage.AppendText(string.Format("The Service started at {0}", baseAddress));
}

Now is the time to implement sending messages to the remote endpoint. We will use ChannelFactory to instantiate new service that will send the messages. Please note that we have to send it to other thread in order to avoid our main UI thread to function properly.

 private void btnSendMessage_Click(object sender, EventArgs e)
 {
    if (txtClientInputMessage.Text.Trim().Length == 0)
    {
        MessageBox.Show("Enter message to be sent!"); return;
    }

    //send it to other thread
    var wcfChannelThread = new Thread(new ParameterizedThreadStart(SendMessage));
    wcfChannelThread.Start(new List<string>() { txtClientInputMessage.Text, txtTargetEndPoint.Text });

    txtClientInputMessage.Text = "";//clear input box
}


 void SendMessage(object config)
 {
    var arg = config as List<string>;
    try
    {
        //use TCP when sending message on the same computer or within the trusted network
        var binding = new NetTcpBinding();
        var endpoint = new EndpointAddress(arg[1]);

        var factory = new ChannelFactory<IServiceHost>(binding, endpoint);
        var channel = factory.CreateChannel();

        //send entered message using created channel
        channel.SendMessage(Convert.ToString(arg[0])); 

        //send message to UI
        AddMessage("", arg[0]);
    }
    catch (Exception ex)
    {
        MessageBox.Show(ex.Message);
    }
}

The last thing to do is to create thread save function that will update our UI rich-text box control with the messages coming in from background threads:

 public void AddMessage(string messageReceived, string messageSent)
 {
    if (this.InvokeRequired)
    {
        BeginInvoke(new AddMessageDel(AddMessage), new object[] { messageReceived, messageSent });
    }
    else
    {
        //insert message
        if (messageReceived.Trim().Length > 0)
        {
            txtClientReceivedMessage.SelectionFont = new System.Drawing.Font("Tahoma", 11);
            txtClientReceivedMessage.SelectionColor = Color.Red;
            txtClientReceivedMessage.AppendText(string.Format("{0}", messageReceived));
        }
        else
        {
            //sent by me
            txtClientReceivedMessage.SelectionFont = new System.Drawing.Font("Tahoma", 11);
            txtClientReceivedMessage.SelectionColor = Color.Green;
            txtClientReceivedMessage.AppendText(string.Format("\nme: {0}", messageSent));
        }

        //insert date
        txtClientReceivedMessage.SelectionFont = new System.Drawing.Font("Tahoma", 8);
        txtClientReceivedMessage.SelectionColor = Color.Blue;
        txtClientReceivedMessage.AppendText(string.Format(" [sent at: {0}]", DateTime.Now.ToString("HH:mm:ss")));

        //scroll to bottom
        txtClientReceivedMessage.SelectionStart = txtClientReceivedMessage.Text.Length;
        txtClientReceivedMessage.ScrollToCaret();
    }
}

I have included two separate project solutions. Each project represents client endpoint that can be used to send message to the other. When using the code, firewall warning message could be displayed – please allow it to listen on chosen port.

If you want to send a message to other computer within the local network, please change the endpoint address to following format: net.tcp://endpointComputerIP:82/client2. If you want to send message to other computer outside of your network, please change binding to http or https.

Hope I have inspired you to explore all possibilities of WCF framework 🙂

WCF_LAN_Messenger

1 Star2 Stars3 Stars4 Stars5 Stars (No Ratings Yet)
Loading...Loading...

WebApi requests compression using Ext.js and asp.net Mvc4

One of the easiest ways to maximize performance of ajax requests being sent over the network is to use gzip compression. There is already a built in mechanism for compressing requests but it depends on IIS settings of our hosting provider. In our case we will apply custom Delegate Handler using asp.net mvc4 ApiController that is not dependent on any environment specific settings.

If you are wondering if it’s worth to implement this solution, have a look on my test results below:

compression

Depending on the content being sent, we can reduce the request size by an average 50% or more. On the above image, the first request have been compressed while the second one was not.

In order to test our solution we will simply invoke ajax request from Ext.js application running along with self-hosted asp.net mvc4 webapi.

  Ext.Ajax.request({
            method: 'GET',
            url: 'api/ExtMvcTest/',

            success: function (response) {
                var text = response.responseText;
                alert('Request completed data length: ' + text.length);
            },
            failure: function (response) {
                alert('An error occured!');
            }
        });

On the server site we need to create our handler that derives from DelegatingHandler class. By doing that we override http SendAsync function and implement our custom CompressedContent class.

 public class APICompressionDelegateHandler : DelegatingHandler
 {
    protected override Task<HttpResponseMessage> SendAsync(HttpRequestMessage request, CancellationToken cancellationToken)
    {
        return base.SendAsync(request, cancellationToken).ContinueWith<HttpResponseMessage>((responseToCompleteTask) =>
        {
            HttpResponseMessage response = responseToCompleteTask.Result;

            if (response.RequestMessage.Headers.AcceptEncoding != null &&
                response.RequestMessage.Headers.AcceptEncoding.Count > 0)
            {
                string encodingType = response.RequestMessage.Headers.AcceptEncoding.First().Value;

                if (response.Content != null)
                {
                    response.Content = new CompressedContent(response.Content, encodingType);
                }
            }

            return response;
        },
        TaskContinuationOptions.OnlyOnRanToCompletion);
    }
}

Next, we need to override SerializeToStreamAsync function in our CompressedContent object that inherits from HttpContent class to implement actual compression and send it back to the calling delegate.

 protected override Task SerializeToStreamAsync(Stream stream, TransportContext context)
  {
        Stream compressedStream = null;

        if (encodingType == "gzip")
        {
            compressedStream = new GZipStream(stream, CompressionMode.Compress, leaveOpen: true);
        }
        else if (encodingType == "deflate")
        {
            compressedStream = new DeflateStream(stream, CompressionMode.Compress, leaveOpen: true);
        }

        return originalContent.CopyToAsync(compressedStream).ContinueWith(tsk =>
        {
            if (compressedStream != null)
            {
                compressedStream.Dispose();
            }
        });
   }

Last thing do to is to register our delegate at application start-up and to define our target controller we get our data from.

 public static class WebApiConfig
  {
        public static void Register(HttpConfiguration config)
        {
            config.Routes.MapHttpRoute(
                          name: "ExtTest",
                          routeTemplate: "api/ExtMvcTest/",
                          defaults: new { controller = "ExtMvcTest", action = "GetTestData" });

            config.Routes.MapHttpRoute(
                name: "DefaultApi",
                routeTemplate: "Controllers/{controller}/{id}",
                defaults: new { id = RouteParameter.Optional }
            );
 
           config.MessageHandlers.Add(new APICompressionDelegateHandler()); //enable API requests compression
        }
    }

This is how our solution files look like:
mvc4_compr_solution

I have added fully working project example below. Please be aware that using compression may overload your server if used improperly. It is advisable to use it mainly for dashboards where the response time is the highest priority.
ExtMvc

1 Star2 Stars3 Stars4 Stars5 Stars (No Ratings Yet)
Loading...Loading...

Programmatically creating scheduled task in Windows Task Scheduler

If you are creating windows forms application that has to perform some tasks on the regular basis the good solution is to use built-in Windows Task Scheduler. It is very stable and reliable as long as the user’s computer is working.

In this article I will show you how to create scheduled task by using Microsoft.Win32.TaskScheduler.dll (managed wrapper dll).

Let’s create our Scheduler class with the function to set up win scheduler. In our example we will run either an external file or test application depending on the parameters passed in.

After creating new instance of the TaskService, we need to set up some basic parameters (names and description to be shown in windows scheduler UI). Next, we need to create trigger, in our case we will use weekly trigger as the task will be performed every day of the week that user will configure.

After that we have to set up execution path and additional startup arguments if required. This is useful to detect from the target application that it has been run automatically and based on that to apply different layout, colors, buttons etc.

 public class Scheduler
 {
    public static string TaskName = "MyTask";

    public static void SetTask(string filePath, DateTime startDate, DaysOfTheWeek daysOfWeek, bool enabled)
    {
        var ts = new TaskService();
        var td = ts.NewTask();
        td.RegistrationInfo.Author = "My company";
        td.RegistrationInfo.Description = "Runs test application";
        td.Triggers.Add(new WeeklyTrigger { StartBoundary = startDate, DaysOfWeek = daysOfWeek, Enabled = enabled });

        //run this application or setup path to the file
        var action = new ExecAction(Assembly.GetExecutingAssembly().Location, null, null);
        if (filePath != string.Empty && File.Exists(filePath))
        {
            action = new ExecAction(filePath);
        }
        action.Arguments = "/Scheduler";
        td.Actions.Add(action);

        ts.RootFolder.RegisterTaskDefinition(TaskName, td);
    }

Next let’s create other basic functions to get and delete current task. This is quite straightforward.

 public static void DeleteTask()
 {
    var ts = new TaskService();
    var task = ts.RootFolder.GetTasks().Where(a => a.Name.ToLower() == TaskName.ToLower()).FirstOrDefault();
    if (task != null)
    {
        ts.RootFolder.DeleteTask(TaskName);
    }
 }

 public static Task GetTask()
 {
    var ts = new TaskService();
    var task = ts.RootFolder.GetTasks().Where(a => a.Name.ToLower() == TaskName.ToLower()).FirstOrDefault();

    return task;
 }

Now, lets create function to display next scheduled task run date. It is quite useful to notify the user about the next planned execution. In our implementation we will use NextRunTime property of the task we created. We also have to check if the task is enabled.

 public static string GetNextScheduleTaskDate()
 {
    try
    {
        var task = Scheduler.GetTask();
        if (task != null)
        {
            var trigger = task.Definition.Triggers.FirstOrDefault();
            if (trigger != null)
            {
                if (trigger.TriggerType == TaskTriggerType.Weekly)
                {
                    if (trigger.Enabled)
                    {
                        var weeklyTrigger = (WeeklyTrigger)trigger;
                        
                        return task.NextRunTime.ToString("yyyy MMM. dd dddd 'at ' HH:mm");
                    }
                }
            }
        }
    }
    catch (Exception)
    { }

    return "no scheduled date!";
 }

Within the UI, we have to create basic helper methods in order to support interface values. In our case we will use checkboxes to set and enable task. In our example, the user will be able to set the task in any day of the week, disable it or delete it permanently. We will also display the next run time information.

 void RefreshNextRunInfo()
 {
    lblNextRun.Text = Scheduler.GetNextScheduleTaskDate();
 }

 //Load selected days from checkboxes
 DaysOfTheWeek GetTaskDays()
 {
    var daysOfWeek = DaysOfTheWeek.AllDays;
    daysOfWeek &= ~DaysOfTheWeek.AllDays;

    if (chkbMonday.Checked) { daysOfWeek = daysOfWeek | DaysOfTheWeek.Monday; }
    if (chkbSaturday.Checked) { daysOfWeek = daysOfWeek | DaysOfTheWeek.Saturday; }
    if (chkbSunday.Checked) { daysOfWeek = daysOfWeek | DaysOfTheWeek.Sunday; }
    if (chkbThursday.Checked) { daysOfWeek = daysOfWeek | DaysOfTheWeek.Thursday; }
    if (chkbTuestday.Checked) { daysOfWeek = daysOfWeek | DaysOfTheWeek.Tuesday; }
    if (chkbWednesday.Checked) { daysOfWeek = daysOfWeek | DaysOfTheWeek.Wednesday; }
    if (chkbFriday.Checked) { daysOfWeek = daysOfWeek | DaysOfTheWeek.Friday; }

    return daysOfWeek;
 }

 void SetTaskForm(bool enabled)
 {
    timePicker.Enabled = enabled;
    chkbFriday.Enabled = enabled;
    chkbMonday.Enabled = enabled;
    chkbSaturday.Enabled = enabled;
    chkbSunday.Enabled = enabled;
    chkbThursday.Enabled = enabled;
    chkbTuestday.Enabled = enabled;
    chkbWednesday.Enabled = enabled;
 }

 //reload current task state (if exists)
 public void RefreshSchedulerSettings()
 {
    //set initial time to 5 minutes ahead for testing
    timePicker.Value = DateTime.Now.AddMinutes(5);

    try
    {
        SetTaskForm(false);
        chkbFriday.Checked = false;
        chkbMonday.Checked = false;
        chkbSaturday.Checked = false;
        chkbSunday.Checked = false;
        chkbThursday.Checked = false;
        chkbTuestday.Checked = false;
        chkbWednesday.Checked = false;
        chkbScheduler.Checked = false;

        var task = Scheduler.GetTask();
        if (task != null)
        {
            var trigger = task.Definition.Triggers.FirstOrDefault();
            if (trigger != null)
            {
                if (trigger.TriggerType == TaskTriggerType.Weekly)
                {
                    if (trigger.Enabled) { SetTaskForm(true); }

                    chkbScheduler.Checked = trigger.Enabled;
                    var weeklyTrigger = (WeeklyTrigger)trigger;
                    timePicker.Value = trigger.StartBoundary;

                    if (weeklyTrigger.DaysOfWeek.HasFlag(DaysOfTheWeek.Friday)) { chkbFriday.Checked = true; }
                    if (weeklyTrigger.DaysOfWeek.HasFlag(DaysOfTheWeek.Monday)) { chkbMonday.Checked = true; }
                    if (weeklyTrigger.DaysOfWeek.HasFlag(DaysOfTheWeek.Saturday)) { chkbSaturday.Checked = true; }
                    if (weeklyTrigger.DaysOfWeek.HasFlag(DaysOfTheWeek.Sunday)) { chkbSunday.Checked = true; }
                    if (weeklyTrigger.DaysOfWeek.HasFlag(DaysOfTheWeek.Thursday)) { chkbThursday.Checked = true; }
                    if (weeklyTrigger.DaysOfWeek.HasFlag(DaysOfTheWeek.Tuesday)) { chkbTuestday.Checked = true; }
                    if (weeklyTrigger.DaysOfWeek.HasFlag(DaysOfTheWeek.Wednesday)) { chkbWednesday.Checked = true; }
                }
            }
        }
    }
    catch (Exception)
    { }
 } 

When saving the task we will use following method that validates and gathers user input information. Your implementation of course will depend on your requirements.

 private void btnSave_Click(object sender, EventArgs e)
 {
    var filePath = string.Empty;//set path to the exe file or leave it empty to run this app for test
    var daysOfWeek = GetTaskDays();

    if (chkbScheduler.Checked && daysOfWeek == 0)
    {
        MessageBox.Show(this, "Select at least one day or turn off scheduler!", "Warning", MessageBoxButtons.OK, MessageBoxIcon.Warning);
        return;
    }

    try
    {
        if (daysOfWeek != 0)
        {
            var startDate = DateTime.Now.Date.AddHours(timePicker.Value.Hour).AddMinutes(timePicker.Value.Minute);
            Scheduler.SetTask(filePath, timePicker.Value, daysOfWeek, chkbScheduler.Checked);
        }
        else
        {
            Scheduler.DeleteTask();
        }
    }
    catch (Exception ex)
    {
        MessageBox.Show(this, "An error occured " + ex.Message, "Error", MessageBoxButtons.OK, MessageBoxIcon.Warning);
    }
    RefreshNextRunInfo();
 }

I have included fully working example below for your tests.

TaskScheduler

1 Star2 Stars3 Stars4 Stars5 Stars (No Ratings Yet)
Loading...Loading...

Using automation when executing SQL scripts stored in separate files

When working on a big projects, sometimes there is a need to update database from the sql files scattered around multiple files or folders especially when using source control for maintaining database changes. Also when using auto builds via CI server this functionality seems to be useful.

In this article I will show you how to automate the process of updating multiple database sql files so you can do it in one go – like that:

  //this is command line executed by TeamCity build (change params with your build configuration values)
 c:\\UpdateScripts.exe "\scripts\Procedures" %Server% %Database% %ToBeReplacedSelectUser% %DatabaseSelectUser% "exec dbo.proc_GrantExecutePermissionsOnProcedures '%DatabaseUser%'"

teamCitySqlCmd

Lets create C# console application first. Once that is done we can implement basic validation rules for parameters being passed in. In our example we will support 6 parameters: Server, Database, StringToFind, StringToReplace, DatabaseUser, FinalQuery (we will use windows integrated database connection).

    if (args.Length == 0)
    {
        Console.WriteLine("No arguments passed!");
        Console.WriteLine(Environment.NewLine);
        Console.WriteLine(getHelp());
        Console.ReadLine();
        return 1;
    }

    if (args.Length < 3)
    {
        if (!silent)
        {
            Console.WriteLine("Not all required arguments passed!");
            Console.WriteLine(Environment.NewLine);
            Console.WriteLine(getHelp());
            Console.ReadLine();
        }
        return 1;
    } 
    ///////////////
    var scriptPath = args[0];
    var server = args[1];
    var database = args[2];
    var findString = args[3];
    var replaceString = args[4];
    var endQuery = args.Length >= 5 ? args[5] : string.Empty;
    /////////////

    if (!Directory.Exists(scriptPath) || Directory.GetFiles(scriptPath).Length == 0)
    {
        if (!silent)
        {
            Console.WriteLine("Directory does not exist or is empty!");
            Console.WriteLine(Environment.NewLine);
            Console.WriteLine(getHelp());
            Console.ReadLine();
        }
        return 1;
    }

The code below will get all .sql files from the directory and execute containing queries. If an file has “GO” statements inside then it needs to be executed in one block to avoid errors. Normally when executing such a scripts, Sql Management Studio cares about that. In our case we simply need to split content by “GO” blocks.

Console.WriteLine("params to find: " + findString);
Console.WriteLine("replace string: " + replaceString);

using (var con = new SqlConnection("Server=" + server + ";Database=" + database + ";Trusted_Connection=True;"))
{
    con.Open();

    var files = Directory.GetFiles(scriptPath).Where(f => f.ToLower().EndsWith(".sql"));

    foreach (var filePath in files)
    {
        #region execute query from file
        var query = File.ReadAllText(filePath);

        if (findString.Length > 0)
        {
            query = query.Replace(findString, replaceString);
        }
        Console.WriteLine("Executing: " + Path.GetFileName(filePath));

        query = query.Replace("go\r\n", "GO\r\n");
        query = query.Replace("go\t", "GO\t");
        query = query.Replace("\ngo", "\nGO");

        //divide into GO groups to avoid errors
        var itemQuery = query.Split(new string[] { "GO\r\n", "GO\t", "\nGO" }, StringSplitOptions.None);

        foreach (var queryItem in itemQuery)
        {
            if (queryItem.Trim().Length < 3) { continue; }

            using (var cmd = new SqlCommand(queryItem, con))
            {
                try
                {
                    cmd.ExecuteNonQuery();
                }
                catch (Exception ex)
                {
                    if (!silent)
                    {
                        Console.WriteLine("Error: " + ex.Message);
                    }
                    exitResult = 1;
                }
            }
        }
        #endregion
    }

At the end we can execute final sql statement. It is useful when for example there is a need to assign database permissions after the update is performed.

 //////////////////////execute final query (e.g permission update)
if (endQuery.Trim().Length > 3)
{
    using (var cmd = new SqlCommand(endQuery, con))
    {
        try
        {
            Console.WriteLine("Executing final query: " + endQuery);
            cmd.ExecuteNonQuery();
        }
        catch (Exception ex)
        {
            Console.WriteLine("Error: " + ex.Message);
            return 1;
        }
    }
}

The Console.WriteLine output will also be picked up by the TeamCity build log, so you can see all update information when needed. I have attached solution files, feel free to adjust it to your needs 🙂
UpdateDBScripts

1 Star2 Stars3 Stars4 Stars5 Stars (No Ratings Yet)
Loading...Loading...

Creating custom sound wave analysis control

The very common requirement when working with the sound files is to display and analyze the sound wave within the form element. The best way of doing that is to create custom sound wave analysis control that we can reuse throughout the multiple projects.

In this article I will show you how to create control that draws the wave on the form. We will use Open source nAudio dll to load sound files. Then we will perform custom drawings based on the extracted sound samples.

soundwave_analysis

Let’s create CustomWaveViewer class that inherits from UserControl. After that we have to define basic variables, the handlers and the rendering thread. The rendering thread will be used when user subscribe to our event handler wanting to take control over the rendering speed. Otherwise the control will render immediately and no additional thread is needed.

 public class CustomWaveViewer : UserControl
 {
   public delegate void OnLineDrawHandler(Point point1, Point point2);
   public event OnLineDrawHandler OnLineDrawEvent;
   private WaveStream waveStream;
   private Thread RenderThread;
    .....
}

When initiating the control we will set double buffer and basic variables. When user will call InitControl, control will be recalculated to fit to our window size.

  public CustomWaveViewer()
 {
    // This call is required by the Windows.Forms Form Designer.
    InitializeComponent();

    //use double buffer to avoid flickering
    this.DoubleBuffered = true;

    this.PenColor = Color.Lime;
    this.PenWidth = 1;
 }

 public void InitControl()
 {
    if (waveStream == null) return;

    var samples = (int)(waveStream.Length / bytesPerSample);
    startPosition = 0;
    SamplesPerPixel = samples / this.Width;
}

After the sound file is loaded we need to calculate bytesPerSample variable that depends on BitsPerSample value and the number of channels.

 public WaveStream WaveStream
 {
    get
    {
        return waveStream;
    }
    set
    {
        waveStream = value;
        if (waveStream != null)
        {
            bytesPerSample = (waveStream.WaveFormat.BitsPerSample / 8) * waveStream.WaveFormat.Channels;
        }
        this.Invalidate();
    }
}

Before we will render the lines we want to create grid lines by using following method:

 private void DrawImageGrid(System.Drawing.Graphics gfx)
 {
    int numOfCells = 30; int cellSize = (int)(gfx.ClipBounds.Height / 4);

    for (int y = 0; y < numOfCells; ++y)
    {
        gfx.DrawLine(new System.Drawing.Pen(System.Drawing.Color.Gray, 1), 0, y * cellSize, numOfCells * cellSize, y * cellSize);
    }

    for (int x = 0; x < numOfCells; ++x)
    {
        gfx.DrawLine(new System.Drawing.Pen(System.Drawing.Color.Gray, 1), x * cellSize, 0, x * cellSize, numOfCells * cellSize);
    }
}

The main method that renders the lines is the OnPaint method of our custom control. In that method we either draw the lines immediately or pass it to the other thread that user can control from the UI. See the in-line comments:

 protected override void OnPaint(PaintEventArgs e)
 {
    try
    {
        //draw grid before drawing the wave
        DrawImageGrid(e.Graphics);

        if (waveStream != null)
        {
            int bytesRead;
            var waveData = new byte[samplesPerPixel * bytesPerSample];
            waveStream.Position = startPosition + (e.ClipRectangle.Left * bytesPerSample * samplesPerPixel);
            ControlPoints.Clear();// clear points 

            using (var linePen = new Pen(PenColor, PenWidth))
            {
                for (var x = e.ClipRectangle.X; x < e.ClipRectangle.Right; x += 1)
                {
                    short low = 0;
                    short high = 0;

                    bytesRead = waveStream.Read(waveData, 0, samplesPerPixel * bytesPerSample);

                    if (bytesRead == 0) { break; }

                    for (var n = 0; n < bytesRead; n += 2)
                    {
                        var sample = BitConverter.ToInt16(waveData, n);
                        if (sample < low) { low = sample; }
                        if (sample > high) { high = sample; }
                    }

                    //calculate min and max values for the current line
                    var lowPercent = ((((float)low) - short.MinValue) / ushort.MaxValue);
                    var highPercent = ((((float)high) - short.MinValue) / ushort.MaxValue);

                    var point1 = new Point(x, (int)(this.Height * lowPercent));
                    var point2 = new Point(x, (int)(this.Height * highPercent));

                    //if event is not hoocked in, then render wave instantly
                    if (OnLineDrawEvent == null)
                    {
                        e.Graphics.DrawLine(linePen, point1, point2);
                    }
                    else
                    {
                        //save points to be used in the rendering thread
                        ControlPoints.Add(point1, point2);
                    }
                }
            }

            //abort current thead if sound has been reloaded
            if (RenderThread != null && RenderThread.IsAlive)
            {
                RenderThread.Abort();
            }

            //start rendering thread
            RenderThread = new Thread(TriggerDrawing);
            RenderThread.IsBackground = true;
            RenderThread.Start();
        }
    }
    catch (Exception)
    {
    }

    base.OnPaint(e);
}

When we pass the rendering to other thread, we simply need to trigger OnLineDrawEvent event for each line stored in our buffer (ControlPoints variable). The UI will then receive the event with the line data.

 void TriggerDrawing()
 {
    //check if the event is attached
    if (OnLineDrawEvent != null)
    {
        foreach (var pointSet in ControlPoints)
        {
            OnLineDrawEvent(pointSet.Key, pointSet.Value);//trigger event and pass the points to the UI
            Thread.Sleep(RenderDelay); //set custom delay
        }
    }
}

Our main UI methods will look as follows. After dropping our custom control on the form, we need to configure it by passing sound wave file path and attach rendering method. The RenderDelay variable will also be used by slider to dynamically control rendering speed.

 private void Form1_Load(object sender, EventArgs e)
 {
    comboBox1.SelectedIndex = 0;//select first sound

    //Attach draw event otherwise the control will render instantly
    customWaveViewer1.OnLineDrawEvent += new CustomWaveViewer.OnLineDrawHandler(customWaveViewer1_OnLineDrawEvent);

    //set initial speed - it can be configured using UI slider
    customWaveViewer1.RenderDelay = 20;

    LoadWaive();//init control
 }

 void LoadWaive()
 {
    var path = "../../sounds/" + comboBox1.Text.Last<char>().ToString() + ".wav";

    customWaveViewer1.WaveStream = new WaveFileReader(path);
    customWaveViewer1.InitControl();
 }

 //Draw the lines when the points arrive from the background thread event
 void customWaveViewer1_OnLineDrawEvent(Point point1, Point point2)
 {
    using (var gr = customWaveViewer1.CreateGraphics())
    {
        using (var linePen = new Pen(Color.Lime, 1))
        {
            gr.DrawLine(linePen, point1, point2);
        }
    }
 }

I have attached working example below for your tests. You may also use other nAudio methods to play the sound file while it’s being rendered.

SoundAnalysis

1 Star2 Stars3 Stars4 Stars5 Stars (No Ratings Yet)
Loading...Loading...

C# commonly used coding standards

In this article I will present you with some most commonly used coding standards that I have come across while working in multiple companies.

1. Naming Conversions

1.1 Use Pascal Casing for class and method names and camel Casing for local variables

Pascal Casing:

public class MyClass
{
      public void GetData()
     {
     }
}

Camel Casing

public class MyClass
{
      public void GetData(string productName)
     { 
          var myProduct = GetProductFromDatabase(productName);
     }
}

1.2 Do not use underscores for member names eg.

//correct

public string myVariable;
public int myProduct;

//incorrect

public string my_variable;
public int _ myProduct;

1.3 Do not use shortcuts eg.

//correct
public string databaseConnectionString;

//incorrect
public string dbConnStr;

1.4 Give the function names appropriate to the returning values eg.

//correct
public  string GetProductReferenceNumber()
{
}

//incorrect
public  string GetObjectString()
{
}

1.5 Use predefined type names instead of system names eg.

//correct
int ProductID;
string ProductName;

//incorrect
Int32 ProductID;
String ProductName;

1.6 Use the var name for variable declaration if the type can be easily identified from the right hand side of the equation eg.

//correct
var name = "myname";

//incorrect
var myObject = GetBasicObject();

1.7 Use noun names for classes

//correct
public class Product
{
}

//incorrect
public class UserProduct
{
}

1.8 Use „I” prefix for interface names eg.

public interface IProductCollection

1.9 Declare private variables on the top of the classes starting with statics on the top

public class Product
{
    static string productName;
    static int productCount;

    int currectCount;
    string productLocationName;

    public void Calculate()
    {
    }
}

1.10 Use singular names for enums except bit field enums eg.

//correct
enum ProductType
{
    ProductTypeOne, ProductTypeTwo
}

//incorrect
enum ProductTypes
{
    ProductTypeOne, ProductTypeTwo
}

//correct
enum ProductTypes
{
    ProductTypeOne = 1, 
    ProductTypeTwo =2
}

2. General rules

2.1 Use && and || operands instead of single & Or |. This will avoid unnecessary comparisons eg.

//correct
If(product != null && (product.Id > 0 || product.Name.length > 0))
{
}

//incorrect
If(product != null & (product.Id > 0 | product.Name.length > 0))
{
}

2.2 Always use (vertically aligned) curly brackets eg.

//correct
foreach(var item In myCollection)
{
      var result = item.Result;
}

//incorrect
foreach(var item In myCollection)
        var result = item.Result;

2.3 Use „using” statements for objects that implement IDisposable interface eg.

//correct
using(var connection = new SqlConnection())
{
     using( var reader = command.ExecuteReader())
     {
     }
}

//incorrect
var connection = new SqlConnection();
var reader = command.ExecuteReader();

reader.close();
connection.close();

2.4 Use lambda expressions for events that you do not need have reference to at later stage in you code eg.

//correct 
public MyForm()
{
   this.Click += (s, e) =>   {
       MessageBox.Show(((ClickEventArgs)e).Point.ToString());
  };
}
//not advisable 
public MyForm()
{
      this.Click += new EventHandler(MyFunction_Click);
}

void Form1_Click(object sender, ClickEventArgs e)  
{     
     MessageBox.Show(((ClickEventArgs)e).Point.ToString());
 }

2.5 Use object initializers for creating object eg.

//correct
var product = new Product()
{
   ProductID = 1,
   ProductName = “Test”,
   CreateDate = DateTime.Now
}

//incorrect
 var product = new Product();
 product. ProductID = 1,
 product .ProductName = “Test”,
 product .CreateDate = DateTime.Now

2.6 Each function should only perform one task eg.

//correct
public int CalculatePriceWithVAT(double initPrice, double vatRate)
{
      return initPrice = initPrice * (1- vatRate);
}
//incorrect
public int CalculatePrice ()
{
      var initPrice = GetInitPrice();
      var vatRate = GetVatFromDataBase();

      return initPrice = initPrice * (1- vatRate);
}

2.7 Separate parts of the code into logical groups eg.

//correct
int CalculateStock()
{
     var fakeValue = 12;
      fakeValue += 12;

      var fakeProduct = new Product();
      var result = fakeProduct.Count + fakeValue;

      return result;
}
//avoid
int CalculateStock()
{
     var fakeValue = 12;
      fakeValue += 12;
      var fakeProduct = new Product();
      var result = fakeProduct.Count + fakeValue;
      return result;
}

2.8 In LINQ use following to check bool values eg:

//correct
If(products.Any())
{
}

//incorrect
If(products.Count() > 0 )
{
}
1 Star2 Stars3 Stars4 Stars5 Stars (1 votes, average: 5.00 out of 5)
Loading...Loading...