AutoBuilds and deployment using TeamCity CI server

When developing software solutions sometimes there is a need to automate process of builds, deployments and testing tasks. One of the possible solutions is the TeamCity server. This Continuous Integration server is especially useful when managing multiple SVN branches that need to be deployed to multiple web applications when any predefined change occurs.

One of the triggers that we can use to start the build and deployment is SVN change. In this article I will show you how to configure auto build and deployment of .net web application triggered by SVN changes.

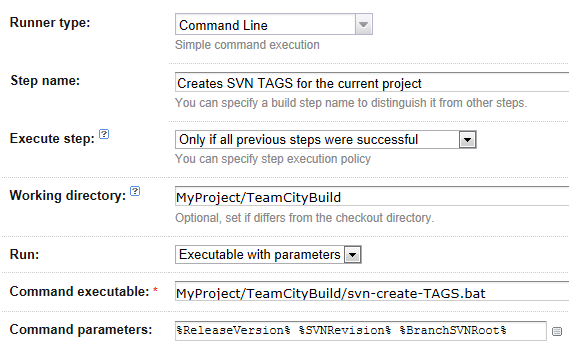
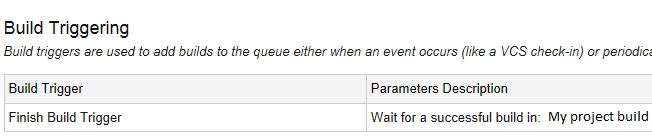
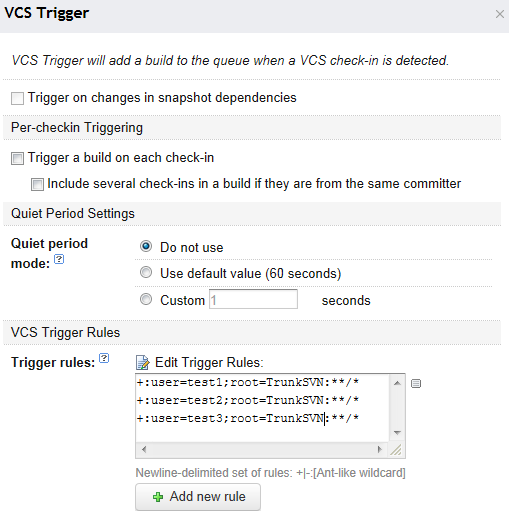
After we have installed TeamCity, we need to create project and add VCS root (I won’t be describing that as it is quite straightforward). After that we will have to define SVN trigger that detects repo changes and triggers the build. Configuration below triggers build when one of 3 developers will commit his/her changes (to the main trunk).

svntrigger

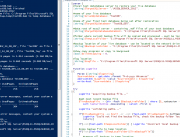
Next thing to do is to configure Visual Studio project file .csproj to auto build and deploy application on AfterBuild event task. To do it please open .csproj in notepad and add the code below:

 <PropertyGroup>
    <DeployTarget>0</DeployTarget>
    <DeployTargetFolder>\\TestServer\MyApplication</DeployTargetFolder>
    <PublishTarget>0</PublishTarget>
    <PublishFolder>..\Deployment\MyApplication</PublishFolder>
  </PropertyGroup>
  <Target Name="PublishProperties">
    <CreateProperty Value="$(PublishFolder)">
      <Output TaskParameter="Value" PropertyName="WebProjectOutputDir" />
    </CreateProperty>
    <CreateProperty Value="$(PublishFolder)\bin\">
      <Output TaskParameter="Value" PropertyName="OutDir" />
    </CreateProperty>
  </Target>
  <Target Name="WebPublish" DependsOnTargets="BeforeBuild;PublishProperties">
    <RemoveDir Directories="$(PublishFolder)" ContinueOnError="true" />
    <CallTarget Targets="ResolveReferences;_CopyWebApplication" />
  </Target>
  <Target Name="Deploy" DependsOnTargets="WebPublish">
    <CreateProperty Value="$(DeployTargetFolder)" Condition="$(DeployFolder) == ''">
      <Output TaskParameter="Value" PropertyName="DeployFolder" />
    </CreateProperty>
    <RemoveDir Directories="$(DeployFolder)" Condition="$(CleanDeploy) == 1" />
    <ItemGroup>
      <DeploymentFiles Include="$(PublishFolder)\**\*.*" />
    </ItemGroup>
    <Copy SourceFiles="@(DeploymentFiles)" DestinationFolder="$(DeployFolder)\%(RecursiveDir)" />
  </Target>
  <Target Name="AfterBuild">
    <CallTarget Targets="WebPublish" Condition="$(PublishTarget) == 1" />
    <CallTarget Targets="Deploy" Condition="$(DeployTarget) == 1" />
  </Target>

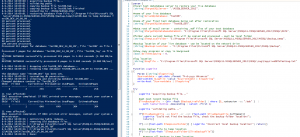
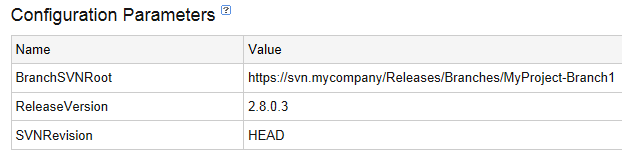
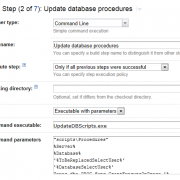
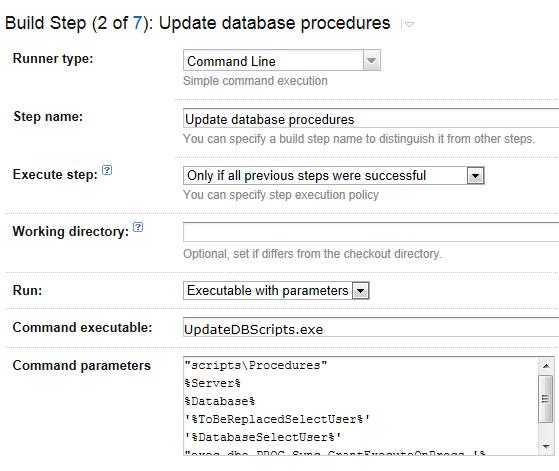
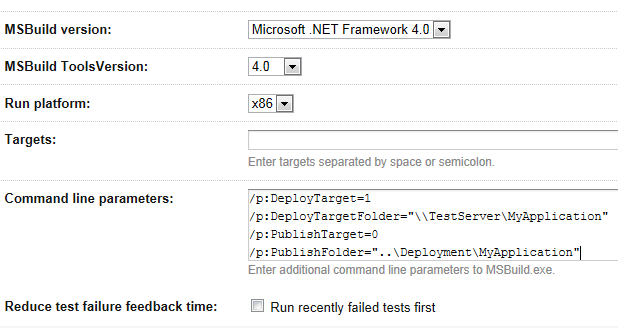
You can notice that in the PropertyGroup there are some params the build will be configured with. In our case we configure DeployTarget and PublishTarget to 0 becase we want to avoid visual studio to trigger the deployment each time we hit F5. We will override this params from the TeamCity triggered build. See the configuration below:

autobuildconfig

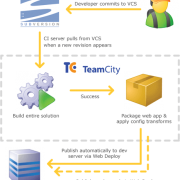
The whole process illustrates this diagram:
ci-build-and-deploy

P.S. If you want to run FxCop as build step, additional change is required. After installing FxCop you need to manually adjust the build agent properties in following location: C:\TeamCity\buildAgent\conf\buildAgent.properties

Following configuration needs to be added:

 system.FxCopRoot=C\:\\Program Files (x86)\\Microsoft Fxcop 10.0
 system.FxCopCmdFileVersion=10.0.30319.1
 system.WindowsSDK7.1

Otherwise you will get “no suitable Build Agent” error

Good luck with your configuration 🙂

1 Star2 Stars3 Stars4 Stars5 Stars (No Ratings Yet)
Loading...Loading...

Live database restoration to test server using Powershell

It is very common requirement during development stage to copy live database to test server on the daily/weekly basis. In such a scenario there is also very often a need to clean the database and perform some operations before restoring it in test environment.

For example if the live database is very big and you don’t need to have all tables on your test server, you can drop it during the copy process.
Similar applies if you need to adjust permissions, change the database name, optimize indexes or just shrink the database file.

CopyLiveDBToTest-300x137

The script below will help you automate the copy database process. On every run, it will check for the latest database backup file in defined location.
Next, it will copy that file to your local temp folder. After that, it will restore the database by giving it a temp name, so you can continue working while the restoration lasts (useful for big databases).
When the database is restored, it will drop the old test database and rename the current one to the same name. Also the old database files will be deleted to free-up the disc space. The database files will have the names like “TestDB_19_08_2014.mdf”.

As a result, you will have up-to-date live database restored on your test server.

 param (
#local test datatabase server to restore your live database 
[string]$TargetSQLServer= ".\MSSQLSERVER_2012",

#name of your live database
[string]$LiveSQLDatabase= "TestDB",

#name of your final test database being set after restoration
[string]$TargetSQLDatabase= "TestDB_DEV",

#data root of mssql server - containing .mdf files of your test database
[string]$TargetSQLDatabaseDataRoot= "C:\Program Files\Microsoft SQL Server\MSSQL11.MSSQLSERVER_2012\MSSQL\DATA",

#folder where current backup file will be copied and processed - must be local folder
[string]$TempLocalFolder= "C:\Program Files\Microsoft SQL Server\MSSQL11.MSSQLSERVER_2012\MSSQL\Backup_temp",

#backup location of your live database - can be located on the network drive
[string]$BackupLiveFolder = "C:\Program Files\Microsoft SQL Server\MSSQL11.MSSQLSERVER_2012\MSSQL\Backup",

#show copy progress or copy in bacground
[bool]$silentCopying = 0,

#log location
[string]$Logfile = "C:\Program Files\Microsoft SQL Server\MSSQL11.MSSQLSERVER_2012\MSSQL\Log\CopyLiveDBToTestLog.txt"
)

Function LogWrite
{
   Param ([string]$logstring)
   $currentdate = get-date -format "M-d-yyyy HH:mm:ss"
   Add-content $Logfile -value "$currentdate | $logstring"
   write-host "$currentdate | $logstring"
}

try
{ 
    LogWrite "acquiring backup file..."
    
    #get most recent backup file
    $liveBackupFile  = (dir -Path $BackupLiveFolder) | where {$_.extension -eq ".bak" }  | 
       sort lastwritetime –Descending | select -first 1;
      
    LogWrite "validating paths..."
    
    if($liveBackupFile -eq $null -or -not (Test-path $liveBackupFile.FullName)){ 
       LogWrite "Could not find the backup file, check the backup folder location!";
       return;}

    if(-not(Test-path $TempLocalFolder)) { LogWrite "Incorrect local backup location!"; return;}

    #copy backup file to temp location
    if(-not(Test-Path "$TempLocalFolder\$liveBackupFile"))
    {
       #remove all backups in temp location   
        dir -path $TempLocalFolder |  Foreach-Object {
        get-childitem -Path $_.FullName |  
         where-object { 
            ($_.FullName.tolower().EndsWith(".bak") -and $_.FullName.tolower().contains($LiveSQLDatabase.ToLower()))
          } | 
         Foreach-Object {
            LogWrite "removing file: $_.FullName"
            remove-item -path $_.FullName
          } 
        }

        LogWrite "copying backup file $liveBackupFile ..."
        
        if(-not($silentCopying -eq 1))
        {
            #use shell to see progress
            $FOF_CREATEPROGRESSDLG = "&H0&"
            $objShell = New-Object -ComObject "Shell.Application"
            $objFolder = $objShell.NameSpace($TempLocalFolder) 
            $objFolder.CopyHere($liveBackupFile.FullName, $FOF_CREATEPROGRESSDLG)
        }
        else
        {
           copy-item -Path $liveBackupFile.FullName -Destination "$TempLocalFolder\$liveBackupFile" -PassThru -Verbose
        }

        LogWrite "copying backup file $liveBackupFile finished"
    }
    else
    {
       LogWrite "backup file already exists: $TempLocalFolder\$liveBackupFile"
    }

    #----------------------------------------------------------

    LogWrite "connecting to $TargetSQLServer"

    $TargetSQLDatabase_temp = $TargetSQLDatabase + "_"+ (get-date).tostring("yy_MM_dd");
    
    $mdfCurrentPath = "$TargetSQLDatabaseDataRoot\$TargetSQLDatabase_temp.mdf"
    if(Test-Path $mdfCurrentPath)
    {
        LogWrite "database $TargetSQLDatabase_temp.mdf already exists!"
        return;
    }

    LogWrite "restoring database from file: $TempLocalFolder\$liveBackupFile to temp database $TargetSQLDatabase_temp ..."

    $DBLogicalFileName = $LiveSQLDatabase;
    $DBLogicalFileName_log = $LiveSQLDatabase + "_Log";

    $query = "RESTORE DATABASE [$TargetSQLDatabase_temp] FROM   
    DISK = N'$TempLocalFolder\$liveBackupFile' WITH  FILE = 1,  
    MOVE N'$DBLogicalFileName' TO N'$TargetSQLDatabaseDataRoot\"+$TargetSQLDatabase_temp+".mdf',   
    MOVE N'$DBLogicalFileName_log' TO N'$TargetSQLDatabaseDataRoot\"+$TargetSQLDatabase_temp+".ldf', 
    NORECOVERY,  NOUNLOAD,  REPLACE,  STATS = 10";


    SQLCMD -S $TargetSQLServer -E -Q $query 

    Start-Sleep -s 10

    #bring it to live from restoring mode
    $query = "RESTORE DATABASE "+$TargetSQLDatabase_temp+" WITH RECOVERY"
    SQLCMD -S $TargetSQLServer -E -Q $query 
    
    LogWrite "dropping old $TargetSQLDatabase database..."

    #drop current database
    $query = "ALTER DATABASE [$TargetSQLDatabase]
    SET OFFLINE WITH ROLLBACK IMMEDIATE
    DROP DATABASE [$TargetSQLDatabase]"
    SQLCMD -S $TargetSQLServer -E -Q $query 
    
    Start-Sleep -s 10
    
    LogWrite "renaming temp database $TargetSQLDatabase_temp to $TargetSQLDatabase ..."

    #rename temp database 
    $query = "ALTER DATABASE ["+$TargetSQLDatabase_temp+"] SET SINGLE_USER WITH ROLLBACK IMMEDIATE    
    ALTER DATABASE ["+$TargetSQLDatabase_temp+"] MODIFY NAME = [$TargetSQLDatabase]
    ALTER DATABASE [$TargetSQLDatabase] SET MULTI_USER"
    SQLCMD -S $TargetSQLServer -E -Q $query 

    LogWrite "recreating db permissions..."
    
    #recreate permissions
    $query = "ALTER AUTHORIZATION ON DATABASE::[$TargetSQLDatabase] TO [sa]
    use  [$TargetSQLDatabase]
    ALTER User [domain\Administrators] with LOGIN = [domain\Administrators]"

    #enable if used
    #SQLCMD -S $TargetSQLServer -E -Q $query 
           
    LogWrite "cleaning and shrinking database $TargetSQLDatabase ..."
    
    $query = "use $TargetSQLDatabase;
    ALTER DATABASE $TargetSQLDatabase SET RECOVERY SIMPLE;   
    truncate table dbo.TestTable;

    DBCC SHRINKFILE('$DBLogicalFileName_Log');
    DBCC SHRINKFILE('$DBLogicalFileName')"
    SQLCMD -S $TargetSQLServer -E -Q $query 
    
    
    LogWrite "optimizing table indexes..."
    
     $query = "USE [$TargetSQLDatabase];
        
        EXEC [dbo].[IndexOptimize]
		@IndexFragmentationMin  = 5,
        @IndexFragmentationRebuildMin  = 30,
		@skiplargetables = 0,
		@PrintInformationOnly = 0"
 
    #enable if used
    #SQLCMD -S $TargetSQLServer -E -Q $query 
    
    
    LogWrite "removing old database files..."
       
    #remove all old database files   
    $fileEntries = [IO.Directory]::GetFiles("$TargetSQLDatabaseDataRoot");
    $todayDatePart = (get-date).tostring("yy_MM_dd");

     foreach($fileName in $fileEntries) 
     { 
        if($fileName.tolower().contains("$TargetSQLDatabase".tolower()) -and -not($fileName.tolower().contains($todayDatePart)))
        {
           LogWrite $fileName
           #remove-item -path $fileName
        }
     }    
      
    LogWrite "Done!"

} 
catch { 
     $msg = "Unexpected Error. Error details: $_.Exception.Message"
     LogWrite $msg 
     Write-Host $msg -foreground Red 
}

Enjoy!
CopyLiveDBToTest

1 Star2 Stars3 Stars4 Stars5 Stars (1 votes, average: 3.00 out of 5)
Loading...Loading...

Auto creating SVN tags and custom release installers

Automation within the software development company allows to save tremendous amount of time in the long run. The time spend for initial configuration of the automated tasks is almost nothing compared to running all processes manually. In this article I will show you how to configure auto SVN tagging and creating custom installation files each time after the TeamCity build is performed.

In our scenario we want to copy our current branch files to the https://svn.mycompany.com/Releases/Tags/ReleaseVersion location and from that location we want to create installation file that we want to deploy on the client server.

The first step is to create new TeamCity build configuration and as a first build step define following configuration:

svn_tags

Let’s create our svn-create-TAGS.bat file. The implementation is quite simple. There are 3 parameters that we will pass in from the TeamCity step: ReleaseVersion (%1), SVNRevision (%2), BranchSVNRoot (%3). Based on that we will trigger script below.

Because subversion copy function doesn’t have replace functionality that we can use, we then decide to delete current tag if exists. If the tag doesn’t exist then we will get svn error that could be passed to TeamCity Log. In our case we will use -q param to not display any error messages as this script will be run multiple times so each time the tags will have to replaced if the same release version is used.

After running this script we will have following tag created eg. https://svn.mycompany.com/Releases/Tags/Release.2.8.0.3″

 echo version %1
 echo revision %2
 echo branch path %3

  echo delete first if exists as there is no overwrite function for svn copy
  "C:\Program Files\TortoiseSVN\bin\svn.exe" delete "https://svn.mycompany.com/Releases/Tags/Release.%1" -q 
    -m "TeamCity generated: Deleting TAG branch for the release: %1" 

 echo copy to tag
 "C:\Program Files\TortoiseSVN\bin\svn.exe" copy -r%2 "%3/MyMainProjectFolder" "https://svn.mycompany.com/Releases/Tags/Release.%1" 
   -m "TeamCity generated: Creating TAG branch for the release: %1"

We also need to configure TeamCity parameters as follows:
svntags_params

When we have release tag created, we can now make release installer that can be deployed to the client. To do that we will define new build step (configuration is similar as the step above – script name and params will only be different).

Let’s create Installer_build.bat script then. We will pass in 2 parameters ReleaseVersion (%1), SVNRevision (%2). The script will create folder structure in Windows Temp location that we will use to import and compress our release files to. After we done with it we will clear that location and move executable file to our final release file location.

The script is basically importing files from the tag we created earlier, then the files are being compressed using 7za.exe command line utility. We can re-build the project in between but in our case project was built already by the other TeamCity process before it was moved to the release tag. After creating zip package we can build custom installer based on that file. This depends on your custom solution. In our example we will simply output the final zip file to be deployed to the client. Please see in-line comments for detailed information:

 echo params
 echo version %1
 echo revision %2

 echo top level folder stucture
 set root=%TEMP%\MyProjectBuild
 set export="%root%\Export"
 set build=%root%\Build
 set installer=%root%\Installer

 echo make sure nothing already exists
 rmdir /s /q "%root%"

 mkdir "%root%"
 mkdir "%build%"

 echo Create the installer
 echo %installer%
 mkdir %installer%

 svn export -r%2 "https://svn.mycompany.com/Releases/Tags/Release.%1/" "%export%"

 echo you may build you project here or proceed
 set MSBUILD_PATH=C:\Windows\Microsoft.NET\Framework\v4.0.30319\MSBuild.exe

 echo Copy files ready to be compressed
 set InstallerFiles=%build%

 echo copy from export filder to the final build folder
 xcopy "%export%\*.*" "%InstallerFiles%\" /E /Y

 echo set tools location that contains your compressor file, set path the same as the executing batch file
 set Tools="%~dp0"
 set BuildZip=%installer%\MyProject.%1.zip

 echo current path %Tools%

 echo build your custom installer or export just zip file
 set FinalExecutable=%BuildZip%
 %Tools%\7za.exe a -tzip -r "%BuildZip%" "%build%\*.*

 echo copy it to the releases location and clear up
 set Releases=C:\Installers

 copy "%installer%\%FinalExecutable%" "%Releases%\%FinalExecutable%"

 if exist "%Releases%\%FinalExecutable%" (
	rmdir /s /q "%root%"
	echo The build is complete.
 ) else (
	echo Unable to copy to final destination. The installer is here: %installer%\%FinalExecutable%
 )

After creating above TeamCity build steps we can configure the release installer build to be triggered on successful main project build.

svntag_build_trigger

In order to get above scripts to work you need to adjust it to your requirements as I took it from the running solution I have created and for obvious reasons had to change the paths and names.
I hope this will help you to be more productive in your daily programming 🙂

1 Star2 Stars3 Stars4 Stars5 Stars (No Ratings Yet)
Loading...Loading...

Generating static map images using Google Map API

If you are using static map images on your website and have a lot of different addresses to be displayed, you can easily automate the process of creating them. The code below will request Google map API and download static images. The address list is stored in .csv file but can also be pulled directly from database. Once map images are created, you can recreate them with different params again.

There is a limit for generating static images without api key, so make sure you wait a bit when getting forbidden error from Google request.

SW1A-0AA


public static string rootPath = Path.GetDirectoryName(Assembly.GetExecutingAssembly().Location);
        public static string csvPath = rootPath + "\\Addresses.csv";
        public static Random rnd = new Random();
 
        public static void Main()
        {
            using (var sr = new StreamReader(csvPath))
            {
                while (!sr.EndOfStream)
                {
                    var data = sr.ReadLine().Split('|');
                    var address = data[0];
                    var postCode = data[1];
 
                    SaveFile(address, postCode);
                }
            }
 
            Console.WriteLine("done!");
            Console.ReadLine();
        }
 
        public static void SaveFile(string address, string postCode)
        {
            try
            {
                var filePath = new DirectoryInfo(rootPath).Parent.Parent.Parent.FullName + @"\output\" + postCode + ".jpg";
                if (File.Exists(filePath))
                {
                    Console.WriteLine("skipped " + address + " " + postCode + " (image exists in output directory)"); return;
                }
 
                Console.WriteLine("processing " + address + " " + postCode);
 
                using (var wc = new WebClient())
                {
                    var url = "https://maps.google.com/maps/api/staticmap?address=" + address + "&center=" + postCode + "&size=275x275&format=jpg&maptype=roadmap&zoom=15.5&markers=color:0xE21A9B|label:T|" + postCode + "&sensor=false";
                    wc.DownloadFile(url, new DirectoryInfo(rootPath).Parent.Parent.Parent.FullName + @"\output\" + postCode + ".jpg");
                }
 
                Thread.Sleep(rnd.Next(300, 2300)); //wait a bit
            }
            catch (Exception ex)
            {
                Console.WriteLine("error for: " + address + " | " + postCode + Environment.NewLine + ex.Message);
            }
        }
    }

Download project: googleImageApi

1 Star2 Stars3 Stars4 Stars5 Stars (No Ratings Yet)
Loading...Loading...

KnockoutJS bindings and observables

KnockoutJS it’s the JavaScript implementation of the MVVM pattern that is based on native JavaScript event management. Implementing knockoutJS both as a standalone solution or in conjunction with other web technologies can greatly improve user experience in our web applications.

As a example lets create simple list of places and restaurants as below:
knockoutjs

In our example, places can have multiple related restaurants. To make programming more funny lets create two separate view models for our entities. In order to differentiate two models we need to use overloaded applyBindings methods passing in form elements.

 var PVM = new PlacesViewModel();
 var RVM = new RestaurantViewModel()

  ko.applyBindings(PVM, document.getElementById('placesModel'));
  ko.applyBindings(RVM, document.getElementById('restaurantModel'));

Lets define html form for places and it’s template:

  <div id="placesModel" style="float: left; width: 350px;">
        <h2>
            Places</h2>
        <div data-bind="foreach: places">
            <div style="background-color: #e5dfdf;" data-bind="template: { name: 'place-template', data: $data }">
            </div>
        </div>
        <br />
        <br />
        <hr />
        <form data-bind="submit: addPlace">
        Name:
        <input name="name" /><br />
        <br />
        Details:
        <textarea rows="4" name="details" cols="20"></textarea>
        <button type="submit">
            add place</button>
        </form>
    </div>

    //template for places
   <script type="text/html" id="place-template">
        <h3 style="color: green;"><b data-bind="visible: !editing(), text: name, click: $root.edit">&nbsp;</b>
            <input data-bind="visible: editing, value: name, hasfocus: editing" />
        </h3>
        <p><em>Click the name above to edit</em></p>

        <p>Place details: <span data-bind="text: details"></span></p>
        <span data-bind="text: $data.name"></span>&nbsp;<a href="#" data-bind="click: $root.removePlace">Remove</a>

        <h4><span data-bind="text: name"></span>&nbsp;restaurants</h4>

        <ul data-bind="foreach: RVM.restaurants">
            <!--ko if: $data.place.toLowerCase().indexOf($parent.name().toLowerCase()) >= 0 -->
            <li style="">
                <span data-bind="text: $data.name"></span>&nbsp;<a href="#" data-bind="click: RVM.removeRestaurant">Remove</a>
            </li>
            <!--/ko-->
        </ul>
    </script>

At this point we need to define knockout view model and define functions for data binding and observables:

 function PlacesViewModel() {
            var self = this;

            self.places = ko.observableArray([
               { name: ko.observable('London'), details: '....', editing: ko.observable(false) },
            ]);

            self.selectedPlace = ko.observable({ name: ko.observable('London'), details: '....', editing: ko.observable(false) });

            self.removePlace = function (place) {
                self.places.remove(place)
            }

            self.addPlace = function (placeForm) {
                //basic validation
                if (placeForm.name.value.trim().length == 0) {
                    alert('Type the place name!'); return;
                }

                var place = { name: ko.observable(placeForm.name.value), details: placeForm.details.value, editing: ko.observable(false) }
                self.places.push(place);

                placeForm.name.value = ''; placeForm.details.value = ''; //clear form
            }

            self.edit = function (arg) {
                arg.editing(true)
            }
        }

Now, lets create simple restaurant form and controls:

 <div id="restaurantModel" style="float: left; padding-left: 30px;">
        <h2>
            Restaurant list</h2>
        <ul data-bind="foreach: restaurants">
            <li style=""><span data-bind="text: $data.name"></span>&nbsp;(<i><span data-bind="text: $data.place"></span></i>)&nbsp;<a
                href="#" data-bind="click: $parent.removeRestaurant">Remove</a> </li>
        </ul>
        <br />
        <br />
        <hr />
        <form data-bind="submit: addRestaurant">
        Name:
        <input name="name" /><br />
        <br />
        Place:
        <select data-bind="options: PVM.places, optionsValue:'name', optionsText: 'name'"
            name="place">
        </select>
        <br />
        <br />
        <button type="submit">
            add restaurant</button>
        </form>
    </div>

At the end we need implement basic restaurants model functions

 function RestaurantViewModel() {
            var self = this;
            self.restaurants = ko.observableArray([{ name: 'Restaurant 1', place: 'London' }, { name: 'Restaurant 2', place: 'Tokyo' }, { name: 'Restaurant 3', place: 'Paris'}]);

            self.removeRestaurant = function (restaurant) {
                self.restaurants.remove(restaurant)
            }

            self.addRestaurant = function (restaurantForm) {
                //basic validation
                if (restaurantForm.name.value.trim().length == 0) {
                    alert('Type the restaurant name!'); return;
                }

                var restaurant = { name: restaurantForm.name.value, place: restaurantForm.place.value };
                self.restaurants.push(restaurant);

                restaurantForm.name.value = '';  //clear form
            }
        }

I have included sample project to be downloaded below. Please use it to check how binding is working when adding, editing and deleting objects on the page.
knockoutjs

1 Star2 Stars3 Stars4 Stars5 Stars (No Ratings Yet)
Loading...Loading...

Programmatically creating scheduled task in Windows Task Scheduler

If you are creating windows forms application that has to perform some tasks on the regular basis the good solution is to use built-in Windows Task Scheduler. It is very stable and reliable as long as the user’s computer is working.

In this article I will show you how to create scheduled task by using Microsoft.Win32.TaskScheduler.dll (managed wrapper dll).

Let’s create our Scheduler class with the function to set up win scheduler. In our example we will run either an external file or test application depending on the parameters passed in.

After creating new instance of the TaskService, we need to set up some basic parameters (names and description to be shown in windows scheduler UI). Next, we need to create trigger, in our case we will use weekly trigger as the task will be performed every day of the week that user will configure.

After that we have to set up execution path and additional startup arguments if required. This is useful to detect from the target application that it has been run automatically and based on that to apply different layout, colors, buttons etc.

 public class Scheduler
 {
    public static string TaskName = "MyTask";

    public static void SetTask(string filePath, DateTime startDate, DaysOfTheWeek daysOfWeek, bool enabled)
    {
        var ts = new TaskService();
        var td = ts.NewTask();
        td.RegistrationInfo.Author = "My company";
        td.RegistrationInfo.Description = "Runs test application";
        td.Triggers.Add(new WeeklyTrigger { StartBoundary = startDate, DaysOfWeek = daysOfWeek, Enabled = enabled });

        //run this application or setup path to the file
        var action = new ExecAction(Assembly.GetExecutingAssembly().Location, null, null);
        if (filePath != string.Empty && File.Exists(filePath))
        {
            action = new ExecAction(filePath);
        }
        action.Arguments = "/Scheduler";
        td.Actions.Add(action);

        ts.RootFolder.RegisterTaskDefinition(TaskName, td);
    }

Next let’s create other basic functions to get and delete current task. This is quite straightforward.

 public static void DeleteTask()
 {
    var ts = new TaskService();
    var task = ts.RootFolder.GetTasks().Where(a => a.Name.ToLower() == TaskName.ToLower()).FirstOrDefault();
    if (task != null)
    {
        ts.RootFolder.DeleteTask(TaskName);
    }
 }

 public static Task GetTask()
 {
    var ts = new TaskService();
    var task = ts.RootFolder.GetTasks().Where(a => a.Name.ToLower() == TaskName.ToLower()).FirstOrDefault();

    return task;
 }

Now, lets create function to display next scheduled task run date. It is quite useful to notify the user about the next planned execution. In our implementation we will use NextRunTime property of the task we created. We also have to check if the task is enabled.

 public static string GetNextScheduleTaskDate()
 {
    try
    {
        var task = Scheduler.GetTask();
        if (task != null)
        {
            var trigger = task.Definition.Triggers.FirstOrDefault();
            if (trigger != null)
            {
                if (trigger.TriggerType == TaskTriggerType.Weekly)
                {
                    if (trigger.Enabled)
                    {
                        var weeklyTrigger = (WeeklyTrigger)trigger;
                        
                        return task.NextRunTime.ToString("yyyy MMM. dd dddd 'at ' HH:mm");
                    }
                }
            }
        }
    }
    catch (Exception)
    { }

    return "no scheduled date!";
 }

Within the UI, we have to create basic helper methods in order to support interface values. In our case we will use checkboxes to set and enable task. In our example, the user will be able to set the task in any day of the week, disable it or delete it permanently. We will also display the next run time information.

 void RefreshNextRunInfo()
 {
    lblNextRun.Text = Scheduler.GetNextScheduleTaskDate();
 }

 //Load selected days from checkboxes
 DaysOfTheWeek GetTaskDays()
 {
    var daysOfWeek = DaysOfTheWeek.AllDays;
    daysOfWeek &= ~DaysOfTheWeek.AllDays;

    if (chkbMonday.Checked) { daysOfWeek = daysOfWeek | DaysOfTheWeek.Monday; }
    if (chkbSaturday.Checked) { daysOfWeek = daysOfWeek | DaysOfTheWeek.Saturday; }
    if (chkbSunday.Checked) { daysOfWeek = daysOfWeek | DaysOfTheWeek.Sunday; }
    if (chkbThursday.Checked) { daysOfWeek = daysOfWeek | DaysOfTheWeek.Thursday; }
    if (chkbTuestday.Checked) { daysOfWeek = daysOfWeek | DaysOfTheWeek.Tuesday; }
    if (chkbWednesday.Checked) { daysOfWeek = daysOfWeek | DaysOfTheWeek.Wednesday; }
    if (chkbFriday.Checked) { daysOfWeek = daysOfWeek | DaysOfTheWeek.Friday; }

    return daysOfWeek;
 }

 void SetTaskForm(bool enabled)
 {
    timePicker.Enabled = enabled;
    chkbFriday.Enabled = enabled;
    chkbMonday.Enabled = enabled;
    chkbSaturday.Enabled = enabled;
    chkbSunday.Enabled = enabled;
    chkbThursday.Enabled = enabled;
    chkbTuestday.Enabled = enabled;
    chkbWednesday.Enabled = enabled;
 }

 //reload current task state (if exists)
 public void RefreshSchedulerSettings()
 {
    //set initial time to 5 minutes ahead for testing
    timePicker.Value = DateTime.Now.AddMinutes(5);

    try
    {
        SetTaskForm(false);
        chkbFriday.Checked = false;
        chkbMonday.Checked = false;
        chkbSaturday.Checked = false;
        chkbSunday.Checked = false;
        chkbThursday.Checked = false;
        chkbTuestday.Checked = false;
        chkbWednesday.Checked = false;
        chkbScheduler.Checked = false;

        var task = Scheduler.GetTask();
        if (task != null)
        {
            var trigger = task.Definition.Triggers.FirstOrDefault();
            if (trigger != null)
            {
                if (trigger.TriggerType == TaskTriggerType.Weekly)
                {
                    if (trigger.Enabled) { SetTaskForm(true); }

                    chkbScheduler.Checked = trigger.Enabled;
                    var weeklyTrigger = (WeeklyTrigger)trigger;
                    timePicker.Value = trigger.StartBoundary;

                    if (weeklyTrigger.DaysOfWeek.HasFlag(DaysOfTheWeek.Friday)) { chkbFriday.Checked = true; }
                    if (weeklyTrigger.DaysOfWeek.HasFlag(DaysOfTheWeek.Monday)) { chkbMonday.Checked = true; }
                    if (weeklyTrigger.DaysOfWeek.HasFlag(DaysOfTheWeek.Saturday)) { chkbSaturday.Checked = true; }
                    if (weeklyTrigger.DaysOfWeek.HasFlag(DaysOfTheWeek.Sunday)) { chkbSunday.Checked = true; }
                    if (weeklyTrigger.DaysOfWeek.HasFlag(DaysOfTheWeek.Thursday)) { chkbThursday.Checked = true; }
                    if (weeklyTrigger.DaysOfWeek.HasFlag(DaysOfTheWeek.Tuesday)) { chkbTuestday.Checked = true; }
                    if (weeklyTrigger.DaysOfWeek.HasFlag(DaysOfTheWeek.Wednesday)) { chkbWednesday.Checked = true; }
                }
            }
        }
    }
    catch (Exception)
    { }
 } 

When saving the task we will use following method that validates and gathers user input information. Your implementation of course will depend on your requirements.

 private void btnSave_Click(object sender, EventArgs e)
 {
    var filePath = string.Empty;//set path to the exe file or leave it empty to run this app for test
    var daysOfWeek = GetTaskDays();

    if (chkbScheduler.Checked && daysOfWeek == 0)
    {
        MessageBox.Show(this, "Select at least one day or turn off scheduler!", "Warning", MessageBoxButtons.OK, MessageBoxIcon.Warning);
        return;
    }

    try
    {
        if (daysOfWeek != 0)
        {
            var startDate = DateTime.Now.Date.AddHours(timePicker.Value.Hour).AddMinutes(timePicker.Value.Minute);
            Scheduler.SetTask(filePath, timePicker.Value, daysOfWeek, chkbScheduler.Checked);
        }
        else
        {
            Scheduler.DeleteTask();
        }
    }
    catch (Exception ex)
    {
        MessageBox.Show(this, "An error occured " + ex.Message, "Error", MessageBoxButtons.OK, MessageBoxIcon.Warning);
    }
    RefreshNextRunInfo();
 }

I have included fully working example below for your tests.

TaskScheduler

1 Star2 Stars3 Stars4 Stars5 Stars (No Ratings Yet)
Loading...Loading...

Terminate background stored procedure session

If you are executing background stored procedure, for example when run asynchronously by the Service Broker, there is often a need to stop the process, especially when it is time consuming operation. In order to do that, we have to find the session id of the process we want and then use KILL function to terminate it.

In order to display currently running queries let’s execute following.

 SELECT sqltext.TEXT as SQLText,
	req.session_id,
	req.database_id,
	req.status,
	req.command,
	req.cpu_time,
	req.total_elapsed_time
	FROM sys.dm_exec_requests req
	CROSS APPLY sys.dm_exec_sql_text(sql_handle) AS sqltext

After we’ve seen how to display running queries, we can now create stored procedure allowing us to stop an session id related to the query name we want.

 CREATE PROCEDURE [dbo].[proc_com_KillBackgroundProcedure] (
 @DatabaseName nvarchar(50) = '',
 @ProcedureName nvarchar(50) = ''
)
AS

declare @SessionToBeKilled int = null;
declare @ProcessName nvarchar(max) = '';

declare dataset cursor for

select SQLText, session_id
from (SELECT sqltext.TEXT as SQLText,
	req.session_id,
	req.database_id,
	req.status,
	req.command,
	req.cpu_time,
	req.total_elapsed_time
	FROM sys.dm_exec_requests req
	CROSS APPLY sys.dm_exec_sql_text(sql_handle) AS sqltext
	inner join master.dbo.sysdatabases m on m.dbid = database_id
	where m.name = @databasename and req.status = 'background' 
        and [TEXT] like '%' + @ProcedureName + '%'
	) as T

open dataset
fetch next from dataset into  @ProcessName, @SessionToBeKilled
while @@fetch_status = 0
begin
 
  EXEC('KILL ' + @SessionToBeKilled);
  print 'killed: ' + convert(varchar(max),@SessionToBeKilled);

fetch next from dataset into  @ProcessName, @SessionToBeKilled
end
close dataset
deallocate dataset

Above query simply gets the session id by the procedure name and then just kills the process. Be careful to not to kill an system query. I hope this has been useful for you 🙂

1 Star2 Stars3 Stars4 Stars5 Stars (No Ratings Yet)
Loading...Loading...

Using mssql Service Broker in Service-Oriented Architecture

Main principle of SOA is separation between the service interface and it’s implementation. In order to achieve that separation on the database level we can use Mssql Service Broker messaging.

Using Service Broker allows us to send internal or external messages between or withing the mssql database. We can also use the massages to activate stored procedure and execute tasks or even external web service by invoking c# custom assembly method. Internal messaging lets us trigger asynchronous events that we can use to perform time consuming operations or integration tasks (for example by activation database trigger that starts the event chain).

In our example I will show you how to execute time consuming task asynchronously. It is especially useful when you need to calculate a lot of data when some table content changes (trigger events).

Below is the example of triggering time consuming procedure synchronously and asynchronously using Service Broker.

servicebroker

In order to implement our solution we need to first create self activating stored procedure that will be activated by service broker queue each time we send the message to.

 CREATE PROCEDURE proc_BrokerTargetActivProc
 AS
  DECLARE @RecvReqDlgHandle UNIQUEIDENTIFIER;
  DECLARE @RecvReqMsg NVARCHAR(100);
  DECLARE @RecvReqMsgName sysname;

  WHILE (1=1)
  BEGIN

    BEGIN TRANSACTION;

    WAITFOR
    ( RECEIVE TOP(1)
        @RecvReqDlgHandle = conversation_handle,
        @RecvReqMsg = message_body,
        @RecvReqMsgName = message_type_name
      FROM TASK_QUEUE
    ), TIMEOUT 5000;

    IF (@@ROWCOUNT = 0)
    BEGIN
      ROLLBACK TRANSACTION;
      BREAK;
    END
     
    declare @targetpProcedure nvarchar(100);
    set @targetpProcedure = CAST(@RecvReqMsg AS nvarchar(100))
    
    IF LEN(@targetpProcedure) > 0
    BEGIN
        --execute target procedure (no need to send the reply)
       exec @targetpProcedure;
     
    END
    ELSE IF @RecvReqMsgName =
        N'https://schemas.microsoft.com/SQL/ServiceBroker/EndDialog'
    BEGIN
       END CONVERSATION @RecvReqDlgHandle;
    END
    ELSE IF @RecvReqMsgName =
        N'https://schemas.microsoft.com/SQL/ServiceBroker/Error'
    BEGIN
       END CONVERSATION @RecvReqDlgHandle;
    END
      
    COMMIT TRANSACTION;

  END
GO

When we have the activation procedure ready, the next step is to create basic Service Broker objects we will use when sending the messages.

CREATE MESSAGE TYPE [//SBM/RequestMessage] VALIDATION=WELL_FORMED_XML; 
CREATE MESSAGE TYPE [//SBM/ReplyMessage] VALIDATION=WELL_FORMED_XML;

CREATE CONTRACT [//SBM/MSGContract]
(
 [//SBM/RequestMessage]
 SENT BY INITIATOR 
  ,[//SBM/ReplyMessage]
 SENT BY TARGET 
);  

CREATE QUEUE TASK_QUEUE
 WITH STATUS=ON,
 ACTIVATION (
  PROCEDURE_NAME = proc_BrokerTargetActivProc,
  MAX_QUEUE_READERS = 5,
  EXECUTE AS SELF);

CREATE SERVICE [//SBM/TargetService] ON QUEUE TASK_QUEUE([//SBM/MSGContract]);
CREATE SERVICE [//SBM/InitService] ON QUEUE TASK_QUEUE([//SBM/MSGContract]);

The final step is to create helper procedure that will be sending activating messages to the queue passing in the target procedure’s name to be executed.

CREATE PROCEDURE proc_ExecuteProcedureAsync
 @ProcedureName nvarchar(100) = ''
 AS

DECLARE @InitDlgHandle UNIQUEIDENTIFIER;
DECLARE @RequestMsg xml;
BEGIN TRANSACTION;
BEGIN DIALOG @InitDlgHandle
     FROM SERVICE
      [//SBM/InitService]
     TO SERVICE
      N'//SBM/TargetService'
     ON CONTRACT
      [//SBM/MSGContract]
     WITH
         ENCRYPTION = OFF;
 
 SELECT @RequestMsg = @ProcedureName;
       
--Send the Message
SEND ON CONVERSATION @InitDlgHandle MESSAGE TYPE [//SBM/RequestMessage](@RequestMsg);

--Close conversation
END CONVERSATION @InitDlgHandle;

COMMIT TRANSACTION;

I have included complete sql script below that will create all structures and procedures for you. Give it a try.
SetUpServiceBroker1

1 Star2 Stars3 Stars4 Stars5 Stars (No Ratings Yet)
Loading...Loading...

Using automation when executing SQL scripts stored in separate files

When working on a big projects, sometimes there is a need to update database from the sql files scattered around multiple files or folders especially when using source control for maintaining database changes. Also when using auto builds via CI server this functionality seems to be useful.

In this article I will show you how to automate the process of updating multiple database sql files so you can do it in one go – like that:

  //this is command line executed by TeamCity build (change params with your build configuration values)
 c:\\UpdateScripts.exe "\scripts\Procedures" %Server% %Database% %ToBeReplacedSelectUser% %DatabaseSelectUser% "exec dbo.proc_GrantExecutePermissionsOnProcedures '%DatabaseUser%'"

teamCitySqlCmd

Lets create C# console application first. Once that is done we can implement basic validation rules for parameters being passed in. In our example we will support 6 parameters: Server, Database, StringToFind, StringToReplace, DatabaseUser, FinalQuery (we will use windows integrated database connection).

    if (args.Length == 0)
    {
        Console.WriteLine("No arguments passed!");
        Console.WriteLine(Environment.NewLine);
        Console.WriteLine(getHelp());
        Console.ReadLine();
        return 1;
    }

    if (args.Length < 3)
    {
        if (!silent)
        {
            Console.WriteLine("Not all required arguments passed!");
            Console.WriteLine(Environment.NewLine);
            Console.WriteLine(getHelp());
            Console.ReadLine();
        }
        return 1;
    } 
    ///////////////
    var scriptPath = args[0];
    var server = args[1];
    var database = args[2];
    var findString = args[3];
    var replaceString = args[4];
    var endQuery = args.Length >= 5 ? args[5] : string.Empty;
    /////////////

    if (!Directory.Exists(scriptPath) || Directory.GetFiles(scriptPath).Length == 0)
    {
        if (!silent)
        {
            Console.WriteLine("Directory does not exist or is empty!");
            Console.WriteLine(Environment.NewLine);
            Console.WriteLine(getHelp());
            Console.ReadLine();
        }
        return 1;
    }

The code below will get all .sql files from the directory and execute containing queries. If an file has “GO” statements inside then it needs to be executed in one block to avoid errors. Normally when executing such a scripts, Sql Management Studio cares about that. In our case we simply need to split content by “GO” blocks.

Console.WriteLine("params to find: " + findString);
Console.WriteLine("replace string: " + replaceString);

using (var con = new SqlConnection("Server=" + server + ";Database=" + database + ";Trusted_Connection=True;"))
{
    con.Open();

    var files = Directory.GetFiles(scriptPath).Where(f => f.ToLower().EndsWith(".sql"));

    foreach (var filePath in files)
    {
        #region execute query from file
        var query = File.ReadAllText(filePath);

        if (findString.Length > 0)
        {
            query = query.Replace(findString, replaceString);
        }
        Console.WriteLine("Executing: " + Path.GetFileName(filePath));

        query = query.Replace("go\r\n", "GO\r\n");
        query = query.Replace("go\t", "GO\t");
        query = query.Replace("\ngo", "\nGO");

        //divide into GO groups to avoid errors
        var itemQuery = query.Split(new string[] { "GO\r\n", "GO\t", "\nGO" }, StringSplitOptions.None);

        foreach (var queryItem in itemQuery)
        {
            if (queryItem.Trim().Length < 3) { continue; }

            using (var cmd = new SqlCommand(queryItem, con))
            {
                try
                {
                    cmd.ExecuteNonQuery();
                }
                catch (Exception ex)
                {
                    if (!silent)
                    {
                        Console.WriteLine("Error: " + ex.Message);
                    }
                    exitResult = 1;
                }
            }
        }
        #endregion
    }

At the end we can execute final sql statement. It is useful when for example there is a need to assign database permissions after the update is performed.

 //////////////////////execute final query (e.g permission update)
if (endQuery.Trim().Length > 3)
{
    using (var cmd = new SqlCommand(endQuery, con))
    {
        try
        {
            Console.WriteLine("Executing final query: " + endQuery);
            cmd.ExecuteNonQuery();
        }
        catch (Exception ex)
        {
            Console.WriteLine("Error: " + ex.Message);
            return 1;
        }
    }
}

The Console.WriteLine output will also be picked up by the TeamCity build log, so you can see all update information when needed. I have attached solution files, feel free to adjust it to your needs 🙂
UpdateDBScripts

1 Star2 Stars3 Stars4 Stars5 Stars (No Ratings Yet)
Loading...Loading...