Posts

Using Windows Azure Service Bus Topics in distributed systems

Service Bus topics allow to perform one way communication using publish/subscribe model. In that model the Service Bus topic can be treated as a intermediary queue that multiple users/components can subscribe to.

When publishing a message we can choose to route it to all subscribers or to apply filters for each subscription resulting in each subscriber receiving messages that are addressed to him. With Service Bus topics we can easily scale distributed applications communicating with each other within or across multiple networks.

In this article I will show you how to build and test Service Bus topic on your local computer. In our example we will simulate sending messages from the web, mobile and service application to the Service Bus Topic.

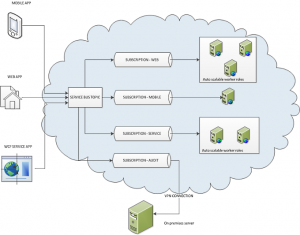
These messages will be then routed to relevant subscriptions based on defined filters we assigned for each of them. Subscription for messages from the web application will be using multiple auto scalable worker roles to process the business logic. Same will apply for service messages. If we don’t expect a lot of traffic coming from mobile application, we can then use single worker role (with failover settings).

Autoscaling worker roles can be performed using Enterprise Library 5.0 – Autoscaling Application Block (aka WASABi). This will ensure that appropriate number of worker roles will be automatically started when traffic increases and stopped if the traffic will ease.

See high level architecture diagram below:

ServiceBusTopic


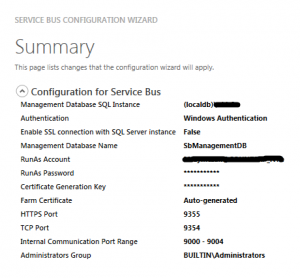
In order to start, we need to first install “Service Bus 1.0 for Windows Server” (runs on Win7 as well). After installation please go to start > Service Bus 1.0 > Service Bus Configuration. Then use the wizard to set up the web farm first and after that, join your computer to that farm – this will essentially create namespace within the namespace on your local machine.

ServiceBus-configuration

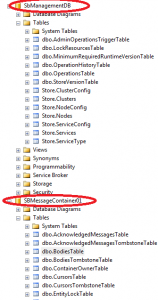
After you configure the Service Bus installation you will get endpoint address that your local application will use to connect to the Service Bus. You may notice that after installation there are 2 databases created on you local MSSQL server, see below image:

ServiceBus-tables

In order to connect to our Service Bus we will use the function below. This will create connection string the pass in to the NamespaceManager class.

  //use this setting when deploying to Windows Azure
  <add key="Microsoft.ServiceBus.ConnectionString" value="Endpoint=sb://[your namespace].servicebus.windows.net;SharedSecretIssuer=owner;SharedSecretValue=[your secret]" />

 public static string getLocalServiceBusConnectionString()
 {
    var ServerFQDN = System.Net.Dns.GetHostEntry(string.Empty).HostName;
    var ServiceNamespace = "ServiceBusDefaultNamespace";
    var HttpPort = 9355;
    var TcpPort = 9354;

    var connBuilder = new ServiceBusConnectionStringBuilder();
    connBuilder.ManagementPort = HttpPort;
    connBuilder.RuntimePort = TcpPort;
    connBuilder.Endpoints.Add(new UriBuilder() { Scheme = "sb", Host = ServerFQDN, Path = ServiceNamespace }.Uri);
    connBuilder.StsEndpoints.Add(new UriBuilder() { Scheme = "https", Host = ServerFQDN, Port = HttpPort, Path = ServiceNamespace }.Uri);

    return connBuilder.ToString();
 }

Within the worker role we will use NamespaceManager to create Service Bus Topic (if does not exist). We will also create subscriptions and associated filters.
Please notice that subscription will filter messages using MessageOrigin property. This property will be assigned to the message in the message send method for each application separately (web, mobile, service).

 public void CreateServiceBusTopicAndSubscriptions(NamespaceManager namespaceManager)
 {
    #region Configure and create Service Bus Topic
    var serviceBusTestTopic = new TopicDescription(TopicName);
    serviceBusTestTopic.MaxSizeInMegabytes = 5120;
    serviceBusTestTopic.DefaultMessageTimeToLive = new TimeSpan(0, 1, 0);

    if (!namespaceManager.TopicExists(TopicName))
    {
        namespaceManager.CreateTopic(serviceBusTestTopic);
    }
    #endregion

    #region Create filters and subsctiptions
    //create filters
    var messagesFilter_Web = new SqlFilter("MessageOrigin = 'Web'");
    var messagesFilter_Mobile = new SqlFilter("MessageOrigin = 'Mobile'");
    var messagesFilter_Service = new SqlFilter("MessageOrigin = 'Service'");

    if (!namespaceManager.SubscriptionExists(TopicName, "WebMessages"))
    {
        namespaceManager.CreateSubscription(TopicName, "WebMessages", messagesFilter_Web);
    }

    if (!namespaceManager.SubscriptionExists(TopicName, "MobileMessages"))
    {
        namespaceManager.CreateSubscription(TopicName, "MobileMessages", messagesFilter_Mobile);
    }

    if (!namespaceManager.SubscriptionExists(TopicName, "WCfServiceMessages"))
    {
        namespaceManager.CreateSubscription(TopicName, "WCfServiceMessages", messagesFilter_Service);
    }
    #endregion
}

We also need to create subscription clients in “OnStart” method giving each subscriber a unique name.

 public override bool OnStart()
 {
    // Set the maximum number of concurrent connections 
    ServicePointManager.DefaultConnectionLimit = 12;

    // Create the queue if it does not exist already
    //string connectionString = CloudConfigurationManager.GetSetting("Microsoft.ServiceBus.ConnectionString");
    var connectionString = getLocalServiceBusConnectionString();
    var namespaceManager = NamespaceManager.CreateFromConnectionString(connectionString);

    //create topic and subscriptions
    CreateServiceBusTopicAndSubscriptions(namespaceManager);

    // Initialize subscription for web, mobile and service
    SubscriptionClients.Add(SubscriptionClient.CreateFromConnectionString(connectionString, TopicName, "WebMessages"));
    SubscriptionClients.Add(SubscriptionClient.CreateFromConnectionString(connectionString, TopicName, "MobileMessages"));
    SubscriptionClients.Add(SubscriptionClient.CreateFromConnectionString(connectionString, TopicName, "WCfServiceMessages"));

    IsStopped = false;
    return base.OnStart();
}

Inside the run method we will use Task Parallel foreach method to create separate task for each subscriber listening for incoming messages.
This is only to simulate multiple subscribers in one place. Normally each worker role will connect to the topic listening for the messages appropriate for it’s type (separate for web, mobile and service).

public override void Run()
{
 Parallel.ForEach(SubscriptionClients, currentSubscrtiption =>
 {
    while (!IsStopped)
    {
        #region Receive messages
        try
        {
            // Receive the message
            var receivedMessage = currentSubscrtiption.Receive();
         
            if (receivedMessage != null)
            {
                var messageFrom = receivedMessage.Properties["MessageOrigin"].ToString();

                switch (messageFrom)
                {
                    case "Web":
                        //send it to web processing logic

                        break;
                    case "Mobile":
                        //send it to mobile processing logic

                        break;
                    case "Service":
                        //send it to service processing logic

                        break;
                    default:
                        break;
                }

                // Process the message
                Trace.WriteLine(Environment.NewLine + "--------------------------" + Environment.NewLine);
                Trace.WriteLine(string.Format("{0} message content: {1}", messageFrom, receivedMessage.GetBody<string>()));

                receivedMessage.Complete();
            }
        }
        catch (MessagingException e)
        {
            if (!e.IsTransient)
            {
                Trace.WriteLine(e.Message);
                throw;
            }

            Thread.Sleep(10000);
        }
        catch (OperationCanceledException e)
        {
            if (!IsStopped)
            {
                Trace.WriteLine(e.Message);
                throw;
            }
        }
        #endregion
    }
});
}

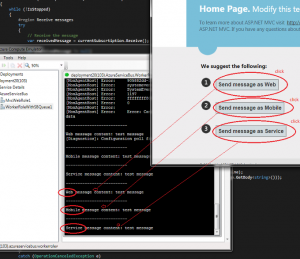
Finally we can simulate sending messages from the MVC application. We will use 3 different buttons to create and send messages.

 [HttpPost]
 public ActionResult SendWebMessage()
 {
    SendMessage("Web");

    return RedirectToAction("Index", "Home");
 }

 [HttpPost]
 public ActionResult SendMobileMessage()
 {
    SendMessage("Mobile");

    return RedirectToAction("Index", "Home");
 }

 [HttpPost]
 public ActionResult SendServiceMessage()
 {
    SendMessage("Service");

    return RedirectToAction("Index", "Home");
 }

See the image below:

ServiceBusTopic-subscriptions

Please note that when sending messages we have to assign value to message.Properties[“MessageOrigin”]. This will be used by the Service Bus Topic to route messages to appropriate subscriptions.

 void SendMessage(string type)
 {
    var connectionString = getLocalServiceBusConnectionString();

    var Client = TopicClient.CreateFromConnectionString(connectionString, "ServiceBusTestTopic");

    var message = new BrokeredMessage("test message");
    message.Properties["MessageOrigin"] = type;

    Client.Send(message);
 }

As usual, I have attached working project files for your tests 🙂

AzureServiceBus

1 Star2 Stars3 Stars4 Stars5 Stars (No Ratings Yet)
Loading...Loading...

Creating custom WCF message router – load balancer

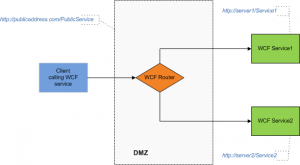
The very common requirement is to route WCF messages from the publicly exposed front-end service (perimeter network) to other services sitting within the local network. This is the good security model that lets us implement routing or load balancer if needed. The front-end service will also act as a firewall in this scenario. The routing may be performed based on the requested service method, content or custom algorithm.

The image below shows typical hight level service infrastructure within the organization.

wcf_router

Let’s start with defining our service that the client will use to send requests. The “Calculate” method will be used to perform time consuming operation that will require more CPU usage.

  [ServiceContract]
    public interface IMessageService
    {
        [OperationContract]
        string SendMessage(string value);

        [OperationContract]
        int Calculate(string value); 
    }

  public class MessageService : IMessageService
  {
        public string SendMessage(string value)
        {
            return string.Format("You have sent: {0}", value);
        }

        public int Calculate(string value)
        {
            //do calculation
            return 999;
        }
    }

Next, we need to define IRouter interface. In our example we will use two methods: RouteMessage, that will process and route the messages and AddAvailableEndPoints, that will be used to assign available endpoints for the requests to be routed to. Please note that our router will not be using service contracts which is very useful as we don’t want to recompile router service each time our message service interface changes. You may also implement function to assign routing rules, in our example we will hard-code the rules for better clarity.

  [ServiceContract]
    public interface IRouter
    {
        [OperationContract(Action = "*", ReplyAction = "*")]
        Message RouteMessage(Message message);

        void AddAvailableEndPoints(List<EndpointAddress> addressList);        
    }

Let’s create our router class now. Please note that we are using static constructor as we will only use one instance of the service (creating and destroying channel factory is very costly operation).

 static IChannelFactory<IRequestChannel> factory;
 List<EndpointAddress> addressList;
 int routeCount;

  //create only one instance
  static Router()
  {
    try
    {
        var binding = new BasicHttpBinding();
        factory = binding.BuildChannelFactory<IRequestChannel>(binding);

        factory.Open();
    }
    catch (Exception e)
    {
        Console.WriteLine("Exception: {0}", e.Message);
    }
  }

Now we need to implement the actual routing algorithm. In our case, when message arrives we will check the action method that proxy object will use to execute on the target service. We have hard-coded the method “Calculate” to be routed to service2, the other request will be routed equally among available services. You can also use XmlDocument class to parse message content if needed.
Of course in the production environment you may want to pass in routing rules as a object and examine that when processing arrived message prior routing it to appropriate service.

 public Message RouteMessage(Message message)
 {
    IRequestChannel channel = null;
    Console.WriteLine("Action {0}", message.Headers.Action);
    try
    {
        //Route based on custom conditions
        if (message.Headers.Action.ToLower().EndsWith("calculate")) //or use custom routing table stored in other location
        {
            //use second endpoint as it has more resources for time consuming operations
            channel = factory.CreateChannel(this.addressList.Skip(1).First());
            Console.WriteLine("Routed to: {0}\n", this.addressList.Skip(1).First().Uri);
        }
        else
        {
            //or
            #region Route other requests equally
            //we assume only 2 endpoints for this example 
            if (routeCount % 2 == 0)
            {
                channel = factory.CreateChannel(this.addressList.First());
                Console.WriteLine("Routed to: {0}\n", this.addressList.First().Uri);
            }
            else
            {
                channel = factory.CreateChannel(this.addressList.Skip(1).First());
                Console.WriteLine("Routed to: {0}\n", this.addressList.Skip(1).First().Uri);
            }
            //reset route counter
            if (routeCount > 10000) { routeCount = 0; } else { routeCount++; }
            #endregion           
        }

        //remove context as the message will be redirected
        message.Properties.Remove("ContextMessageProperty");

        channel.Open();

        var reply = channel.Request(message);

        channel.Close();

        return reply;
    }
    catch (Exception e)
    {
        Console.WriteLine(e.Message);
        return null;
    }
}

At this time, we can create client application that will call our front-end service(router) multiple times for our test.

 static void Main(string[] args)
 {
    Console.Write("Press enter to send multiple messages");
    Console.ReadLine();

    var baseFrontOfficeAddress = new Uri("https://localhost:81/FrontOffice");

    try
    {
        var binding = new BasicHttpBinding();
        var endpoint = new EndpointAddress(baseFrontOfficeAddress);

        var factory = new ChannelFactory<IMessageService>(binding, endpoint);
        var channel = factory.CreateChannel();

        //simulate multiple requests
        for (var i = 0; i < 10; i++)
        {
            var reply = channel.SendMessage("test message");
            Console.WriteLine(reply);

            var replyCalulated = channel.Calculate("test message");
            Console.WriteLine("Calculated value: " + replyCalulated);
        }

        Console.ReadLine();
        factory.Close();
    }
    catch (Exception ex)
    {
        Console.WriteLine(ex.Message);
        Console.ReadLine();
    }
}

In order to receive client requests we need to start our services. In our example we will host router and available services within the same application. Normally we would deploy router service within DMZ zone and target services on the separate computers withing our local network. For security reasons, only router service would be exposed to public network.

 static void Main(string[] args)
 {
    //execute this first using cmd (win7)
    //netsh http add urlacl url=https://+:81/FrontOffice user=Domain(or PC name)\UserName
    //netsh http add urlacl url=https://+:81/service1 user=Domain(or PC name)\UserName
    //netsh http add urlacl url=https://+:81/service2 user=Domain(or PC name)\UserName

    //front office endpoint - all clients will call this address before requests will be routed
    var baseFrontOfficeAddress = new Uri("https://localhost:81/FrontOffice");

    #region Target service endpoints that requests can be routed to (can be more than 2)
    var baseEndPointAddress1 = new Uri("https://localhost:81/service1");
    var baseEndPointAddress2 = new Uri("https://localhost:81/service2");

    var endPoint1 = new EndpointAddress(baseEndPointAddress1);
    var endPoint2 = new EndpointAddress(baseEndPointAddress2); 
    #endregion

    #region These services should normally be deployed to different servers within the organization
    //start service 1
    var hostService1 = new ServiceHost(typeof(MessageService1), baseEndPointAddress1);
    hostService1.AddServiceEndpoint(typeof(IMessageService), new BasicHttpBinding(), "");
    hostService1.Open();
    Console.WriteLine("MessageService1 service running");

    //start service 2
    var hostService2 = new ServiceHost(typeof(MessageService2), baseEndPointAddress2);
    hostService2.AddServiceEndpoint(typeof(IMessageService), new BasicHttpBinding(), "");
    hostService2.Open();
    Console.WriteLine("MessageService2 service running");        
    #endregion

    #region Start router service
    var router = new Router();

    //add available service enpoints
    router.AddAvailableEndPoints(new List<EndpointAddress>() { endPoint1, endPoint2 });

    var routerHost = new ServiceHost(router);
    routerHost.AddServiceEndpoint(typeof(IRouter), new BasicHttpBinding(), baseFrontOfficeAddress);
    routerHost.Open();

    Console.WriteLine("Router service running");           
    #endregion           
    
    Console.WriteLine("---Run client to send messages---");  
    Console.ReadLine(); 
}

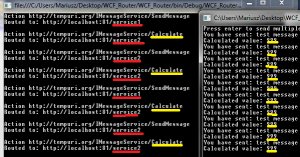
The results of our test is shown below. In this example we chose to route all requests for “Caluculate” method to “service2” (as it located on faster machine within the network), the other requests are routed equally to service1 or service2.

routed_messages

Above way of routing messages is very flexible as it is implemented on the very low level. The other way of routing messages is to use RoutingService class. In this approach you would define the routing table, endpoints and filters in your configuration file. Based on these settings you would add service behavior that will use RoutingService class to route messages.

I have attached project files below for your tests. Please execute below commands before testing it:

netsh http add urlacl url=https://+:81/FrontOffice user=Domain(or PC name)\UserName”
netsh http add urlacl url=https://+:81/service1 user=Domain(or PC name)\UserName
netsh http add urlacl url=https://+:81/service2 user=Domain(or PC name)\UserName

WCF_Router

1 Star2 Stars3 Stars4 Stars5 Stars (No Ratings Yet)
Loading...Loading...

Using WCF REST service in server and client side calls

When using WCF services sometimes there is a need to use REST architecture, especially for web applications. Using REST, brings a lot of benefits such as: broad caching possibilities, interoperability, simplicity etc. Also using REST with JSON instead of soap/xml based protocol decreases network bandwidth and makes it easier to utilize by JavaScript Ajax calls.

In this article I will show you how to retrieve and update data from WCF restful service using JSON protocol. In order to do that we will build request helper to wrap-up our requests sent from MVC application. We will also use JSONP data format to make cross-domain ajax calls to WCF service.

wcf_rest_json_calls

Let’s create MVC application and IIS hosted WCF service. In order to apply custom routing to our service, we will have to change following settings:
– set aspNetCompatibilityEnabled=”true” in WCF web.config file,
– set [AspNetCompatibilityRequirements(RequirementsMode = AspNetCompatibilityRequirementsMode.Allowed)] – to our service class,

We also need to set crossDomainScriptAccessEnabled=”true” in WCF web.config for our ajax calls from different domain (different localhost port).

Please see WCF web.config settings:

 <?xml version="1.0"?>
<configuration>
  <system.web>
    <compilation debug="true" targetFramework="4.0" />
    <authentication mode="None"/>
  </system.web>
  <system.serviceModel>
     <bindings>
        <webHttpBinding>
          <binding name="webHttpBindingWithJsonP" crossDomainScriptAccessEnabled="true" />
        </webHttpBinding>
      </bindings>
    <services>
      <service name="WCFRestfulService.MyService" behaviorConfiguration="RESTBehavior">
        <endpoint address=""  binding="webHttpBinding" contract="WCFRestfulService.IRestService"
                  behaviorConfiguration="MyEndpointBehavior"  bindingConfiguration="webHttpBindingWithJsonP">
        </endpoint>
      </service>
    </services>
    <behaviors>
      <serviceBehaviors>
        <behavior name="RESTBehavior">
          <serviceMetadata httpGetEnabled="true" />
          <serviceDebug includeExceptionDetailInFaults="true"/>
        </behavior>
      </serviceBehaviors>
      <endpointBehaviors>
        <behavior name="MyEndpointBehavior">
          <webHttp/>
        </behavior>
      </endpointBehaviors>
    </behaviors>
    <serviceHostingEnvironment aspNetCompatibilityEnabled="true"
       multipleSiteBindingsEnabled="true">
    </serviceHostingEnvironment>
  </system.serviceModel>
</configuration>

Next let’s create our ServiceContract and DataContract. Please note that we are defining UriTemplate to specified url contract routing, we will also use WebMessageFormat.Json attribute to declare the request format.

 [ServiceContract(Namespace = "https://mysite.com/2013/06/08", Name = "WCFRestService")]
 public interface IRestService
 {
    [OperationContract]
    [WebGet(ResponseFormat = WebMessageFormat.Json, RequestFormat = WebMessageFormat.Json,
    UriTemplate = "Products?skip={skip}&top={top}")]
    [Description("Returns a list of all products")]
    List<Product> GetAllProducts(int skip, int top);

    [OperationContract]
    [WebInvoke(Method = "DELETE", ResponseFormat = WebMessageFormat.Json, RequestFormat = WebMessageFormat.Json,
    UriTemplate = "DeleteProduct?productID={productID}")]
    [Description("Deletes a product")]
    string DeleteProduct(string productID);

    [OperationContract]
    [WebInvoke(Method = "POST", ResponseFormat = WebMessageFormat.Json, RequestFormat = WebMessageFormat.Json,
    UriTemplate = "/UpdateProduct")]
    [Description("Updates the product")]
    string UpdateProduct(Product productDto);
 }

 [DataContract]
 public class Product
 {
    [DataMember]
    public string ProductID { get; set; }

    [DataMember]
    public string Name { get; set; }

    [DataMember]
    public string Category { get; set; }

    [DataMember]
    public double Price { get; set; }
 }

Also, in the service global file we need to define following routing rule.

 protected void Application_Start(object sender, EventArgs e)
  {
      RouteTable.Routes.Add(new ServiceRoute("", new WebServiceHostFactory(), typeof(MyService)));
  }

Our .svc file should contain following (Factory=”System.ServiceModel.Activation.WebScriptServiceHostFactory” added)

 <%@ ServiceHost Language="C#" Debug="true" Service="WCFRestfulService.MyService" CodeBehind="MyService.svc.cs" Factory="System.ServiceModel.Activation.WebScriptServiceHostFactory" %>

Inside our service class we will add following test methods:

 [AspNetCompatibilityRequirements(RequirementsMode = AspNetCompatibilityRequirementsMode.Allowed)]
 public class MyService : IRestService
 {
    List<Product> IRestService.GetAllProducts(int skip, int top)
    {
        var productList = new List<Product>();
        var random = new Random();

        #region simulate database
        for (var i = 0; i < 100; i++)
        {
            productList.Add(new Product()
            {
                ProductID = i.ToString(),
                Category = "Category " + i % 2,
                Name = "Product " + i.ToString(),
                Price = random.Next(10, 100)
            });
        } 
        #endregion

        //////////////////////

        var productSet = (from product in productList
                          orderby product.Name
                          select product).Skip(skip).Take(top).ToList();

        return productSet;
    }

    string IRestService.DeleteProduct(string productID)
    {
        //delete from database here


        return "OK";//return status or error
    }

    string IRestService.UpdateProduct(Product productDto)
    {
        //update the product here


        return "OK";//return status or error
    }

}

Next, in MVC application let’s create request helper that we will use to wrap-up our requests executed from C# controllers. Helper functions simply convert our data to JSON format when sending REST requests. We will also de-serialize objects from JSON to C# when retrieving the data.

 public class RequestHelper
 {
    /// <summary>
    /// Get object using GET
    /// </summary>
    /// <typeparam name="T"></typeparam>
    /// <param name="url"></param>
    /// <returns></returns>
    public static T GetObjectRest<T>(string url)
    {
        var request = HttpWebRequest.Create(url);
        request.Method = "GET";

        var response = request.GetResponse() as HttpWebResponse;
        using (var resStream = response.GetResponseStream())
        {
            using (var reader = new StreamReader(resStream))
            {
                var jsonResponse = reader.ReadToEnd();

                return FromJSON<T>(jsonResponse);
            }
        }
    }

    /// <summary>
    /// Updates object
    /// </summary>
    /// <param name="url"></param>
    /// <returns></returns>
    public static string UpdateObjectRest<T>(string url, T objectDto)
    {
        var request = (HttpWebRequest)WebRequest.Create(url); 
        request.Method = "POST";
        request.ContentType = "application/json";

        //send the data.
        using (var requestWriter = new StreamWriter(request.GetRequestStream()))
        {
            requestWriter.Write(ToJSON<T>(objectDto));
        }

        //read response
        var response = (HttpWebResponse)request.GetResponse();
        using (var resStream = response.GetResponseStream())
        {
            using (StreamReader reader = new StreamReader(resStream))
            {
                return reader.ReadToEnd();
            }
        }
    }

    /// <summary>
    /// Send DELETE request
    /// </summary>
    /// <param name="url"></param>
    /// <returns></returns>
    public static string DeleteObjectRest(string url)
    {
        var request = (HttpWebRequest)WebRequest.Create(url);
        request.Method = "DELETE";

        //read response
        var response = (HttpWebResponse)request.GetResponse();
        using (var resStream = response.GetResponseStream())
        {
            using (StreamReader reader = new StreamReader(resStream))
            {
                return reader.ReadToEnd();
            }
        }
    }

    /// <summary>
    /// Deserialize json to custom object
    /// </summary>
    /// <typeparam name="T"></typeparam>
    /// <param name="json"></param>
    /// <returns></returns>
    public static T FromJSON<T>(string json)
    {
        var jss = new JavaScriptSerializer();

        return jss.Deserialize<T>(json);
    }

    /// <summary>
    /// Serializes object to json
    /// </summary>
    /// <typeparam name="T"></typeparam>
    /// <param name="objectDto"></param>
    /// <returns></returns>
    public static string ToJSON<T>(T objectDto)
    {
        var jss = new JavaScriptSerializer();

        return jss.Serialize(objectDto);
    }
}

Calling Rest service will look as follows:

  //get list of products
  var productList = RequestHelper.GetObjectRest<List<Product>>("https://localhost:9582/Products?skip=0&top=10");

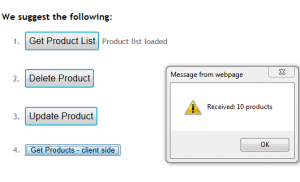
Retrieving data using client side Ajax request is quite difficult because of the cross-domain policy (CORS) disabling web script access by default. The way around that is to use JSONP data format so the server is treating our request as a script call allowing us to return data back inside the call-back function. The limitation of that is that we can only use GET method to retrieve the data. If you need full access to the WCF restful service, it is recommended to make your Ajax requests from the same domain.

 <script type="text/javascript">
    function GetProducts() {
        $.ajax({
            type: "GET", //only 'get' is supported with 'jasonp' datatype
            url: "https://localhost:9582/Products?skip=0&top=10",
            dataType: "jsonp",
            data: '',
            success: function (result) {
                alert('Received: ' + result.length + ' products');
            },
            error: function (xhr, ajaxOptions, thrownError) {
                // alert(xhr.status);
                // alert(thrownError);
            }
        });
    }
</script>

Please find the project files included below.

WCFRestfulService

1 Star2 Stars3 Stars4 Stars5 Stars (No Ratings Yet)
Loading...Loading...

C# 5.0 Async Programming and Caller Information

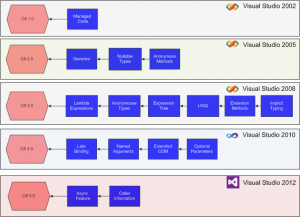
Since the release of .Net 4.5 Framework there are new, very useful features added that I want you to get familiar with. Because the C# language evolves along the .Net Framework, I have created chart that will help you to see all major changes that have been introduced over the last 10 years. I still remember myself starting my programming adventure with VS 2002 🙂

c_versions_history

Let’s focus on the new C# 5.0 features now.

Async Framework introduced in C# 5.0 will probably change the the way we do our programming on the .net platform. The idea is to apply standard async procedures in the background while allowing developer to minimize amount of code required.

The new Async logic seems to be incorporated into standard synchronous functions with only a few keywords added (eg. await, async). When marked async, methods are executed synchronously until the first await statement. At this same time the control is given back to the caller allowing executing thread to function correctly (will not freeze UI).

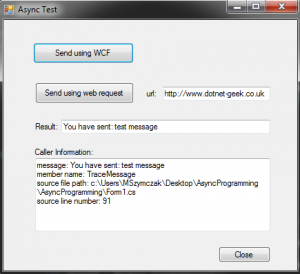
In our example we will call WCF service using async framework. This is mostly accurate real live scenario whether you will use windows forms or WPF application to boost user experience within the UI layer.

async_programming1

After our WCF service is started (self hosting) we are implementing code as follows.

 private async void btnSendWCF_Click(object sender, EventArgs e)
 {
    Task<string> responseTask = SendWCFMessage("test message");

    await Task.Delay(3000); //give it more time

    var response = await responseTask;

    txtResult.Text = response;
}

After executing this methods we are awaiting for the responseTask result while main thread is returned to the caller and UI is fully responsive.

SendWCFMessage method returns task string result. We will use Factory.StartNew to wrap-up our WCF request and return it. See in-line comments.

 Task<string> SendWCFMessage(string message)
 {
    return Task<string>.Factory.StartNew(() =>
    {
        try
        {
            //use TCP when sending message on the same computer or within the trusted network
            var binding = new NetTcpBinding();
            var endpoint = new EndpointAddress(hostEndPointAddress);

            var factory = new ChannelFactory<IServiceHost>(binding, endpoint);
            var channel = factory.CreateChannel();

            //send entered message using created channel
            var result = channel.SendMessage(message);

            //Trace caller information
            TraceMessage(result);

            //return value from the task
            return result;
        }
        catch (Exception ex)
        {
            return ex.Message;
        }
    });
}

As a second example we will use WebRequest class and reuse existing async functionality – the methods GetResponseAsync and CopyToAsync. In both examples we will also display caller trace information.

 private async void btnSendHttpReq_Click(object sender, EventArgs e)
{
    var request = WebRequest.Create(txtUri.Text.Trim());
    var content = new MemoryStream();

    Task<WebResponse> responseTask = request.GetResponseAsync();

    using (var response = await responseTask)
    {
        using (var responseStream = response.GetResponseStream())
        {
            Task copyTask = responseStream.CopyToAsync(content);

            await Task.Delay(3000);//give it more time

            //wait until finished (release main thread in the meantime)
            await copyTask;
        }
    }

    txtResult.Text = string.Format("Response length {0}", content.Length);

    //Trace caller information
    TraceMessage(txtResult.Text);
}

Please notice that in Caller Information “member name” is btnSendHttpReq_Click for webrequest and TraceMessage for WCF as the method is invoked from different thread.

I have attached project files below so you can do your tests as well.

AsyncProgramming

1 Star2 Stars3 Stars4 Stars5 Stars (No Ratings Yet)
Loading...Loading...

Creating WCF custom transport channel

Primary purpose of using WCF within organization is to wrap-up existing components into service oriented architecture (SOA) that can be then easily reused and maintained. When communicating within the local network or between the local components, you may want to implement your own WCF transport channel satisfying your specific requirements.

In this article I will show you how to write your own transport channel to be used without the contract bindings.

wcf_custom_channel

Lets’s start from the CustomBinding class that needs to implement Binding base. One thing to remember is that in CreateBindingElements method the transport element must be the last in the collection, otherwise you will get exception.

 public class CustomBinding : Binding
 {
    readonly MessageEncodingBindingElement messageElement;
    readonly CustomChannelBindingElement transportElement;

    public CustomBinding()
    {
        this.messageElement = new TextMessageEncodingBindingElement();
        this.transportElement = new CustomChannelBindingElement(); //must be the last in collection
    }

    public override BindingElementCollection CreateBindingElements()
    {
        return new BindingElementCollection(new BindingElement[] {
            this.messageElement,
            this.transportElement
        });
    }

    public override string Scheme
    {
        get { return this.transportElement.Scheme; }
    }
}

Next we need to create CustomChannelBindingElement that inherits from TransportBindingElement class. The implementation is quite simple. The scheme may be any prefix you like “http” or “myHttp”. In build channel and listener methods we are simply creating new instances of CustomChannelFactory and CustomChannelListener objects.

 public class CustomChannelBindingElement : TransportBindingElement
 {
    public CustomChannelBindingElement() { }

    public CustomChannelBindingElement(CustomChannelBindingElement clone) { }

    public override string Scheme
    {
        get { return "myprotocol"; }
    }

    public override bool CanBuildChannelFactory<TChannel>(BindingContext context)
    {
        return typeof(TChannel) == typeof(IRequestChannel);
    }

    public override bool CanBuildChannelListener<TChannel>(BindingContext context)
    {
        return typeof(TChannel) == typeof(IReplyChannel);
    }

    public override IChannelFactory<TChannel> BuildChannelFactory<TChannel>(BindingContext context)
    {
        if (context == null)
        {
            throw new ArgumentNullException("context");
        }
        if (!CanBuildChannelFactory<TChannel>(context))
        {
            throw new ArgumentException(String.Format("Unsupported channel type: {0}.", typeof(TChannel).Name));
        }
        return (IChannelFactory<TChannel>)(object)new CustomChannelFactory(this, context);
    }

    public override IChannelListener<TChannel> BuildChannelListener<TChannel>(BindingContext context)
    {
        if (context == null)
        {
            throw new ArgumentNullException("context");
        }
        if (!CanBuildChannelListener<TChannel>(context))
        {
            throw new ArgumentException(String.Format("Unsupported channel type: {0}.", typeof(TChannel).Name));
        }
        return (IChannelListener<TChannel>)(object)new CustomChannelListener(this, context);
    }

    public override BindingElement Clone()
    {
        return new CustomChannelBindingElement(this);
    }
}

Next, we need to create CustomChannelFactory class passing in transportElement and BindingContext to the constructor. Please note the context.BindingParameters.Remove method removes binding element before the validation takes place in async calls. Then, based on MessageEncodingBindingElement we create encoder factory.

 class CustomChannelFactory : ChannelFactoryBase<IRequestChannel>
 {
    readonly MessageEncoderFactory encoderFactory;

    public CustomChannelFactory(CustomChannelBindingElement transportElement, BindingContext context)
        : base(context.Binding)
    {
        var messageElement = context.BindingParameters.Remove<MessageEncodingBindingElement>();
        this.encoderFactory = messageElement.CreateMessageEncoderFactory();
    }

    protected override IRequestChannel OnCreateChannel(EndpointAddress address, Uri via)
    {
        return new CustomRequestChannel(this, encoderFactory, address, via);
    }

    protected override IAsyncResult OnBeginOpen(TimeSpan timeout, AsyncCallback callback, object state)
    {
        throw new NotImplementedException();
    }

    protected override void OnEndOpen(IAsyncResult result)
    {
        throw new NotImplementedException();
    }

    protected override void OnOpen(TimeSpan timeout)
    {

    }
}

Next step is to create CustomChannelListener inheriting from ChannelListenerBase. In this class I have also implemented some methods needed when working with async calls.

 class CustomChannelListener : ChannelListenerBase<IReplyChannel>
 {
    #region privates
    readonly Uri uri;
    readonly MessageEncoderFactory encoderFactory;
    CustomReplyChannel innerChannel;
    delegate IReplyChannel AsyncOnAcceptCaller(TimeSpan timeout);
    AsyncOnAcceptCaller asyncOnAcceptCaller; 
    #endregion

    public CustomChannelListener(CustomChannelBindingElement transportElement, BindingContext context)
        : base(context.Binding)
    {
        this.uri = new Uri(context.ListenUriBaseAddress, context.ListenUriRelativeAddress);
        var messageElement = context.BindingParameters.Remove<MessageEncodingBindingElement>();

        this.encoderFactory = messageElement.CreateMessageEncoderFactory();
        this.asyncOnAcceptCaller = new AsyncOnAcceptCaller(this.OnAcceptChannel);
    }

    protected override IReplyChannel OnAcceptChannel(TimeSpan timeout)
    {
        var address = new EndpointAddress(this.Uri);
        innerChannel = new CustomReplyChannel(this, encoderFactory, address);

        return innerChannel;
    }

    protected override IAsyncResult OnBeginAcceptChannel(TimeSpan timeout, AsyncCallback callback, object state)
    {
        return asyncOnAcceptCaller.BeginInvoke(timeout, callback, state);
    }

    protected override IReplyChannel OnEndAcceptChannel(IAsyncResult result)
    {
        return asyncOnAcceptCaller.EndInvoke(result);
    }

    protected override IAsyncResult OnBeginWaitForChannel(TimeSpan timeout, AsyncCallback callback, object state)
    {
        throw new NotImplementedException();
    }

    protected override bool OnEndWaitForChannel(IAsyncResult result)
    {
        throw new NotImplementedException();
    }

    protected override bool OnWaitForChannel(TimeSpan timeout)
    {
        throw new NotImplementedException();
    }

    public override Uri Uri
    {
        get { return this.uri; }
    }

    protected override void OnAbort()
    {
        throw new NotImplementedException();
    }

    protected override IAsyncResult OnBeginClose(TimeSpan timeout, AsyncCallback callback, object state)
    {
        throw new NotImplementedException();
    }

    protected override IAsyncResult OnBeginOpen(TimeSpan timeout, AsyncCallback callback, object state)
    {
        throw new NotImplementedException();
    }

    protected override void OnClose(TimeSpan timeout)
    {
        throw new NotImplementedException();
    }

    protected override void OnEndClose(IAsyncResult result)
    {
        throw new NotImplementedException();
    }

    protected override void OnEndOpen(IAsyncResult result)
    {
        throw new NotImplementedException();
    }

    protected override void OnOpen(TimeSpan timeout)
    {

    }
}

Let’s create our channelbase now. Please note that you need to pass in ChannelManagerBase to the constructor. Our read and write message methods will simply create new messages with the data as a string passed in from the request and reply channels. Depending on your requirements you may want to implement your own mechanism of creating messages eg. read from files etc.

 public abstract class CustomChannelBase : ChannelBase
 {
    #region privates
    readonly EndpointAddress address;
    readonly MessageEncoder encoder;
    readonly ChannelManagerBase manager;

    #endregion

    public EndpointAddress RemoteAddress
    {
        get { return this.address; }
    }

    public CustomChannelBase(ChannelManagerBase manager, MessageEncoderFactory encoderFactory, EndpointAddress addres)
        : base(manager)
    {
        this.address = address;
        this.manager = manager;
        this.encoder = encoderFactory.CreateSessionEncoder();
    }

    public Message ReadMessage(string data)
    {
        return Message.CreateMessage(MessageVersion.Default, "fault", data);
    }

    public Message WriteMessage(string data)
    {
        return Message.CreateMessage(MessageVersion.Default, "fault", data);
    }

    protected override void OnAbort()
    {
        throw new NotImplementedException();
    }

    protected override IAsyncResult OnBeginClose(TimeSpan timeout, AsyncCallback callback, object state)
    {
        throw new NotImplementedException();
    }

    protected override IAsyncResult OnBeginOpen(TimeSpan timeout, AsyncCallback callback, object state)
    {
        throw new NotImplementedException();
    }

    protected override void OnClose(TimeSpan timeout)
    {

    }

    protected override void OnEndClose(IAsyncResult result)
    {
        throw new NotImplementedException();
    }

    protected override void OnEndOpen(IAsyncResult result)
    {
        throw new NotImplementedException();
    }

    protected override void OnOpen(TimeSpan timeout)
    {

    }
}

Finally, we can create our reply channel that will be used to reply to incoming requests. In this example we will use tcpListener to communicate with the client. In this case WCF service will serve as a wrapper for the underlying TCP communication. In the method WaitForRequest we are simply waiting for incoming message and returning true. After that, the method IReplyChannel.ReceiveRequest is triggered. In that method we simply read the message from the TCP client passing it to the request context.

 public class CustomReplyChannel : CustomChannelBase, IReplyChannel
{
    #region privates
    readonly EndpointAddress localAddress;
    readonly object readLock;
    readonly MessageEncoderFactory encoderFactory;
    delegate IReplyChannel AsyncOnAcceptCaller(TimeSpan timeout);
    AsyncOnAcceptCaller asyncOnAcceptCaller;

    TcpListener tcpListener;
    TcpClient tcpClient;
    #endregion

    public EndpointAddress LocalAddress
    {
        get { return this.localAddress; }
    }

    public CustomReplyChannel(ChannelManagerBase manager, MessageEncoderFactory encoderFactory, EndpointAddress address)
        : base(manager, encoderFactory, address)
    {
        this.encoderFactory = encoderFactory;
        this.localAddress = address;
        this.asyncOnAcceptCaller = new AsyncOnAcceptCaller(this.OnAcceptChannel);

        //start listener
        if (this.tcpListener == null)
        {
            this.tcpListener = new TcpListener(address.Uri.Port);
        }

        tcpListener.Start();
    }

    protected IReplyChannel OnAcceptChannel(TimeSpan timeout)
    {
        var address = new EndpointAddress(this.localAddress.Uri);

        return new CustomReplyChannel(this.Manager, this.encoderFactory, address);
    }

    #region IReplyChannel Members

    IAsyncResult IReplyChannel.BeginReceiveRequest(TimeSpan timeout, AsyncCallback callback, object state)
    {
        throw new NotImplementedException();
    }

    IAsyncResult IReplyChannel.BeginReceiveRequest(AsyncCallback callback, object state)
    {
        throw new NotImplementedException();
    }

    IAsyncResult IReplyChannel.BeginTryReceiveRequest(TimeSpan timeout, AsyncCallback callback, object state)
    {
        return asyncOnAcceptCaller.BeginInvoke(timeout, callback, state);
    }

    IAsyncResult IReplyChannel.BeginWaitForRequest(TimeSpan timeout, AsyncCallback callback, object state)
    {
        throw new NotImplementedException();
    }

    RequestContext IReplyChannel.EndReceiveRequest(IAsyncResult result)
    {
        throw new NotImplementedException();
    }

    bool IReplyChannel.EndTryReceiveRequest(IAsyncResult result, out RequestContext context)
    {
        context = ((IReplyChannel)this).ReceiveRequest(DefaultReceiveTimeout);
        return true;
    }

    bool IReplyChannel.EndWaitForRequest(IAsyncResult result)
    {
        throw new NotImplementedException();
    }

    EndpointAddress IReplyChannel.LocalAddress
    {
        get { throw new NotImplementedException(); }
    }

    RequestContext IReplyChannel.ReceiveRequest(TimeSpan timeout)
    {
        ThrowIfDisposedOrNotOpen();

        try
        {
            var clientStream = tcpClient.GetStream();

            var message = new byte[4096];
            var enc = new ASCIIEncoding();

            var bytesRead = clientStream.Read(message, 0, 4096);
            var response = enc.GetString(message, 0, bytesRead);

            var buffer = enc.GetBytes("Message received");

            clientStream.Write(buffer, 0, buffer.Length);
            clientStream.Flush();

            return new CustomRequestContext(this.ReadMessage(response), this);
        }
        catch (SocketException ex)
        {
            return new CustomRequestContext(this.ReadMessage(ex.Message), this);
        }
        catch (Exception ex)
        {
            return new CustomRequestContext(this.ReadMessage(ex.Message), this);
        }
    }

    RequestContext IReplyChannel.ReceiveRequest()
    {
        throw new NotImplementedException();
    }

    bool IReplyChannel.TryReceiveRequest(TimeSpan timeout, out RequestContext context)
    {
        throw new NotImplementedException();
    }

    bool IReplyChannel.WaitForRequest(TimeSpan timeout)
    {
        ThrowIfDisposedOrNotOpen();

        //blocks until a client has sent a message
        this.tcpClient = tcpListener.AcceptTcpClient();

        return true;
    }

    #endregion

    #region IChannel Members

    T IChannel.GetProperty<T>()
    {
        T channel = encoderFactory.Encoder.GetProperty<T>();
        if (channel != null)
        {
            return channel;
        }

        if (typeof(T) == typeof(MessageVersion))
        {
            return (T)(object)encoderFactory.Encoder.MessageVersion;
        }

        return base.GetProperty<T>();
    }

    #endregion

    #region ICommunicationObject Members

    void ICommunicationObject.Abort()
    {
        throw new NotImplementedException();
    }

    IAsyncResult ICommunicationObject.BeginClose(TimeSpan timeout, AsyncCallback callback, object state)
    {
        throw new NotImplementedException();
    }

    IAsyncResult ICommunicationObject.BeginClose(AsyncCallback callback, object state)
    {
        throw new NotImplementedException();
    }

    IAsyncResult ICommunicationObject.BeginOpen(TimeSpan timeout, AsyncCallback callback, object state)
    {
        throw new NotImplementedException();
    }

    IAsyncResult ICommunicationObject.BeginOpen(AsyncCallback callback, object state)
    {
        throw new NotImplementedException();
    }

    void ICommunicationObject.Close()
    {
        throw new NotImplementedException();
    }

    event EventHandler ICommunicationObject.Closed
    {
        add { throw new NotImplementedException(); }
        remove { throw new NotImplementedException(); }
    }

    event EventHandler ICommunicationObject.Closing
    {
        add { throw new NotImplementedException(); }
        remove { throw new NotImplementedException(); }
    }

    void ICommunicationObject.EndClose(IAsyncResult result)
    {
        throw new NotImplementedException();
    }

    void ICommunicationObject.EndOpen(IAsyncResult result)
    {
        throw new NotImplementedException();
    }

    event EventHandler ICommunicationObject.Faulted
    {
        add { throw new NotImplementedException(); }
        remove { throw new NotImplementedException(); }
    }

    event EventHandler ICommunicationObject.Opened
    {
        add { throw new NotImplementedException(); }
        remove { throw new NotImplementedException(); }
    }

    event EventHandler ICommunicationObject.Opening
    {
        add { throw new NotImplementedException(); }
        remove { throw new NotImplementedException(); }
    }

    CommunicationState ICommunicationObject.State
    {
        get { throw new NotImplementedException(); }
    }

    #endregion
}

The request channel is quite straightforward as it simply sends messages using TCP client. We are also reading reply to confirm that our message has been delivered.

 public class CustomRequestChannel : CustomChannelBase, IRequestChannel
 {
    readonly Uri via;

    public Uri Via
    {
        get { return this.via; }
    }

    public CustomRequestChannel(ChannelManagerBase manager, MessageEncoderFactory encoderFactory, EndpointAddress address, Uri via)
        : base(manager, encoderFactory, address)
    {
        this.via = via;
    }

    public Message Request(Message message, TimeSpan timeout)
    {
        ThrowIfDisposedOrNotOpen();

        try
        {
            using (var tcpClient = new TcpClient(this.Via.Host, this.Via.Port))
            {
                var clientStream = tcpClient.GetStream();

                tcpClient.ReceiveTimeout = timeout.Seconds;
                tcpClient.SendTimeout = timeout.Seconds;

                var msg = new byte[4096];
                var encoder = new ASCIIEncoding();

                //get string value from message body
                var messageBody = message.GetBody<string>();
                var buffer = encoder.GetBytes(messageBody);

                //send message
                clientStream.Write(buffer, 0, buffer.Length);
                clientStream.Flush();

                //read reply
                var bytesRead = clientStream.Read(msg, 0, 4096);
                var response = encoder.GetString(msg, 0, bytesRead);

                return this.ReadMessage(response);
            }
        }
        catch (SocketException ex)
        {
            return this.ReadMessage(ex.Message);
        }
        catch (Exception ex)
        {
            return this.ReadMessage(ex.Message);
        }
    }

    public Message Request(Message message)
    {
        return this.Request(message, DefaultReceiveTimeout);
    }

    public IAsyncResult BeginRequest(Message message, TimeSpan timeout, AsyncCallback callback, object state)
    {
        throw new NotImplementedException();
    }

    public IAsyncResult BeginRequest(Message message, AsyncCallback callback, object state)
    {
        throw new NotImplementedException();
    }

    public Message EndRequest(IAsyncResult result)
    {
        throw new NotImplementedException();
    }
}

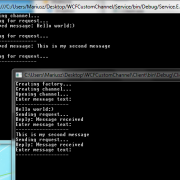
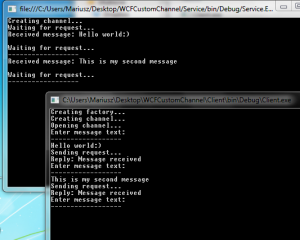
Finally we can test our server service

 static void StartService()
    {
        var binding = new WCFCustomChannelLib.CustomBinding();
        var uri = new Uri("myProtocol://localhost:81/x");

        var listener = binding.BuildChannelListener<IReplyChannel>(uri, new BindingParameterCollection());

        listener.Open(TimeSpan.FromSeconds(5));

        Console.Write("Creating channel...");
        Console.Write(Environment.NewLine);

        var channel = listener.AcceptChannel(TimeSpan.FromSeconds(5));
        channel.Open(TimeSpan.FromSeconds(5));

        Console.Write("Waiting for request...");
        Console.Write(Environment.NewLine);

        while (channel.WaitForRequest(TimeSpan.FromMinutes(1)))
        {
            using (var context = channel.ReceiveRequest(TimeSpan.FromSeconds(5)))
            {
                using (var message = context.RequestMessage)
                {
                    Console.WriteLine("Received message: {0}", message.GetBody<string>());
                    Console.Write(Environment.NewLine);

                    var replyMessage = Message.CreateMessage(MessageVersion.Default, "fault", "Message received");

                    context.Reply(replyMessage, TimeSpan.FromSeconds(5));
                }
            }
            Console.Write("Waiting for request...");
            Console.Write(Environment.NewLine + "------------------" + Environment.NewLine);
        }

        Console.WriteLine("terminated");
        channel.Close(TimeSpan.FromSeconds(5));
    }
}

And the client service

 static void Main(string[] args)
    {
        Console.Write("Creating factory...");

        var binding = new WCFCustomChannelLib.CustomBinding();

        var factory = binding.BuildChannelFactory<IRequestChannel>();
        factory.Open(TimeSpan.FromSeconds(5));

        Console.Write(Environment.NewLine);
        Console.Write("Creating channel...");

        var uri = new Uri("myProtocol://localhost:81/x");
        var channel = factory.CreateChannel(new EndpointAddress(uri));

        Console.Write(Environment.NewLine);
        Console.Write("Opening channel...");
        Console.Write(Environment.NewLine);

        channel.Open(TimeSpan.FromSeconds(5));
           
        while (true)
        {
            Console.Write("Enter message text: ");
            Console.Write(Environment.NewLine + "------------------" + Environment.NewLine);

            var messageText = Console.ReadLine();
            if (messageText == null) { break; }

            Console.Write("Sending request...");
            Console.Write(Environment.NewLine);

            var requestMessage = Message.CreateMessage(MessageVersion.Default, "fault", messageText);
            var replyMessage = channel.Request(requestMessage, TimeSpan.FromSeconds(5));
               
            using (replyMessage)
            {
                if (replyMessage != null)
                {
                    Console.WriteLine("Reply: {0}", replyMessage.GetBody<string>());
                }
            }
        }

        channel.Close(TimeSpan.FromSeconds(5));
        factory.Close();
    }
}

I have included working sample that you can download and test on your own. Feel free to play with it 🙂

WCFCustomChannel

1 Star2 Stars3 Stars4 Stars5 Stars (No Ratings Yet)
Loading...Loading...

Creating LAN messenger using WCF Message Inspector

WCF self-hosting service can be really useful for messaging within the single or multiple tiers. Communication may involve sending execution tasks to other components or sending simple messages to be displayed on remote computer.

When sending system massages we can use Message Queuing (MSMQ) and transactions to ensure that the task will be executed even if the service if temporary off-line by storing it in the queue for planned execution. This approach makes the system loosely coupled to it’s components.

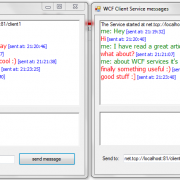
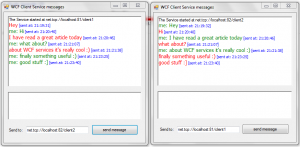
Self hosted WCF service can also be used to send and receive simple messages. In this article I will show you how to implement simple LAN messenger.

wcfLMessenger1

The interesting feature of WCF services is the ability to intercept messages as they arrive through the message channel. By using Message Inspector we can preview or change the message that we have intercepted.
We can hook in our Message Inspector by creating and adding custom service behavior. Lets start with the MyServiceBehavior class:

  public class MyServiceBehavior : IServiceBehavior
   {
      public void AddBindingParameters(ServiceDescription serviceDescription, ServiceHostBase serviceHostBase, 
           System.Collections.ObjectModel.Collection<ServiceEndpoint> endpoints, BindingParameterCollection bindingParameters)
       {
       }

      public void ApplyDispatchBehavior(ServiceDescription serviceDescription, ServiceHostBase serviceHostBase)
      {
           //note that ChannelDispatchers are available only after service is open
          foreach (ChannelDispatcher channelDispatcher in serviceHostBase.ChannelDispatchers) 
          {
             foreach (EndpointDispatcher epDisp in channelDispatcher.Endpoints)
             {
                   //attach message interceptor
                   epDisp.DispatchRuntime.MessageInspectors.Add(new MyMessageInspector()); 
               }
            }
       }

       public void Validate(ServiceDescription serviceDescription, ServiceHostBase serviceHostBase)
       {
       }
   }

Now we need to create Message Interceptor class that will intercept the massages and in our case send it to the UI to be displayed. Code below simply extracts the message value from the SOAP message received.

 public class MyMessageInspector : IDispatchMessageInspector
 {
	public object AfterReceiveRequest(ref System.ServiceModel.Channels.Message request, IClientChannel channel, InstanceContext instanceContext)
	{
		foreach (var form in Application.OpenForms)
		{
			if (form is ClientServiceForm)
			{
				var mainForm = form as ClientServiceForm;

				var message = request.ToString();

				//simple string extraction (we assume only one interface method)
				var startPos = message.LastIndexOf("<value>");
				var endPos = message.LastIndexOf("</value>");
				message = message.Substring(startPos + 7, endPos - startPos - 7);

				mainForm.AddMessage("\n" + message, ""); //send message to be displayed

				return null;
			}
		}
		return null;
  }

Next step is to start self-hosted service when application starts. Code below creates ServiceHost instance, adds TCP endpoint and our custom behavior class. Please note that service will remain open as long as the window Form is not closed (Windows Service wcf host should be implemented instead if required).

 void StartService()
 {
    var baseAddress = new Uri(HostEndPointAddress);

    hostService = new ServiceHost(typeof(MessageService), baseAddress);

    hostService.AddServiceEndpoint(typeof(IServiceHost), new NetTcpBinding(), "");
    hostService.Description.Behaviors.Add(new WCFClient.AppService.MyServiceBehavior());

    hostService.Open();

    txtClientReceivedMessage.AppendText(string.Format("The Service started at {0}", baseAddress));
}

Now is the time to implement sending messages to the remote endpoint. We will use ChannelFactory to instantiate new service that will send the messages. Please note that we have to send it to other thread in order to avoid our main UI thread to function properly.

 private void btnSendMessage_Click(object sender, EventArgs e)
 {
    if (txtClientInputMessage.Text.Trim().Length == 0)
    {
        MessageBox.Show("Enter message to be sent!"); return;
    }

    //send it to other thread
    var wcfChannelThread = new Thread(new ParameterizedThreadStart(SendMessage));
    wcfChannelThread.Start(new List<string>() { txtClientInputMessage.Text, txtTargetEndPoint.Text });

    txtClientInputMessage.Text = "";//clear input box
}


 void SendMessage(object config)
 {
    var arg = config as List<string>;
    try
    {
        //use TCP when sending message on the same computer or within the trusted network
        var binding = new NetTcpBinding();
        var endpoint = new EndpointAddress(arg[1]);

        var factory = new ChannelFactory<IServiceHost>(binding, endpoint);
        var channel = factory.CreateChannel();

        //send entered message using created channel
        channel.SendMessage(Convert.ToString(arg[0])); 

        //send message to UI
        AddMessage("", arg[0]);
    }
    catch (Exception ex)
    {
        MessageBox.Show(ex.Message);
    }
}

The last thing to do is to create thread save function that will update our UI rich-text box control with the messages coming in from background threads:

 public void AddMessage(string messageReceived, string messageSent)
 {
    if (this.InvokeRequired)
    {
        BeginInvoke(new AddMessageDel(AddMessage), new object[] { messageReceived, messageSent });
    }
    else
    {
        //insert message
        if (messageReceived.Trim().Length > 0)
        {
            txtClientReceivedMessage.SelectionFont = new System.Drawing.Font("Tahoma", 11);
            txtClientReceivedMessage.SelectionColor = Color.Red;
            txtClientReceivedMessage.AppendText(string.Format("{0}", messageReceived));
        }
        else
        {
            //sent by me
            txtClientReceivedMessage.SelectionFont = new System.Drawing.Font("Tahoma", 11);
            txtClientReceivedMessage.SelectionColor = Color.Green;
            txtClientReceivedMessage.AppendText(string.Format("\nme: {0}", messageSent));
        }

        //insert date
        txtClientReceivedMessage.SelectionFont = new System.Drawing.Font("Tahoma", 8);
        txtClientReceivedMessage.SelectionColor = Color.Blue;
        txtClientReceivedMessage.AppendText(string.Format(" [sent at: {0}]", DateTime.Now.ToString("HH:mm:ss")));

        //scroll to bottom
        txtClientReceivedMessage.SelectionStart = txtClientReceivedMessage.Text.Length;
        txtClientReceivedMessage.ScrollToCaret();
    }
}

I have included two separate project solutions. Each project represents client endpoint that can be used to send message to the other. When using the code, firewall warning message could be displayed – please allow it to listen on chosen port.

If you want to send a message to other computer within the local network, please change the endpoint address to following format: net.tcp://endpointComputerIP:82/client2. If you want to send message to other computer outside of your network, please change binding to http or https.

Hope I have inspired you to explore all possibilities of WCF framework 🙂

WCF_LAN_Messenger

1 Star2 Stars3 Stars4 Stars5 Stars (No Ratings Yet)
Loading...Loading...

Finding the distance between two addresses using Google API

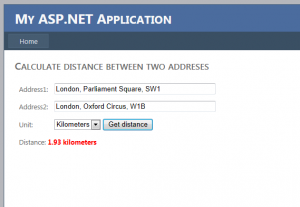
There are number of cases when you will need to calculate the distance between two addresses in your application. For example when building an social website or CRM solution. Calculating the distance between the addresses has never been so easy thanks to Google geolocation API. The API is available for free but it has the limit of 2500 requests per day, you can always buy the business version if your service gets more popular.

geolocation

Lets start with building the empty asp.net website. After creating basic UI controls we can implement the back end of our application. We will use Json serialization when getting response from API so we need to prepare serialization function and geolocation response class.

 public static T FromJSON<T>(string json)
 {
     JavaScriptSerializer jss = new JavaScriptSerializer();

     return jss.Deserialize<T>(json);
  }

We will use data contracts to deserialize Json response to our class

 [DataContract(Namespace = "")]
 public class GeocodeResponse
 {
    [DataMember(Name = "status", Order = 1)]
    public string Status { get; set; }

    [DataMember(Name = "result", Order = 2)]
    public List<Result> Results { get; set; }

    [DataContract(Name = "result", Namespace = "")]
    public class Result
    {
        [DataMember(Name = "geometry")]
        public CGeometry Geometry { get; set; }

        [DataContract(Name = "geometry", Namespace = "")]
        public class CGeometry
        {
            [DataMember(Name = "location")]
            public CLocation Location { get; set; }

            [DataContract(Name = "location", Namespace = "")]
            public class CLocation
            {
                [DataMember(Name = "lat", Order = 1)]
                public double Lat { get; set; }
                [DataMember(Name = "lng", Order = 2)]
                public double Lng { get; set; }
            }
        }
    }
 }

To get Json object from API we need to send request and read response from it.

 public static string WebRequestJson(string url)
 {
    var response = string.Empty;

    StreamWriter requestWriter;

    var webRequest = System.Net.WebRequest.Create(url) as HttpWebRequest;
    if (webRequest != null)
    {
        webRequest.Method = "POST";
        webRequest.ServicePoint.Expect100Continue = false;
        webRequest.Timeout = 99000;

        webRequest.ContentType = "application/json";
        //POST the data.
        using (requestWriter = new StreamWriter(webRequest.GetRequestStream()))
        {
            requestWriter.Write("");
        }
    }

    HttpWebResponse resp = (HttpWebResponse)webRequest.GetResponse();
    using (Stream resStream = resp.GetResponseStream())
    {
        using (StreamReader reader = new StreamReader(resStream))
        {
            response = reader.ReadToEnd();
        }
    }

    return response;
 }

In our main function we are getting Json objects from API by making request to Google and passing address in request URL. Having Json objects for each address we deserialize it to our GeocodeResponse class. In this step we can check response if it is valid or contains only one location for one provided address.

 public static double GetDistance(string address1, string address2, DistanceUnit unit)
 {
    //make jason requests to google api
    string json1 = WebRequestJson(
        string.Format("https://maps.googleapis.com/maps/api/geocode/json?address={0}&sensor=false", address1)
        );
    string json2 = WebRequestJson(
        string.Format("https://maps.googleapis.com/maps/api/geocode/json?address={0}&sensor=false", address2)
        );

    //deserialize json to GeocodeResponse object
    var loc1 = FromJSON<GeocodeResponse>(json1);
    var loc2 = FromJSON<GeocodeResponse>(json2);

    //check is response is ok
    if (loc1.Status != "OK" || loc2.Status != "OK") { return -1; }

    //check if only one location found for each address
    //if (loc1.Results.Count > 1 || loc2.Results.Count > 1) { return -2; }

    //copy coordinate values
    var pos1 = new Coordinate()
    {
        Latitude = loc1.Results.First().Geometry.Location.Lat,
        Longitude = loc1.Results.First().Geometry.Location.Lng
    };
    var pos2 = new Coordinate()
    {
        Latitude = loc2.Results.First().Geometry.Location.Lat,
        Longitude = loc2.Results.First().Geometry.Location.Lng
    };

    //return distance in unit
    return CalculateDistance(pos1, pos2, unit);
}

When we have the final coordinates (latitude and longitude) for each address, we can now calculate the distance in the specified unit. We take the earth’s radius into account- the rest it’s just the pure mathematics.

  public static double CalculateDistance(Coordinate pos1, Coordinate pos2, DistanceUnit unit)
    {
        var R = 6371;//default in km

        switch (unit)
        {
            case DistanceUnit.Miles:
                R = 3960; break;
            case DistanceUnit.Kilometers:
                R = 6371; break;
            case DistanceUnit.Meters:
                R = 6371000; break;
        }

        //get location difference and convert to radians
        var dLat = DegreeToRadian(pos2.Latitude - pos1.Latitude);
        var dLon = DegreeToRadian(pos2.Longitude - pos1.Longitude);

        //calculate distance
        var a = Math.Sin(dLat / 2) * Math.Sin(dLat / 2) +
            Math.Cos(DegreeToRadian(pos1.Latitude)) *
            Math.Cos(DegreeToRadian(pos2.Latitude)) *
            Math.Sin(dLon / 2) * Math.Sin(dLon / 2);

        var c = 2 * Math.Asin(Math.Min(1, Math.Sqrt(a)));

        var d = R * c;//convert to unit

        return d;
    }

When we have all implementation done, we can finally test our application. I have included complete working application for your tests.

Geolocation

1 Star2 Stars3 Stars4 Stars5 Stars (No Ratings Yet)
Loading...Loading...

File helpers using LINQ

When dealing with files, it is useful to have standard set of helpers to be used that we can relay on. This is when LINQ comes in handy. In this article I will present you with some useful functions that you can use in your daily programming.

Simple operation should be simple. Hence, when getting the number of lines in the text file, one line of code is just enough.

 public static long GetNumberOfLines(string filePath)
 {
     return File.Exists(filePath) ? File.ReadAllLines(filePath).Count() : 0;
 }

Getting the biggest file in the folder is also very easy with LINQ

   public static string FindTheLargestFileInDirectory(string path)
    {
        return Directory.Exists(path) && Directory.GetFiles(path).Count() > 0 ? 
               Directory.EnumerateFiles(path).Select(i => new FileInfo(i))
               .OrderByDescending(i => i.Length).FirstOrDefault().FullName : null;
    }

Similar when getting all files with the size of less than 1 Kb

   public static IEnumerable<string> FindFilesLessThanOneKiloBytesInThisFolder(string path)
    {
        return Directory.Exists(path) && Directory.GetFiles(path).Count() > 0 ?  
             Directory.EnumerateFiles(path).Select(i => new FileInfo(i))
             .Where(i => i.Length < 1024).Select(i => i.FullName) : null;
    }

You can use this function if you need to get files created in last 7 days

   public static IEnumerable<string> FindAllFilesCreatedLessThanWeekAgo(string path)
   {
        return Directory.Exists(path) && Directory.GetFiles(path).Count() > 0 ? 
               Directory.EnumerateFiles(path).Select(i => new FileInfo(i))
               .Where(i => i.CreationTime > DateTime.Now.AddDays(-7))
               .Select(i => i.FullName) : null;
   }

And finally if you want to get the oldest file in the folder (common scenario when deleting old logs) you can try this

   public static string FindOldestFileInFolder(string path)
   {
        return Directory.Exists(path) && Directory.GetFiles(path).Count() > 0 ? 
               Directory.EnumerateFiles(path)
               .Select(i => new FileInfo(i))
               .OrderByDescending(i => i.LastAccessTime).FirstOrDefault()
               .FullName : null;
   }

If you want to compare two files and get identical lines this may be useful to you

   public static IEnumerable<string> FindIdenticalLinesInTwoFiles(string filePath1, string filePath2)
    {
        if (File.Exists(filePath1) && File.Exists(filePath2))
        {
            return File.ReadAllLines(filePath1).Where(i => !string.IsNullOrEmpty(i))
                   .Intersect(File.ReadAllLines(filePath2).Where(i => !string.IsNullOrEmpty(i)));
         }

       return null;
    }

When collecting system information this function may be useful as well. It simply gets all extensions of the files in the directory and counts number of files associated with them.

 public static Dictionary<string, int> ListAndCountTheNumberOfDifferentFileExtensions(string path) 
   {
       return Directory.EnumerateFiles(path)
              .Select(i => new FileInfo(i))
              .GroupBy(i => i.Extension)
              .OrderByDescending(i => i.Count())
              .ToDictionary(i => i.Key, i => i.Count());            
    }

As you can see using LINQ is so easy that allows you to focus more on the business problems and less on coding itself.

1 Star2 Stars3 Stars4 Stars5 Stars (No Ratings Yet)
Loading...Loading...