Handling DataGrid row events

When creating user interface the common situation is to handle datagrid row event in response to user action. Example of that is changing dropdown list value and refreshing row information without reloading the whole datagrid.
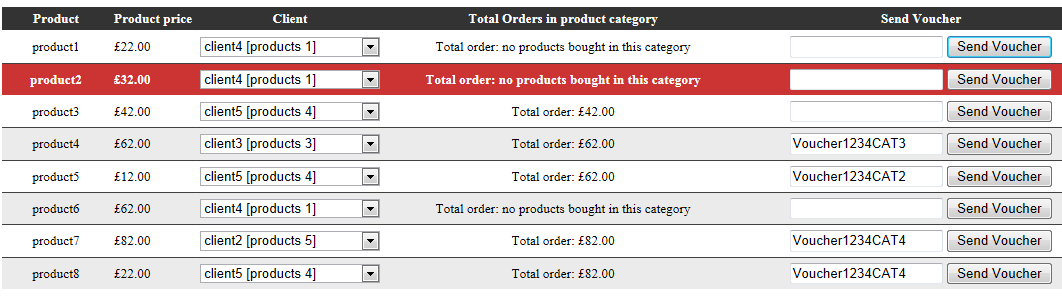
For instance if we have a datagrid with the products containing dropdown list with the clients in each row, we can allow the user to change datagrid row data separately without resetting other datagrid rows.

In our example we will build the simple datagrid with the products that will allow us to select and send voucher codes to the clients with total purchase exceeding certain level in product category.

grid-row-event

Lets start with creating basic class structures:

 public class Client
 {
    public Client(){}
    public int ID { get; set; }
    public string Name { get; set; }
    public IList<Product> Products { get; set; }
 }
  
 public class Product
 {
    public Product() { }
    public int ID { get; set; }
    public int CatID { get; set; }
    public string Name { get; set; }
    public double Price { get; set; }
 }

After creating new asp.net website project with default.aspx page, we need to add some dummy data in page load event (to be replaced with the database data). We cerate product list and assign product categories to it. And finally create client list and assign products they bought.

We use LINQ to quickly load products to client objects “p => p.Price > 10” – this will load products with the price greater than 10.

  protected void Page_Load(object sender, EventArgs e)
   {
        if (!IsPostBack)
        {
            #region mock data
            productList.Clear();
            clientList.Clear();

            productList.Add(new Product() { ID = 1, CatID = 1, Name = "product1", Price = 22 });
            productList.Add(new Product() { ID = 2, CatID = 3, Name = "product2", Price = 32 });
            productList.Add(new Product() { ID = 3, CatID = 1, Name = "product3", Price = 42 });
            productList.Add(new Product() { ID = 4, CatID = 3, Name = "product4", Price = 62 });
            productList.Add(new Product() { ID = 5, CatID = 2, Name = "product5", Price = 12 });
            productList.Add(new Product() { ID = 6, CatID = 2, Name = "product6", Price = 62 });
            productList.Add(new Product() { ID = 7, CatID = 4, Name = "product7", Price = 82 });
            productList.Add(new Product() { ID = 8, CatID = 4, Name = "product8", Price = 22 });

            clientList.Add(new Client() { ID = 1, Name = "client1",
                           Products = productList.Where(p => p.Price > 10).ToList() });
            clientList.Add(new Client() { ID = 2, Name = "client2",
                            Products = productList.Where(p => p.Price > 30).ToList() });
            clientList.Add(new Client() { ID = 3, Name = "client3",
                            Products = productList.Where(p => p.Price > 60).ToList() });
            clientList.Add(new Client() { ID = 4, Name = "client4",
                           Products = productList.Where(p => p.Price > 80).ToList() });
            clientList.Add(new Client() { ID = 5, Name = "client5",
                           Products = productList.Where(p => p.Price > 40).ToList() });
            #endregion

            ///////////////
            gridList.DataSource = productList;
            gridList.DataBind();
        }
    }

Once we have data loaded into our datagrid, we need to create client lists in each row. We will do it in gridList_RowDataBound event. What we do is simply finding the dropdown list in each row and bind the client list to it.
When binding dropdown lists we use custom object created on the fly using LINQ – see my previous articles to get description of that process.

  protected void gridList_RowDataBound(object sender, System.Web.UI.WebControls.GridViewRowEventArgs e)
   {
        if (e.Row.RowType == System.Web.UI.WebControls.DataControlRowType.DataRow)
        {
            var ddlClients = e.Row.FindControl("ddlClients") as DropDownList;

            ddlClients.DataSource = (from obj in clientList
                                     select new
                                     {
                                         ID = obj.ID,
                                         Name = string.Format("{0} [prod. {1}]", obj.Name, obj.Products.Count())
                                     }).ToList().OrderByDescending(a => a.Name).ThenBy(a => a.ID);

            ddlClients.DataTextField = "Name";
            ddlClients.DataValueField = "ID";
            ddlClients.DataBind();

            RenderGridRow(e.Row);
        }
   }

Our next step is to create selected index changed event for the client lists in the datagrid. Every time someone will change the client, the corresponding datagrid row will be updated.

   protected void dropdownlist_SelectedIndexChanged(object sender, EventArgs e)
    {
        GridViewRow gridRow = (GridViewRow)(((System.Web.UI.Control)sender).NamingContainer);
        gridList.SelectedIndex = gridRow.RowIndex;// highlight the current the row

        RenderGridRow(gridRow);
    }

In our case we will render datagrid row as follows:

  void RenderGridRow(GridViewRow row)
    {
        var catID = (row.FindControl("ctrlCatID") as HiddenField).Value;
        var ddlClients = row.FindControl("ddlClients") as DropDownList;
        var ltrTotal = row.FindControl("ltrTotal") as Literal;
        var btnSendVoucher = row.FindControl("btnSendVoucher") as Button;
        ///////////////////
        btnSendVoucher.CommandArgument = ddlClients.SelectedItem.Value.ToString();// we use it as alternative

        var items = clientList.Find(e => e.ID.ToString() == ddlClients.SelectedItem.Value.ToString())
            .Products.Where(p => p.CatID.ToString() == catID.ToString());

        var total = items.Any() ? items.Sum(p => p.Price) : 0;

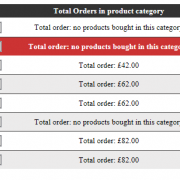
        ltrTotal.Text = total > 0 ? total.ToString("C") : "no products bought in this category";
    }

The final step is to handle send voucher button event:

  protected void btnSendVoucher_OnClick(object sender, EventArgs e)
   {
        GridViewRow gridRow = (GridViewRow)(((System.Web.UI.Control)sender).NamingContainer);
        //or use
        //var clientID = ((Button)sender).CommandArgument;

        var txtVoucher = gridRow.FindControl("txtVoucher") as TextBox;
        var ddlClients = gridRow.FindControl("ddlClients") as DropDownList;

        var clientID = ddlClients.SelectedItem.Value.ToString();
        var voucher = txtVoucher.Text;

        //send voucher to client here
    }

That’s it. I have attached working example below. Feel free to play with it 🙂
gridViewEvent

1 Star2 Stars3 Stars4 Stars5 Stars (No Ratings Yet)
Loading...Loading...

SHA1 and MD5 hashing algorithms

When storing passwords in database, it is considered a good practice to hash them first. The most common way to do that is to use MD5 or SHA hashing algorithms. Hashing passwords is more secure because after creating a hash from the user’s password theoretically there is not way to get the password back from it. In reality MD5 is more vulnerable to “collision attacks” as it uses 128 bit value while SHA1 uses 160 bits which makes it harder to crack.

The disadvantage of hashing passwords is the fact that if an users forgets his password, we cannot send him a reminder. We will have to reset it first.

Theoretically if someone will steal our database, it is possible to use bruit force attack to find the original passwords by trying different combinations of words and numbers. To prevent that we can add our custom string to the user’s string before hashing. This makes it more difficult to crack the passwords having only database without our application files where the custom string is being stored.

 class Program
    {
        static void Main(string[] args)
        {
            string md5 = CreateMD5Hash("test");
            //result: CY9rzUYh03PK3k6DJie09g==

            string sha1 = CreateSHA1Hash("test");
            //result: qUqP5cyxm6YcTAhz05Hph5gvu9M
        }

        /// <summary>
        /// Creates MD5 hash of text
        /// </summary>
        public static string CreateMD5Hash(string clearText)
        {
            return Convert.ToBase64String(MD5.Create().ComputeHash(UnicodeEncoding.UTF8.GetBytes(clearText)));
        }

        /// <summary>
        /// Creates SHA1 hash of text
        /// </summary>
        public static string CreateSHA1Hash(string clearText)
        {
            return Convert.ToBase64String(SHA1.Create().ComputeHash(UnicodeEncoding.UTF8.GetBytes(clearText))).TrimEnd('=');
        }
    }

1 Star2 Stars3 Stars4 Stars5 Stars (No Ratings Yet)
Loading...Loading...

LINQ basic string and digit operations

Hi, today I want to show you how we can do the basic string and digit operations with the LINQ. If you are not using Linq in your current projects, you may find it very tempting to start with it. Once you learn it you will probably be using it all the time 🙂

Lets start with the function that sums the numbers that contains a given digit. We can do it in just one line of code 🙂

 public static int SumNumbers(int[] numbers, int digit)
 {
     return numbers.Where(i => i.ToString().Contains(digit.ToString())).Sum();
 }

If you want to sum number of words that contain minimum number of letters, this will be useful.

 public static int CountWords(string text, int minNumberOfLetters)
 {
     return text.Split(' ').Count(i => i.Length >= minNumberOfLetters);
 }

If you ever wanted to find the longest word in a text, here is example.

 public static string FindLongestWord(string text)
 {
     return text.Split(' ').OrderByDescending(i => i.Length).ThenBy(i => i).First();
 }

And if you want to count number of distinct words longer than given number, check this

 public static int CountWordsLongerThan(string text, int minimumLetters)
 {
     return text.Split(' ').Where(i => i.Length >= minimumLetters).Distinct().Count();
 }

This function gets list of non unique words in the string (separated by the space) and longer than 5 letters

 public static IEnumerable<string> FindNonUniqueWords(string inputText)
 {
     return inputText.ToLower().Split(' ')
       .OrderBy(i => i).GroupBy(i => i).Where(i => i.Count() > 1)
       .Select(i => i.Key).Where(i => i.Length > 5);
 }

And finally something more sophisticated, similarity calculation between two texts (for words having more than 4 letters)

 public static int CalculateSimilarity(string text1, string text2)
 {
    var words1 = text1.Split(' ').Where(i => i.Length > 4).Distinct();
    var words2 = text2.Split(' ').Where(i => i.Length > 4).Distinct();

     return words1.Intersect(words2).Count();
  }

Don’t forget to use “using System.Linq;” namespace in your project before using this. And of course parameters validation must be added to every function to be fully functional.

That’s it for now.

1 Star2 Stars3 Stars4 Stars5 Stars (No Ratings Yet)
Loading...Loading...

Encrypting Url parameters with DES

When reading and validating URL parameters you probably came across the situation that you wanted to hide some values for security reasons. Such a situations happen very often eg. when confirming email address of an user by sending validation link or by validating payment callback etc.

One of the solutions is to encrypt Url parameters using DES algorithm. DES it’s a symmetric algorithm that allows you to encrypt and decrypt values using shared public key. It is advisable to change public key from time to time for security reasons.

Below are two helper methods needed to encrypt and decrypt values:

    /// <summary>
    /// Encrypts an string using provided public key (DES)
    /// </summary>
    /// <param name="stringToEncrypt">String to be encrypted</param>
    /// <param name="sEncryptionKey">Public key</param>
    /// <returns>string</returns>
    public static string DES_encrypt(string stringToEncrypt, string sEncryptionKey)
    {
     if (stringToEncrypt.Length <= 3) { throw new Exception("Invalid input string"); }

     byte[] key = { };
     byte[] IV = { 10, 20, 30, 40, 50, 60, 70, 80 }; //defining vectors
     byte[] inputByteArray;
     key = Encoding.UTF8.GetBytes(sEncryptionKey.Substring(0, 8));
     using (var des = new DESCryptoServiceProvider())
     {
        inputByteArray = Encoding.UTF8.GetBytes(stringToEncrypt);
        using (var ms = new MemoryStream())
        {
            using (var cs = new CryptoStream(ms, des.CreateEncryptor(key, IV), CryptoStreamMode.Write))
            {
                cs.Write(inputByteArray, 0, inputByteArray.Length);
                cs.FlushFinalBlock();
                return Convert.ToBase64String(ms.ToArray());
            }
        }
      }
   }

and

    /// <summary>
    /// Decrypts an string using provided public key (DES)
    /// </summary>
    /// <param name="stringToDecrypt">String to be decrypted</param>
    /// <param name="sEncryptionKey">Public key</param>
    /// <returns>string</returns>
    public static string DES_decrypt(string stringToDecrypt, string sEncryptionKey)
    {
     if (stringToDecrypt.Length <= 3) { throw new Exception("Invalid input string"); }

     byte[] key = { };
     byte[] IV = { 10, 20, 30, 40, 50, 60, 70, 80 };//defining vectors
     byte[] inputByteArray = new byte[stringToDecrypt.Length];
     key = Encoding.UTF8.GetBytes(sEncryptionKey.Substring(0, 8));
     using (var des = new DESCryptoServiceProvider())
     {
        inputByteArray = Convert.FromBase64String(stringToDecrypt.Replace(" ", "+"));
        using (var ms = new MemoryStream())
        {
            using (CryptoStream cs = new CryptoStream(ms, des.CreateDecryptor(key, IV), CryptoStreamMode.Write))
            {
                cs.Write(inputByteArray, 0, inputByteArray.Length);
                cs.FlushFinalBlock();
                var encoding = Encoding.UTF8;
                return encoding.GetString(ms.ToArray());
            }
        }
     }
   }

In real life scenario when sending validation email we are simply encrypting our parametrized string the way shown bellow:

  var urlParam = txtEmail.Text + ";" + userID + ";" + DateTime.Now.ToString();

  var encryptedParam = Encryption.DES_encrypt(urlParam, "12345678");

  //send confirmation email with link: https://www.myadress.com/validate.aspx?sid=encryptedParam

When someone clicks the link and comes to our page we need to decrypt values and read the data.

   var encryptedParam = Request["sid"];

   var decryptedParam = Encryption.DES_decrypt(encryptedParam, "12345678");

   var email = decryptedParam.Split(';')[0];
   var userID = decryptedParam.Split(';')[1];
   var dateSent = DateTime.Parse(decryptedParam.Split(';')[2]);

As you probably have noticed, we use same public key to encrypt and decrypt values. In our situation the public key is safe because it is only stored on our server and is not being sent across the network.

For the above functions to be fully functional you need implement basic validation. It is also a good practice to add timestamp date to encrypted string so we can ensure the data was sent within defined time frame, lets say within last 5 minutes. After that the data will expire and wont be accepted by our application.

DES it’s quite save and efficient algorithm that you can use in your daily programming. It should be suitable in most case scenarios, unless you are building banking system 🙂

1 Star2 Stars3 Stars4 Stars5 Stars (No Ratings Yet)
Loading...Loading...

Creating MVC3 Custom View Engine

MVC it’s so great and flexible framework that even lets you create your own custom view engine if you need to replace Razor’s default rendering. You will probably not need this but we I will show you how to do it.

In our example we simply display all view data that are available during http request. Lets create our debug class that inherits from IView interface. In the Render function we simply use textwriter to display request data. The code looks as follows:

 public class DebugDataView : IView
 {
    public void Render(ViewContext viewContext, TextWriter writer)
    {
        Write(writer, "---Routing Data---");
        foreach (string key in viewContext.RouteData.Values.Keys)
        {
            Write(writer, "Key: {0}, Value: {1}",
            key, viewContext.RouteData.Values[key]);
        }

        Write(writer, "---View Data---");
        foreach (string key in viewContext.ViewData.Keys)
        {
            Write(writer, "Key: {0}, Value: {1}", key,
            viewContext.ViewData[key]);
        }
    }

    private void Write(TextWriter writer, string template, params object[] values)
    {
        writer.Write(string.Format(template, values) + "<p/>");
    }
}

Next we need to create our debug view engine class that inherits from IViewEngine interface. In FindView function, if our view name is found, we simply apply our own view style by passing in the instance of DebugDataView class that we have implemented earlier.

 public class DebugDataViewEngine : IViewEngine
 {
    public ViewEngineResult FindView(ControllerContext controllerContext, string viewName, string masterName, bool useCache)
    {
        if (viewName == "DebugData")
        {
            return new ViewEngineResult(new DebugDataView(), this);
        }
        else
        {
            return new ViewEngineResult(new string[] { "Debug Data View Engine" });
        }
    }

    public ViewEngineResult FindPartialView(ControllerContext controllerContext, string partialViewName, bool useCache)
    {
        return new ViewEngineResult(new string[] { "Debug Data View Engine" });
    }

    public void ReleaseView(ControllerContext controllerContext, IView view)
    {
        // no action here
    }
}

The last step is to register our custom engine in the Application_Start() function.

 protected void Application_Start()
    {
        AreaRegistration.RegisterAllAreas();

        ViewEngines.Engines.Add(new DebugDataViewEngine());

        RegisterGlobalFilters(GlobalFilters.Filters);
        RegisterRoutes(RouteTable.Routes);
    }

Download the sample below to see how it works.
CustomViewEngine

1 Star2 Stars3 Stars4 Stars5 Stars (No Ratings Yet)
Loading...Loading...

Custom Tree View Control

When using default asp.net Tree View control there is always been a problem to get the proper styling at the node level. Example of that is trying to set an node font weight to bold.

The simplest solution is to create custom tree view node that inherits from default TreeNode class.

  public class CustomTreeNode : TreeNode
  {
  }

When overriding RenderPreText method in that class we can change default rendering of the tree node text the way we want. We do it by adding text attributes using htmltextwriter. Below is example of that.

 protected override void RenderPreText(HtmlTextWriter writer)
 {
      writer.AddAttribute(HtmlTextWriterAttribute.Class, CssClass);
      writer.RenderBeginTag(HtmlTextWriterTag.Span);
      base.RenderPreText(writer);
  }

Here is complete working example of the custom tree view node.

 public class CustomTreeNode : TreeNode
    {
        public CustomTreeNode() : base() { }
        public CustomTreeNode(TreeView owner, bool isRoot) : base(owner, isRoot) { }

        private string _cssClass;
        public string CssClass
        {
            get { return _cssClass; }
            set { _cssClass = value; }
        }

        protected override void RenderPreText(HtmlTextWriter writer)
        {
            writer.AddAttribute(HtmlTextWriterAttribute.Class, CssClass);
            writer.RenderBeginTag(HtmlTextWriterTag.Span);
            base.RenderPreText(writer);
        }

        protected override void RenderPostText(HtmlTextWriter writer)
        {
            writer.RenderEndTag();
            base.RenderPostText(writer);
        }
    }

    public class CustomTreeView : TreeView
    {
        protected override TreeNode CreateNode()
        {
            return new CustomTreeNode(this, false);
        }
    }

Example of use:

      var tn = new CustomTreeNode();
      tn.Text = "test";
      tn.Value = "1";
      tn.CssClass = "normalNode/boldNode";          
      treeView.Nodes.Add(tn);

    //and the css
    .normalNode
    {
	font-weight:normal;
    }
    
    .boldNode
    {
	font-weight:bold;
    }

I hope this article helped you to understand how we can change default control rendering.

custom-tree-node

1 Star2 Stars3 Stars4 Stars5 Stars (No Ratings Yet)
Loading...Loading...

Remote Post utility

If you want to do an http post from code behind eg. to redirect to payment page it is sometimes useful to have an helper to be used throughout your application. Below is the simple class that does it’s job.

 public class RemotePost
{
    private NameValueCollection Inputs = new NameValueCollection();
    public string Url = "";
    public string Method = "post";
    public string FormName = "form1";

    public void Add(string name, string value)
    {
        Inputs.Add(name, value);
    }

    public void Post()
    {
        HttpContext.Current.Response.Clear();
        HttpContext.Current.Response.Write(@"<html><head><meta http-equiv=""Content-Type"" content=""text/html; charset=iso-8859-1"">");
        HttpContext.Current.Response.Write(String.Format(@"</head><body onload=""document.{0}.submit()"">", FormName));
        HttpContext.Current.Response.Write(String.Format(@"<form name=""{0}"" method=""{1}"" action=""{2}"" >", FormName, Method, Url));
        int i = 0;
        while (i < Inputs.Keys.Count)
        {
            HttpContext.Current.Response.Write(String.Format(@"<input name=""{0}"" type=""hidden"" value=""{1}"">", Inputs.Keys[i], Inputs[Inputs.Keys[i]]));
            i += 1;
        }
        HttpContext.Current.Response.Write("</form>");
        HttpContext.Current.Response.Write("</body></html>");
        HttpContext.Current.Response.End();
    }
}

When using it you simply add your parameters in the button click event before doing post request.


public void btnPay_OnClick(object sender, EventArgs e)
 {
        RemotePost myremotepost = new RemotePost();
        myremotepost.FormName = "form1";
        myremotepost.Method = "post";
        myremotepost.Url = "https://.......";
        myremotepost.Add("id", "123");
        //.....
        //----
        /////////////////////////
        myremotepost.Post();
}

An alternative way to that is sample below. You may also want to set PostBackUrl of the clicked button to avoid user to see response page.

 public void Post()
    {
        string url = "post url";

        using (StringBuilder postData = new StringBuilder())
        {
            postData.Append("first_name=" + HttpUtility.UrlEncode(txtFirstName.Text) + "&");
            postData.Append("last_name=" + HttpUtility.UrlEncode(txtLastName.Text));

            //TO DO - do it for all Form Elements

            //////////////////////////////
            StreamWriter writer = null;

            using (HttpWebRequest request = (HttpWebRequest)WebRequest.Create(url))
            {
                request.Method = "POST";
                request.ContentType = "application/x-www-form-urlencoded";
                request.ContentLength = postData.ToString().Length;
                try
                {
                    writer = new StreamWriter(request.GetRequestStream());
                    writer.Write(postData.ToString());
                }
                finally
                {
                    if (writer != null)
                        writer.Close();
                }
            }
        }

        Response.Redirect("RedirectPage");

    }
1 Star2 Stars3 Stars4 Stars5 Stars (No Ratings Yet)
Loading...Loading...

Format DataTextField of the DropDownList

Some times there is a need to format DataTextField value of the DropDownList without changing the data source structure.
One of the ways to achieve this is to use LINQ by changing the property value “on the fly”. We just need to create the new structure that is being bound to the DropDownList.

   var userList = GetUsers();

   ddlUsers.DataSource = (from obj in userList
	       select new
		{
		  ID = obj.ID,
		  Name = string.Format("{0} {1} - £{2}", obj.Name, obj.SurName, obj.Balance)
		}).ToList();
                    
   ddlUsers.DataTextField = "Name";
   ddlUsers.DataValueField = "ID";
   ddlUsers.DataBind();              
 

This is quite handy when you are unsure if the text formatting will change in the future. Hope I helped you with this quick example 🙂

1 Star2 Stars3 Stars4 Stars5 Stars (No Ratings Yet)
Loading...Loading...

File helpers using LINQ

When dealing with files, it is useful to have standard set of helpers to be used that we can relay on. This is when LINQ comes in handy. In this article I will present you with some useful functions that you can use in your daily programming.

Simple operation should be simple. Hence, when getting the number of lines in the text file, one line of code is just enough.

 public static long GetNumberOfLines(string filePath)
 {
     return File.Exists(filePath) ? File.ReadAllLines(filePath).Count() : 0;
 }

Getting the biggest file in the folder is also very easy with LINQ

   public static string FindTheLargestFileInDirectory(string path)
    {
        return Directory.Exists(path) && Directory.GetFiles(path).Count() > 0 ? 
               Directory.EnumerateFiles(path).Select(i => new FileInfo(i))
               .OrderByDescending(i => i.Length).FirstOrDefault().FullName : null;
    }

Similar when getting all files with the size of less than 1 Kb

   public static IEnumerable<string> FindFilesLessThanOneKiloBytesInThisFolder(string path)
    {
        return Directory.Exists(path) && Directory.GetFiles(path).Count() > 0 ?  
             Directory.EnumerateFiles(path).Select(i => new FileInfo(i))
             .Where(i => i.Length < 1024).Select(i => i.FullName) : null;
    }

You can use this function if you need to get files created in last 7 days

   public static IEnumerable<string> FindAllFilesCreatedLessThanWeekAgo(string path)
   {
        return Directory.Exists(path) && Directory.GetFiles(path).Count() > 0 ? 
               Directory.EnumerateFiles(path).Select(i => new FileInfo(i))
               .Where(i => i.CreationTime > DateTime.Now.AddDays(-7))
               .Select(i => i.FullName) : null;
   }

And finally if you want to get the oldest file in the folder (common scenario when deleting old logs) you can try this

   public static string FindOldestFileInFolder(string path)
   {
        return Directory.Exists(path) && Directory.GetFiles(path).Count() > 0 ? 
               Directory.EnumerateFiles(path)
               .Select(i => new FileInfo(i))
               .OrderByDescending(i => i.LastAccessTime).FirstOrDefault()
               .FullName : null;
   }

If you want to compare two files and get identical lines this may be useful to you

   public static IEnumerable<string> FindIdenticalLinesInTwoFiles(string filePath1, string filePath2)
    {
        if (File.Exists(filePath1) && File.Exists(filePath2))
        {
            return File.ReadAllLines(filePath1).Where(i => !string.IsNullOrEmpty(i))
                   .Intersect(File.ReadAllLines(filePath2).Where(i => !string.IsNullOrEmpty(i)));
         }

       return null;
    }

When collecting system information this function may be useful as well. It simply gets all extensions of the files in the directory and counts number of files associated with them.

 public static Dictionary<string, int> ListAndCountTheNumberOfDifferentFileExtensions(string path) 
   {
       return Directory.EnumerateFiles(path)
              .Select(i => new FileInfo(i))
              .GroupBy(i => i.Extension)
              .OrderByDescending(i => i.Count())
              .ToDictionary(i => i.Key, i => i.Count());            
    }

As you can see using LINQ is so easy that allows you to focus more on the business problems and less on coding itself.

1 Star2 Stars3 Stars4 Stars5 Stars (No Ratings Yet)
Loading...Loading...

Extension methods in C#

Extension methods enable you to add your own methods to already existing system types without deriving from those types. Extension methods are always static but they are called as a instance methods on the extended types. We can extend types like string, double, DateTime etc. as well as LINQ queries which already are extensions of IEnumerable type.

Extended types can be used as a helper methods that you can compile and use in all your projects.

Lets start with the simple string extensions. First example simply checks if string has a value. The second one strips html tags from the string.

    /// <summary>
    /// Determines whether this instance of string is not null or empty.
    /// </summary>
    public static bool HasValue(this string text)
    {
        return !string.IsNullOrEmpty(text);
    }

    /// <summary>
    /// Strips html tags from the string
    /// </summary>
    public static string HtmlStrip(this string input)
    {
        input = Regex.Replace(input, "<style>(.|\n)*?</style>", string.Empty);
        input = Regex.Replace(input, @"<xml>(.|\n)*?</xml>", string.Empty);
        return Regex.Replace(input, @"<(.|\n)*?>", string.Empty);
    }   

Similar is with the double extensions

    /// <summary>
    /// Rounds the value to last 10s
    /// </summary>
    public static double RoundOff(this double i)
    {
        return ((double)Math.Round(i / 10.0)) * 10;
    } 

The sample below is very useful when displaying dates. It displays friendly string with the time left to an event, it extends DateTime type.

 public static string ToDateLeftString(this DateTime input)
    {
        var oSpan = DateTime.Now.Subtract(input);
        var TotalMinutes = oSpan.TotalMinutes;
        var Suffix = " ago";

        if (TotalMinutes < 0.0)
        {
            TotalMinutes = Math.Abs(TotalMinutes);
            Suffix = " from now";
        }

        var aValue = new SortedList<double, Func<string>>();
        aValue.Add(0.75, () => "less than a minute");
        aValue.Add(1.5, () => "about a minute");
        aValue.Add(45, () => string.Format("{0} minutes", Math.Round(TotalMinutes)));
        aValue.Add(90, () => "about an hour");
        aValue.Add(1440, () => string.Format("about {0} hours", Math.Round(Math.Abs(oSpan.TotalHours)))); // 60 * 24
        aValue.Add(2880, () => "a day"); // 60 * 48
        aValue.Add(43200, () => string.Format("{0} days", Math.Floor(Math.Abs(oSpan.TotalDays)))); // 60 * 24 * 30
        aValue.Add(86400, () => "about a month"); // 60 * 24 * 60
        aValue.Add(525600, () => string.Format("{0} months", Math.Floor(Math.Abs(oSpan.TotalDays / 30)))); // 60 * 24 * 365 
        aValue.Add(1051200, () => "about a year"); // 60 * 24 * 365 * 2
        aValue.Add(double.MaxValue, () => string.Format("{0} years", Math.Floor(Math.Abs(oSpan.TotalDays / 365))));

        return aValue.First(n => TotalMinutes < n.Key).Value.Invoke() + Suffix;
    } 

The last example extends the IEnumerable type so we are actually adding a new LINQ function.

    /// <summary>
    /// Selects the item with maximum of the specified value.
    /// </summary>
    public static T WithMax<T, TKey>(this IEnumerable<T> list, Func<T, TKey> keySelector)
    {
        return list.OrderByDescending(i => keySelector(i)).FirstOrDefault();
    } 

When testing above methods you will get following results

  static void Main(string[] args)
    {
        //DateTime extended method
        var myDate = DateTime.Now.AddDays(7);
        var dateLeft = myDate.ToDateLeftString(); //result: "6 days from now"

        //System.String extended method
        var myNoHtmlString = "<br><b>test</b>".HtmlStrip(); //result: "test"

        //or 
        var hasStringValue = "test string".HasValue(); //result: true

        //System.Double extension
        double myTo10sRoundedValue = (66.3).RoundOff(); //result: 70

        //Linq extensions
        List<int> list = new List<int>() { 1, 2, 3 }; 
        var max = list.WithMax(i => i); //result: 3
    }

I have included sample project below so you can do some testing yourself.
ExtensionMethods

1 Star2 Stars3 Stars4 Stars5 Stars (No Ratings Yet)
Loading...Loading...