Social media Sentiment Analysis using C# API

Sentiment Analysis in Social media has become very important for many companies over the last few years as more and more people use this communication channel not only to exchange the messages, but also to express their opinions about the products and services they use or used in the past.

In order to start proper sentiment analysis, we need to use correct Text Analytics and Text Mining techniques. The fastest way is to use external API to get the information we need and then import that data on the daily basis to our system database, where we can visualize and track the results.

In this article I will show you, how you can convert unstructured data e.g. tweets using text2data.org API, into structured information that you can use to track sentiment towards the brand, product or company.

First step is to register in the service and get the private key to be used in your API calls. Next, you need to download API SDK from here

The code below, will just create request object containing your information and post that to platform using json or xml format. The response object will have information you need: Detected Entities, Themes, Keywords, Citations, Slang words and abbreviations. For each of these you can get sentiment result as double, polarity and score (positive, negative or neutral). Received information can be formatted the way you want. Below is complete sample (except for private key):

  static void Main(string[] args)
   {
        var inputText = "I am not negative about the LG brand.";
        var privateKey = "-------------"; //add your private key here (you can find it in the admin panel once you sign-up)
        var secret = ""; //this should be set-up in admin panel as well.

       var doc = new Document()
       {
          DocumentText = inputText,
          IsTwitterContent = false,
          PrivateKey = privateKey,
          Secret = secret
       };

       var docResult = API.GetDocumentAnalysisResult(doc); //execute request

       if (docResult.Status == (int)DocumentResultStatus.OK) //check status
       {
        //display document level score
        Console.WriteLine(string.Format("This document is: {0}{1} {2}", docResult.DocSentimentPolarity, docResult.DocSentimentResultString, docResult.DocSentimentValue.ToString("0.000")));

        if (docResult.Entities != null && docResult.Entities.Any())
        {
         Console.WriteLine(Environment.NewLine + "Entities:");
         foreach (var entity in docResult.Entities)
         {
           Console.WriteLine(string.Format("{0} ({1}) {2}{3} {4}", entity.Text, entity.KeywordType, entity.SentimentPolarity, entity.SentimentResult, entity.SentimentValue.ToString("0.0000")));
          }
       }
 
      if (docResult.Keywords != null && docResult.Keywords.Any())
      {
         Console.WriteLine(Environment.NewLine + "Keywords:");
         foreach (var keyword in docResult.Keywords)
          {
             Console.WriteLine(string.Format("{0} {1}{2} {3}", keyword.Text, keyword.SentimentPolarity, keyword.SentimentResult, keyword.SentimentValue.ToString("0.0000")));
            }
        }

        //display more information below if required 

      }
      else
      {
          Console.WriteLine(docResult.ErrorMessage);
      }

       Console.ReadLine();
  }

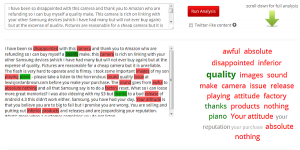
You can always validate results by checking the demo site (on text2data.org platform)

sentiment-analysis

Enjoy 🙂

Social-Media-Icons

1 Star2 Stars3 Stars4 Stars5 Stars (1 votes, average: 5.00 out of 5)
Loading...Loading...

Auto creating installers using WIX (Open source) and CI server

Creating installer packages has become more complicated recently as the Microsoft decided to not to support installation projects (.vdproj) in VS 2012 upwards. On the top of that there is additional difficulty if we want to auto-create installers on the server that hasn’t got commercial Visual Studio installed – we just cannot do it 🙁

The perfect solution for that is to use WIX installer (Open source). WIX enables you to build installation packages from xml files without relying on Visual Studio. The only component required is to install WIX toolset on the build server (wixtoolset.org)

The main WIX file is the .wixproj file that builds the required package either from inside Visual Studio or from command line – without VS. In that project file we can find some commands that use WIX heat, candle and light modules to create required msi files. See sample below:

Harvesting module will create dynamic list of all files that need to be included into installer. This list is gathered after our website app is published to the local folder:

  <Exec Command="&quot;$(WixPath)heat.exe&quot; dir $(PublishF) -dr INSTALLLOCATION -ke -srd -cg MyWebWebComponents -var var.publishDir -gg -out WebSiteContent.wxs" ContinueOnError="false" WorkingDirectory="." />

After harvesting, we can finally build installer. Please note that we can pass in custom parameters when triggering candle module, the parameters must be preceded with the letter “d” e.g. -dMyParam. In our sample we will use this to pass in command line arguments that will define our installer’s name, version, website root etc.

 <Exec Command="&quot;$(WixPath)candle.exe&quot; -ext WixIISExtension -ext WixUtilExtension -ext WiXNetFxExtension -dProductName=$(ProductName) -dWebFolderName=$(WebFolderName) -dProductVersion=$(ProductVersion) -dUpgradeCode=$(UpgradeCode) -dProductCode=$(ProductCode) -dpublishDir=$(PublishF) -dMyWebResourceDir=. @(WixCode, ' ')" ContinueOnError="false" WorkingDirectory="." />

 <Exec Command="&quot;$(WixPath)light.exe&quot; -ext WixUIExtension -ext WixIISExtension -ext WixUtilExtension -ext WiXNetFxExtension -out $(MsiOut) @(WixObject, ' ')" ContinueOnError="false" WorkingDirectory="." />

For the purpose of this article we will create very simple installer without configuring IIS settings, deploying sql scripts etc. All installer’s basic configuration can be found in UIDialogs.wxs, MyWebUI.wxs, IisConfiguration.wxs – you may want to adjust it for your needs. The file Product.wxs is the main entry point where you can define installation folders, actions, validations etc.

Please note that adding UpgradeCode and MajorUpgrade configuration elements will result in any older installed version to be automatically un-installed prior the installation. Also, any custom params you want to use inside your installer configuration must be used like this $(var.MyParamName).

 <Product Id="$(var.ProductCode)" 
			 Name="$(var.ProductName)" 
			 Language="1033" 
			 Version="$(var.ProductVersion)" 
			 Manufacturer="MyCompany" 
			 UpgradeCode="$(var.UpgradeCode)" >
 <MajorUpgrade DowngradeErrorMessage="A newer version of Product Name Removed is already installed."/> 
 
 .....

After defining our WIX configuration files, we can finally build our installer. We can do it by using batch or Power Shell script, or use Visual Studio to do it. It is because the .wixproj file it’s just normal ms-build file.

When using CI server we can simply run power-shell installation process by passing in our version number (build number, revision etc.) and other parameters we need.

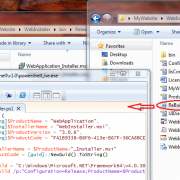
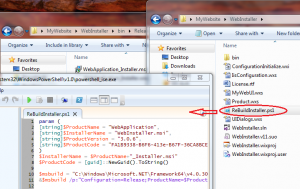
This is how we can run it with PS:
WIX_installer-powershell

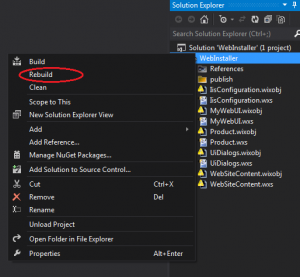
We can still use Visual Studio to do the same, as presented below:
WIX_installer-visualstudio

I have attached working sample below. Please don’t forget to install WIX toolset before running it. Also please check if all paths to WIX and msbuild folders are the same on your server (or use environment variables instead).

Enjoy!
MyWebsite

1 Star2 Stars3 Stars4 Stars5 Stars (1 votes, average: 5.00 out of 5)
Loading...Loading...

Using presentation model components and entities in ntier architecture

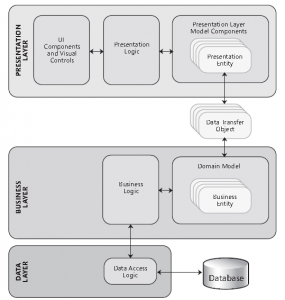
When designing applications that will run in the n-tier environment there are some additional factors to be considered. First of all it is very likely that your business entities will be located on separate machine. In this scenario there is a need to create objects in your UI layer that will have functionality of the business objects sitting on separate tier. Those objects should also include businesses validation logic and be able to easily apply bindings to UI components.

When transferring business entity data between the tiers, there is a need to create “data transformation objects” that transport object information across the network (if not invoked directly). DTOs also allow to separate layers and expose only those data that we will use (encapsulation). It is especially useful when using restful services.

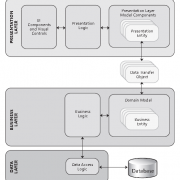
Diagram below shows the typical n-tier architecture using presentation components and entities.

pres_model_components

Diagram 1. Presentation model components and entities in multi tier application (please refer to “Microsoft Application Architecture Guide, 2nd Edition” book for more details).

Please note that using DTOs may incur some performance lost as the objects need to be mapped and transformed between the layes/tiers. Solution for that could be executing batch commands at once sending final results as combined object to avoid round trips within the network.

If your tiers are located within your local network it is advisable to use TCP protocol(more efficient) otherwise use HTTP/HTTPS when transferring data across the public network.

1 Star2 Stars3 Stars4 Stars5 Stars (No Ratings Yet)
Loading...Loading...

TOGAF vs COBIT, PRINCE2 and ITIL – Webinar

TOGAF is currently the most popular open architecture framework that is widely implemented in medium and big organizations. It’s ADM lets us operate within generic, proven framework when defining the Enterprise Architecture.

If you are an Architect or PM, it is very useful to know how TOGAF relates to other frameworks like COBIT, ITIL and PRINCE2.

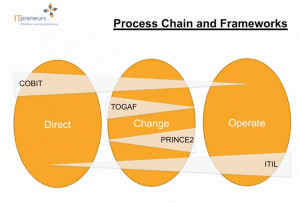
Digram below shows how those frameworks overlap with each other on the operation, governance and change management level.
togaf_process_change_frameworks
We can clearly see that TOGAF overlaps with COBIT in architecture governance, with ITIL in service/ operation area and with PRINCE2 in change management.

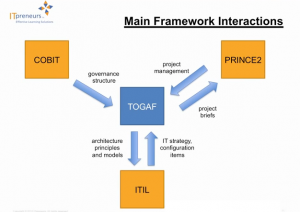
Further interaction is shown on the next diagram:

Togaf_cobit_itil_prince2

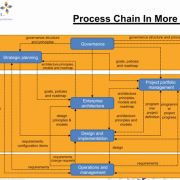
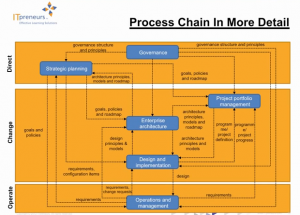
Process chain for the above diagrams depicts following image:

process_change_detials

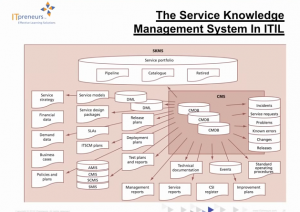
ITIL itself, can be described as follows:

service_level_knowhow_itil

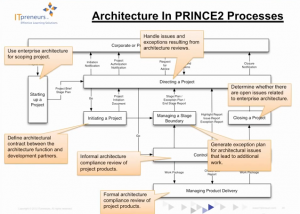
Finally, the last diagram shows how PRINCE2 relates to Architecture within its operational level:

architecture_in_prince2

For more information, please check following video:


1 Star2 Stars3 Stars4 Stars5 Stars (1 votes, average: 4.00 out of 5)
Loading...Loading...

Umbraco custom model with pager

Umbraco is the open source content management system allowing for quick content creation and easy customization as it uses ASP.NET MVC pattern to render page components.

The power of Umbraco is the flexibility and a host of features it provides out of the box. It is also written in C# which makes it especially popular amongst the developers.

Creating custom views with Umbraco is very easy, as we can set-up our own routing methods by inheriting from RenderMvcController and overriding action methods accepting and returning RenderModel object:

public class MyPageController : RenderMvcController
{

public override ActionResult Index(RenderModel model)
{
//your logic here

return base.Index(model);
}
}

However, if we want to accept and return our own custom model, the hack is required.
Suppose we want to return custom model containing pager information. We can do that by extending RenderModel class as follows:

public class MyCustomModel : RenderModel
{
public MyCustomModel() : this(new UmbracoHelper(UmbracoContext.Current).TypedContent(UmbracoContext.Current.PageId)) { }
public MyCustomModel(IPublishedContent content, CultureInfo culture) : base(content, culture) { }
public MyCustomModel(IPublishedContent content) : base(content) { }

public string Title { get; set; }
public List<IPublishedContent> ModelItems { get; set; }
public Pager Pager { get; set; }
}

Our pager class will look as this:

 public class Pager
 {
 public int TotalPages { get; set; }
 public int CurrentPage { get; set; }
 public int PageSize { get; set; }
 public int NumberOfRows { get; set; }
 }
 

Next, our controller action will have following logic:

public override ActionResult Index(RenderModel model)
{
var myCustomModel = new MyCustomModel();

var modelItems = model.Content.Children.OrderByDescending(x => x.CreateDate);
//pager logic
const int PAGE_SIZE = 6;
var currentPage = 1;
int.TryParse(Request.QueryString["page"], out currentPage);

myCustomModel.Pager = new Pager()
{
PageSize = PAGE_SIZE,
TotalPages = (int)Math.Ceiling((double)modelItems.Count() / (double)PAGE_SIZE),
CurrentPage = currentPage
};

myCustomModel.ModelItems = currentPage == 0 ? modelItems.Take(PAGE_SIZE).ToList() : modelItems.Skip((currentPage - 1) * PAGE_SIZE).Take(PAGE_SIZE).ToList();

if (myCustomModel.Pager.CurrentPage > myCustomModel.Pager.TotalPages) { myCustomModel.Pager.CurrentPage = myCustomModel.Pager.TotalPages; }
else if (myCustomModel.Pager.CurrentPage < 1) { myCustomModel.Pager.CurrentPage = 1; }

return base.Index(myCustomModel);
}

As we return custom model from the action, we also need to define this in our custom view as shown below:

@inherits Umbraco.Web.Mvc.UmbracoViewPage<MyCustomModel>

<div class="row">
<div class="col-md-6">
@foreach (var item in Model.ModelItems.Take(Model.Pager.NumberOfRows))
{
//display your item data here
}
</div>
</div>

@Html.Partial("_Pager", Model.Pager) //embed pager view

Finally, the pager partial view should look as follows:

@model Pager

@{
var IsBreak = false;
}

<div class="container">
@if (Model.TotalPages > 1)
{
<ul class="pager">
@if (Model.CurrentPage > 1)
{
<li><a href="?page=@(Model.CurrentPage - 1)">Previous</a></li>
}
@for (int p = 1; p < Model.TotalPages + 1; p++)
{
var linkClass = (p == Model.CurrentPage) ? "disabled" : "active";
if (p == Model.CurrentPage)
{
<li class="@Html.Raw(linkClass)"><a href="?page=@p">@p</a></li>
IsBreak = false;
}
else
{
if (p == 1
|| p == Model.CurrentPage - 1
|| p == Model.CurrentPage + 1
|| p == Model.TotalPages - 1
|| p == Model.TotalPages)
{
<li class="@Html.Raw(linkClass)"><a href="?page=@p">@p</a></li>
IsBreak = false;
}
else
{
if (IsBreak)
{
continue;
}
else
{
<li><a href="#">...</a></li>
IsBreak = true;
}
}
}
}

@if (Model.CurrentPage < Model.TotalPages)
{
<li><a href="?page=@(Model.CurrentPage + 1)">Next</a></li>
}
</ul>
}
</div>

The above is fully working example – of course you need to do some html adjustments depending on your requirements. Enjoy!

1 Star2 Stars3 Stars4 Stars5 Stars (No Ratings Yet)
Loading...Loading...

Entity validation engine using c# expression rules

Validating entity data is the common task when building business applications. Very often happens that we want to separate the rules from the app code to be able to quickly change it without affecting the application. In this article we will build simple validation engine that will be evaluating rules stored as linq expressions.

In our example we will hardcode the rules in separate .cs files (based on entity type). You may also want to store the linq expressions as a string in database and also compile the code dynamically from the string and then execute the rules based on the output dll file.

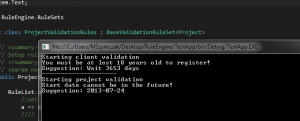
validation-engine

In our case we will hard code the rule in .css files. The following example shows the rule definitions for Client entity.

  public class ClientValidationRules : BaseValidationRuleSet<Client>
   {
        public ClientValidationRules(Client arg)
        {
            RuleList.Add(new ValidationRule<Client>(
                //set the rule
                a => a.Name.Trim().Any() && !a.Name.Any(b => char.IsLower(b))
                ////
                , arg)
                {
                    //set the result
                    Message = "Name cannot be all in uppercase!",
                    ResultTypeIfFailed = ValidationResultType.ERROR,
                    SuggestionString = arg.Name.ToLower()
                });

            RuleList.Add(new ValidationRule<Client>(
                //set the rule
               a => a.DateOfBirth.AddYears(18) > DateTime.Now
                ////
               , arg)
            {
                //set the result
                Message = "You must be at lest 18 years old to register!",
                ResultTypeIfFailed = ValidationResultType.ERROR,
                SuggestionString = string.Format("Wait {0} days", DateTime.Now.Subtract(arg.DateOfBirth).TotalDays.ToString("0"))
            });
        }
    }
}

You can see that this way allows us to easily define rule’s logic based on the entity data. We can also define suggestion message for each rule separately. By setting ValidationResultType as a rule result we can for example allow to save data if this is only a warning or prevent saving the data by the user if this is an error.

The implementation is as follows. Let’s start with generic ValidationRule class containing the rule data and delegate to run.

 namespace RuleEngine
 {
    public class ValidationRule<T> where T : class
    {
        public string Message { get; set; }
        public string SuggestionString { get; set; }
        
        public ValidationResultType ResultTypeIfFailed { get; set; }

        internal Func<T, bool> RuleDelegate { get; set; }
        internal T ObjectTovalidate { get; set; }

        public ValidationRule(Func<T, bool> rule, T arg)
        {
            RuleDelegate = rule;
            ObjectTovalidate = arg;
        }

        public bool RunRuleDelegate()
        {
            return RuleDelegate(ObjectTovalidate);
        }
    }
 }

It’s base class will have the “Run” method implementation.

 namespace RuleEngine
 {
    public abstract class BaseValidationRuleSet<T> where T : class
    {
        public List<ValidationRule<T>> RuleList { get; internal set; }

        /// <summary>
        /// Initiates rule list
        /// </summary>
        public BaseValidationRuleSet()
        {
            RuleList = new List<ValidationRule<T>>();
        }

        /// <summary>
        /// Run all added rules
        /// </summary>
        /// <returns></returns>
        public ValidationResult Run()
        {
            foreach (var rule in this.RuleList)
            {
                var result = rule.RunRuleDelegate();

                if (result)
                {
                    return new ValidationResult() { IsValid = false, ResultType = rule.ResultTypeIfFailed, Message = rule.Message, SuggestionString = rule.SuggestionString };
                }
            }

            return new ValidationResult() { IsValid = true, ResultType = ValidationResultType.OK };
        }
    }
}

Let’s define ValidationResult class that will be returned after running the rule delegate.

 namespace RuleEngine
 {
    public class ValidationResult
    {
        public bool IsValid { get; set; }
        public string SuggestionString { get; set; }
        public string Message { get; set; }
        public ValidationResultType ResultType { get; set; }
    }
}

The ValidationEngine class will have the entry point for different entity validation methods. You may also want to create generic function to pass the validating object to. You also can preload all rules at runtime and evaluate dynamically using AppDomain.CurrentDomain.GetAssemblies() method.

  public class ValidationEngine: ValidationEngineBase
  {
      public ValidationResult RunProjectRules(Project project)
      {
          return new ProjectValidationRules(project).Run();
      }
      public ValidationResult RunClientRules(Client client)
      {
          return new ClientValidationRules(client).Run();
      }
   }

In order to test our solution we can use console app. We also need to load some fake data into our entities.

     static void Main(string[] args)
        {
            var validationEngine = new ValidationEngine();

            #region load entities
            var client = new Client()
                  {
                      Name = "CLIENT NUMBER1a",
                      DateOfBirth = DateTime.Now.AddYears(-10)
                  };

            var project = new Project()
            {
                Name = "PROJECT NUMBER1",
                StartDate = DateTime.Now.AddDays(1),
                EndDate = DateTime.Now.AddDays(1)
            }; 
            #endregion


            #region validate client
            Console.WriteLine("Starting client validation");

            var result = validationEngine.RunClientRules(client);

            if (!result.IsValid)
            {
                Console.WriteLine(result.Message);
                Console.WriteLine(string.Format("Suggestion: {0}", result.SuggestionString));
            }
            else
            {
                Console.WriteLine("OK");
            }
            #endregion

            Console.WriteLine("--------------------");

            #region validate project
            Console.WriteLine("Starting project validation");

            result = validationEngine.RunProjectRules(project);

            if (!result.IsValid)
            {
                Console.WriteLine(result.Message);
                Console.WriteLine(string.Format("Suggestion: {0}", result.SuggestionString));
            }
            else
            {
                Console.WriteLine("OK");
            }
            #endregion

            Console.ReadLine();
        }

I have included project files bellow for your tests.


#Article update#

We can also create simple business rule engine in very similar way, here is the implementation:

 namespace RuleEngine
 {
    /// <summary>
    /// To be extended if needed
    /// </summary>
    public abstract class BusinessRuleEngineBase
    {
        
    }

    /// <summary>
    /// Runs set of rules for different entities
    /// </summary>
    public class BusinessRuleEngine : BusinessRuleEngineBase
    {
        /// <summary>
        /// Run rules for ScheduledFlight 
        /// </summary>
        /// <param name="scheduledFlight"></param>
        /// <returns></returns>
        public bool RunBusinessRulesFor(ScheduledFlight scheduledFlight)
        {
            return new FlightBusinessRules(scheduledFlight).Run();
        }
    }
 }

Business rule implementation containing evaluating and executing delegate

/// <summary>
/// Runs delegate on the specified business rule set
/// </summary>
/// <typeparam name="T"></typeparam>
public class BusinessRule<T> where T : class
{
    public string RuleName { get; set; }
    internal Func<T, bool> RuleDelegate { get; set; }
    internal Func<T, bool> ExecuteRuleDelegate { get; set; }
    internal T ObjectToValidate { get; set; }
    internal T ObjectToApply { get; set; }

    public BusinessRule(Func<T, bool> rule, Func<T, bool> ruleApply, T arg)
    {
        RuleDelegate = rule;
        ExecuteRuleDelegate = ruleApply;
        ObjectToValidate = arg;
        ObjectToApply = arg;
    }

    /// <summary>
    /// Determines if business rule should be applied
    /// </summary>
    /// <returns></returns>
    public bool ApplyRuleDelegate()
    {
        return RuleDelegate(ObjectToValidate);
    }

    /// <summary>
    /// Applies business rule on the current entity
    /// </summary>
    /// <returns></returns>
    public bool ApplyBusinessDelegate()
    {
        return ExecuteRuleDelegate(ObjectToApply);
    }
    
}

BaseBusinessRuleSet base class

/// <summary>
/// Base class for business rule sets
/// </summary>
/// <typeparam name="T"></typeparam>
public abstract class BaseBusinessRuleSet<T> where T : class
{
    public List<BusinessRule<T>> RuleList { get; internal set; }

    /// <summary>
    /// Initiates business rule list
    /// </summary>
    public BaseBusinessRuleSet()
    {
        RuleList = new List<BusinessRule<T>>();
    }

    /// <summary>
    /// Run all added business rules
    /// </summary>
    /// <returns></returns>
    public bool Run()
    {
        foreach (var rule in this.RuleList)
        {
            var result = rule.ApplyRuleDelegate();

            //if rule is true, run business logic
            if (result)
            {
                rule.ApplyBusinessDelegate();

                return true;
            }
        }

        return false;
    }
}

And finally the business rule set-up class.

public class FlightBusinessRules : BaseBusinessRuleSet<ScheduledFlight>
{
    /// <summary>
    /// Setup business rules for ScheduledFlight
    /// </summary>
    /// <param name="arg"></param>
    public FlightBusinessRules(ScheduledFlight arg)
    {

        RuleList.Add(new BusinessRule<ScheduledFlight>(
            //set the rule
                a => (double)arg.Passengers.Count(p => p.Type == PassengerType.AirlineEmployee) / arg.Passengers.Count > arg.FlightRoute.MinimumTakeOffPercentage
            ,
            //execute rule
                 e =>
                 {
                     //lower the base price till 100
                     if (arg.FlightRoute.BasePrice >= 100)
                     {
                         arg.FlightRoute.BasePrice -= 10;
                     }

                     //add more logic here...

                     return true;
                 },
                arg) { RuleName = "ApplyDiscountFor_AirlineEmployee" });


        RuleList.Add(new BusinessRule<ScheduledFlight>(
            //set the rule
              a => a.FlightRoute.BasePrice == 0
              ,
            //execute rule
               e =>
               {
                   //enforce minimal base price
                   arg.FlightRoute.BasePrice = 100;

                   return true;
               },
              arg) { RuleName = "EnsureMinimalBasePrice" });

    }
}

RuleEngine

1 Star2 Stars3 Stars4 Stars5 Stars (No Ratings Yet)
Loading...Loading...

Displaying interactive MS Chart objects in ASP.NET MVC

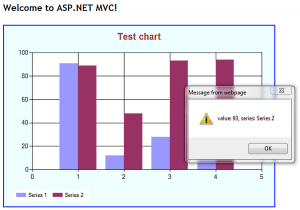
Displaying charts using MS Chart is usually simple in asp.net webform. The problem exists if we want to use it in Asp.net MVC application without putting it on .aspx page. In this article I will show you how to display interactive chart using purely MVC view.

mschart_mvc

Lets start with creating ChartHelper class that will contain basic logic for creating chart objects. In the function CreateDummyChart() we will just create standard MS Chart object with some dummy data.

 public static Chart CreateDummyChart()
 {
    var chart = new Chart() { Width = 600, Height = 400 };
    chart.Palette = ChartColorPalette.Excel;
    chart.Legends.Add(new Legend("legend1") { Docking = Docking.Bottom });

    var title = new Title("Test chart", Docking.Top, new Font("Arial", 15, FontStyle.Bold), Color.Brown);
    chart.Titles.Add(title);
    chart.ChartAreas.Add("Area 1");

    chart.Series.Add("Series 1");
    chart.Series.Add("Series 2");

    chart.BackColor = Color.Azure;
    var random = new Random();
    
    //add random data: series 1
    foreach (int value in new List<int>() { random.Next(100), random.Next(100), random.Next(100), random.Next(100) })
    {
        chart.Series["Series 1"].Points.AddY(value);

        //attach JavaScript events - it can also be ajax call
        chart.Series["Series 1"].Points.Last().MapAreaAttributes = "onclick=\"alert('value: #VAL, series: #SER');\"";
    }

    //add random data: series 2
    foreach (int value in new List<int>() { random.Next(100), random.Next(100), random.Next(100), random.Next(100) })
    {
        chart.Series["Series 2"].Points.AddY(value);

        //attach JavaScript events - it can also be ajax call
        chart.Series["Series 2"].Points.Last().MapAreaAttributes = "onclick=\"alert('value: #VAL, series: #SER');\"";
    }

    return chart;
 }

Next, we need to create function that takes our newly created chart object and saves it to memory stream. After that we only need to convert the stream to byte array and to base64 string afterwards.

Having image string created, we simply construct html “img” tag to be rendered by our view. Please note that “data:image/png;base64” attributes are necessary to tell the browser to render it as image.

 public static string GetChartImageHtml(Chart chart)
 {
    using (var stream = new MemoryStream())
    {
        var img = "<img src='data:image/png;base64,{0}' alt='' usemap='#" + ImageMap + "'>";

        chart.SaveImage(stream, ChartImageFormat.Png);

        var encoded = Convert.ToBase64String(stream.ToArray());

        return string.Format(img, encoded);
    }
 }

The final thing is to create DisplayChart() method in the view to be used by Html.RenderAction. Apart from chart’s image string, we also need to display chart’s image map in order to enable chart JavaScript events when needed.

public ActionResult DisplayChart()
{  
    var chart = ChartHelper.CreateDummyChart();
   
    var result = new StringBuilder();
    result.Append(ChartHelper.GetChartImageHtml(chart));
    result.Append(chart.GetHtmlImageMap(ChartHelper.ImageMap));

    return Content(result.ToString());
}

And finally this is our view

@{
    ViewBag.Title = "Home Page";
}

<h2>@ViewBag.Message</h2>

@{ Html.RenderAction("DisplayChart"); }

I have attached project files to save your time 🙂

mschart-mvc

1 Star2 Stars3 Stars4 Stars5 Stars (No Ratings Yet)
Loading...Loading...

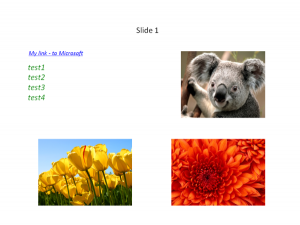
Adding links and styled text to Power-Point presentation

Formatting paragraphs in OpenXML documents is playing crucial part in proper implementation as the very common requirement is to change PowerPoint files programmatically during the business workflow processes.
I have recently received lot of queries about how to insert formatted text and links into the presentation. Hence, in this article I will show you how to do it.

In the past I have written article about auto generating Power-Point documents from the template file, in this part I will extend the functionality I have implemented before.

power-point-links

Let’s start with defining placeholder paragraphs we will use to insert our formatted texts and links:

 var templ = new PowerPointTemplate();
 templ.PowerPointParameters.Add(new PowerPointParameter() { Name = "[#Paragraph1#]", Text = "Slide 1" });
 templ.PowerPointParameters.Add(new PowerPointParameter() { Name = "[#Paragraph2#]", Text = "Slide 2" });
 templ.PowerPointParameters.Add(new PowerPointParameter() { Name = "[#List1(string[])#]", Text = "test1 n test2 n test3 n test4" });
 templ.PowerPointParameters.Add(new PowerPointParameter() { Name = "[#List2(string[])#]", Text = "test1 n test2 n test3 n test4" });

 templ.PowerPointParameters.Add(new PowerPointParameter() { Name = "[#Link1(#link#)#]", Text = "My link - to Microsoft; https://microsoft.com" });
 templ.PowerPointParameters.Add(new PowerPointParameter() { Name = "[#Link2(#link#)#]", Text = "My link - to Google; https://google.com" });

As you can see, we will handle text lists and single links defined in our template. Of course the names and params will depend on your requirements.

I will skip describing how the process works as this can be read in my previous article. I will go straight to the styled paragraph creation.

Function below returns new paragraph with the styles we have defined in parameters. The RunProperties class is created, then we are assigning the styles – please note that the color needs to be converted to HEX before adding it to run properties. Next we need to define the text-box object containing paragraph’s text. At the end we simply need to append run properties and text to the run and finally append run to the paragraph object.

If you need multiple colors within one paragraph, simply create multiple texts, runs and run properties and configure it separately before assigning it to the paragraph object.

 public Paragraph CreateStyledParagraph(string text, System.Drawing.Color color, bool isBold, bool isItalic, int fontSize = 2000)
 {
    var runProperties = new RunProperties(); //set basic styles for paragraph
    runProperties.Bold = isBold;
    runProperties.Italic = isItalic;
    runProperties.FontSize = fontSize;
    runProperties.Dirty = false;

    var hexColor = color.R.ToString("X2") + color.G.ToString("X2") + color.B.ToString("X2");//convert color to hex
    var solidFill = new SolidFill();
    var rgbColorModelHex = new RgbColorModelHex() { Val = hexColor };

    solidFill.Append(rgbColorModelHex);
    runProperties.Append(solidFill);

    //use this to assign the font family
    runProperties.Append(new LatinFont() { Typeface = "Arial Black" });

    var textBody = new Drawing.Text();
    textBody.Text = text; //assign text

    var run = new Drawing.Run();
    var newParagraph = new Paragraph();

    run.Append(runProperties);//append styles
    run.Append(textBody);//append text
    newParagraph.Append(run);//append run to paragraph

    return newParagraph;
}

Creating links is a little bit different. In order to do it we first need to create HyperlinkRelationship in the slide, the HyperlinkOnClick class contained within the run will then map to it on user click event. Please note that link color is not supported.

 public Paragraph CreateStyledLinkParagraph(SlidePart slidePart, string url, string text, bool isBold, bool isItalic, int fontSize = 2000)
 {
    //note: HyperlinkOnClick does not support link color

    var relationshipId = "rIdlink" + Guid.NewGuid().ToString();//create unique id
    slidePart.AddHyperlinkRelationship(new System.Uri(url, System.UriKind.Absolute), true, relationshipId);//assign hyperlink to the current slide we process

    var runProperties = new RunProperties(
         new LatinFont() { Typeface = "Bodoni MT Black"},
         new HyperlinkOnClick() { Id = relationshipId }); //set basic styles and assign relationshipId
    runProperties.Bold = isBold;
    runProperties.Italic = isItalic;
    runProperties.FontSize = fontSize;
    runProperties.Dirty = false;

    var textBody = new Drawing.Text();
    textBody.Text = text; //assign text

    var run = new Drawing.Run();
    var newParagraph = new Paragraph();

    run.Append(runProperties);//append styles
    run.Append(textBody);//append text
    newParagraph.Append(run);//append run to paragraph

    return newParagraph;
 }

The final replacement is being done in ReplaceText function. See in-line comments:

 void ReplaceText(Paragraph paragraph, SlidePart currentSlide)
 {
    var parent = paragraph.Parent; //get parent element - to be used when removing placeholder
    var dataParam = new PowerPointParameter();

    if (ContainsParam(paragraph, ref dataParam)) //check if paragraph is on our parameter list
    {
        //insert text list
        if (dataParam.Name.Contains("string[]")) //check if param is a list
        {
            var arrayText = dataParam.Text.Split(Environment.NewLine.ToCharArray()); //in our case we split it into lines

            if (arrayText is IEnumerable) //enumerate if we can
            {
                foreach (var itemData in arrayText)
                {
                    //var newParagraph = CloneParaGraphWithStyles(paragraph, dataParam.Name, itemData);// create new param - preserve styles
                    var newParagraph = CreateStyledParagraph(itemData.Trim(), System.Drawing.Color.Green, false, true, 2000);

                    parent.InsertBefore(newParagraph, paragraph); //insert new element
                }
            }
            paragraph.Remove();//delete placeholder
        }
        else if (dataParam.Name.Contains("#link#")) //check if param is a link
        {
            var linkText = dataParam.Text.Split(';')[0].Trim();
            var linkUrl = dataParam.Text.Split(';')[1].Trim();

            var newParagraph = CreateStyledLinkParagraph(currentSlide, linkUrl, linkText, false, true, 1500);
            parent.InsertBefore(newParagraph, paragraph); //insert new element

            paragraph.Remove();//delete placeholder
        }
        else
        {
            //insert text line
            var param = CloneParaGraphWithStyles(paragraph, dataParam.Name, dataParam.Text); // create new param - preserve styles
            parent.InsertBefore(param, paragraph);//insert new element

            paragraph.Remove();//delete placeholder
        }
    }
 }

I have included fully working solution below so you can easily convert it to your needs. I hope this information was useful for you 🙂

PowerPoint-styled-TextLinks

1 Star2 Stars3 Stars4 Stars5 Stars (No Ratings Yet)
Loading...Loading...

C# 5.0 Async Programming and Caller Information

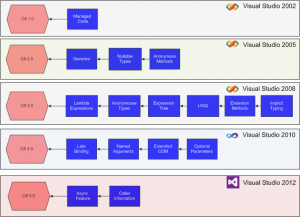
Since the release of .Net 4.5 Framework there are new, very useful features added that I want you to get familiar with. Because the C# language evolves along the .Net Framework, I have created chart that will help you to see all major changes that have been introduced over the last 10 years. I still remember myself starting my programming adventure with VS 2002 🙂

c_versions_history

Let’s focus on the new C# 5.0 features now.

Async Framework introduced in C# 5.0 will probably change the the way we do our programming on the .net platform. The idea is to apply standard async procedures in the background while allowing developer to minimize amount of code required.

The new Async logic seems to be incorporated into standard synchronous functions with only a few keywords added (eg. await, async). When marked async, methods are executed synchronously until the first await statement. At this same time the control is given back to the caller allowing executing thread to function correctly (will not freeze UI).

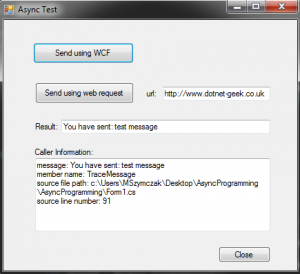
In our example we will call WCF service using async framework. This is mostly accurate real live scenario whether you will use windows forms or WPF application to boost user experience within the UI layer.

async_programming1

After our WCF service is started (self hosting) we are implementing code as follows.

 private async void btnSendWCF_Click(object sender, EventArgs e)
 {
    Task<string> responseTask = SendWCFMessage("test message");

    await Task.Delay(3000); //give it more time

    var response = await responseTask;

    txtResult.Text = response;
}

After executing this methods we are awaiting for the responseTask result while main thread is returned to the caller and UI is fully responsive.

SendWCFMessage method returns task string result. We will use Factory.StartNew to wrap-up our WCF request and return it. See in-line comments.

 Task<string> SendWCFMessage(string message)
 {
    return Task<string>.Factory.StartNew(() =>
    {
        try
        {
            //use TCP when sending message on the same computer or within the trusted network
            var binding = new NetTcpBinding();
            var endpoint = new EndpointAddress(hostEndPointAddress);

            var factory = new ChannelFactory<IServiceHost>(binding, endpoint);
            var channel = factory.CreateChannel();

            //send entered message using created channel
            var result = channel.SendMessage(message);

            //Trace caller information
            TraceMessage(result);

            //return value from the task
            return result;
        }
        catch (Exception ex)
        {
            return ex.Message;
        }
    });
}

As a second example we will use WebRequest class and reuse existing async functionality – the methods GetResponseAsync and CopyToAsync. In both examples we will also display caller trace information.

 private async void btnSendHttpReq_Click(object sender, EventArgs e)
{
    var request = WebRequest.Create(txtUri.Text.Trim());
    var content = new MemoryStream();

    Task<WebResponse> responseTask = request.GetResponseAsync();

    using (var response = await responseTask)
    {
        using (var responseStream = response.GetResponseStream())
        {
            Task copyTask = responseStream.CopyToAsync(content);

            await Task.Delay(3000);//give it more time

            //wait until finished (release main thread in the meantime)
            await copyTask;
        }
    }

    txtResult.Text = string.Format("Response length {0}", content.Length);

    //Trace caller information
    TraceMessage(txtResult.Text);
}

Please notice that in Caller Information “member name” is btnSendHttpReq_Click for webrequest and TraceMessage for WCF as the method is invoked from different thread.

I have attached project files below so you can do your tests as well.

AsyncProgramming

1 Star2 Stars3 Stars4 Stars5 Stars (No Ratings Yet)
Loading...Loading...

Creating WCF custom transport channel

Primary purpose of using WCF within organization is to wrap-up existing components into service oriented architecture (SOA) that can be then easily reused and maintained. When communicating within the local network or between the local components, you may want to implement your own WCF transport channel satisfying your specific requirements.

In this article I will show you how to write your own transport channel to be used without the contract bindings.
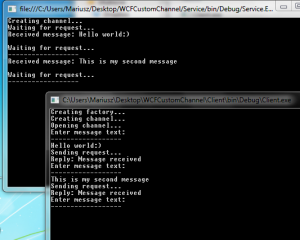
wcf_custom_channel

Lets’s start from the CustomBinding class that needs to implement Binding base. One thing to remember is that in CreateBindingElements method the transport element must be the last in the collection, otherwise you will get exception.

 public class CustomBinding : Binding
 {
    readonly MessageEncodingBindingElement messageElement;
    readonly CustomChannelBindingElement transportElement;

    public CustomBinding()
    {
        this.messageElement = new TextMessageEncodingBindingElement();
        this.transportElement = new CustomChannelBindingElement(); //must be the last in collection
    }

    public override BindingElementCollection CreateBindingElements()
    {
        return new BindingElementCollection(new BindingElement[] {
            this.messageElement,
            this.transportElement
        });
    }

    public override string Scheme
    {
        get { return this.transportElement.Scheme; }
    }
}

Next we need to create CustomChannelBindingElement that inherits from TransportBindingElement class. The implementation is quite simple. The scheme may be any prefix you like “http” or “myHttp”. In build channel and listener methods we are simply creating new instances of CustomChannelFactory and CustomChannelListener objects.

 public class CustomChannelBindingElement : TransportBindingElement
 {
    public CustomChannelBindingElement() { }

    public CustomChannelBindingElement(CustomChannelBindingElement clone) { }

    public override string Scheme
    {
        get { return "myprotocol"; }
    }

    public override bool CanBuildChannelFactory<TChannel>(BindingContext context)
    {
        return typeof(TChannel) == typeof(IRequestChannel);
    }

    public override bool CanBuildChannelListener<TChannel>(BindingContext context)
    {
        return typeof(TChannel) == typeof(IReplyChannel);
    }

    public override IChannelFactory<TChannel> BuildChannelFactory<TChannel>(BindingContext context)
    {
        if (context == null)
        {
            throw new ArgumentNullException("context");
        }
        if (!CanBuildChannelFactory<TChannel>(context))
        {
            throw new ArgumentException(String.Format("Unsupported channel type: {0}.", typeof(TChannel).Name));
        }
        return (IChannelFactory<TChannel>)(object)new CustomChannelFactory(this, context);
    }

    public override IChannelListener<TChannel> BuildChannelListener<TChannel>(BindingContext context)
    {
        if (context == null)
        {
            throw new ArgumentNullException("context");
        }
        if (!CanBuildChannelListener<TChannel>(context))
        {
            throw new ArgumentException(String.Format("Unsupported channel type: {0}.", typeof(TChannel).Name));
        }
        return (IChannelListener<TChannel>)(object)new CustomChannelListener(this, context);
    }

    public override BindingElement Clone()
    {
        return new CustomChannelBindingElement(this);
    }
}

Next, we need to create CustomChannelFactory class passing in transportElement and BindingContext to the constructor. Please note the context.BindingParameters.Remove method removes binding element before the validation takes place in async calls. Then, based on MessageEncodingBindingElement we create encoder factory.

 class CustomChannelFactory : ChannelFactoryBase<IRequestChannel>
 {
    readonly MessageEncoderFactory encoderFactory;

    public CustomChannelFactory(CustomChannelBindingElement transportElement, BindingContext context)
        : base(context.Binding)
    {
        var messageElement = context.BindingParameters.Remove<MessageEncodingBindingElement>();
        this.encoderFactory = messageElement.CreateMessageEncoderFactory();
    }

    protected override IRequestChannel OnCreateChannel(EndpointAddress address, Uri via)
    {
        return new CustomRequestChannel(this, encoderFactory, address, via);
    }

    protected override IAsyncResult OnBeginOpen(TimeSpan timeout, AsyncCallback callback, object state)
    {
        throw new NotImplementedException();
    }

    protected override void OnEndOpen(IAsyncResult result)
    {
        throw new NotImplementedException();
    }

    protected override void OnOpen(TimeSpan timeout)
    {

    }
}

Next step is to create CustomChannelListener inheriting from ChannelListenerBase. In this class I have also implemented some methods needed when working with async calls.

 class CustomChannelListener : ChannelListenerBase<IReplyChannel>
 {
    #region privates
    readonly Uri uri;
    readonly MessageEncoderFactory encoderFactory;
    CustomReplyChannel innerChannel;
    delegate IReplyChannel AsyncOnAcceptCaller(TimeSpan timeout);
    AsyncOnAcceptCaller asyncOnAcceptCaller; 
    #endregion

    public CustomChannelListener(CustomChannelBindingElement transportElement, BindingContext context)
        : base(context.Binding)
    {
        this.uri = new Uri(context.ListenUriBaseAddress, context.ListenUriRelativeAddress);
        var messageElement = context.BindingParameters.Remove<MessageEncodingBindingElement>();

        this.encoderFactory = messageElement.CreateMessageEncoderFactory();
        this.asyncOnAcceptCaller = new AsyncOnAcceptCaller(this.OnAcceptChannel);
    }

    protected override IReplyChannel OnAcceptChannel(TimeSpan timeout)
    {
        var address = new EndpointAddress(this.Uri);
        innerChannel = new CustomReplyChannel(this, encoderFactory, address);

        return innerChannel;
    }

    protected override IAsyncResult OnBeginAcceptChannel(TimeSpan timeout, AsyncCallback callback, object state)
    {
        return asyncOnAcceptCaller.BeginInvoke(timeout, callback, state);
    }

    protected override IReplyChannel OnEndAcceptChannel(IAsyncResult result)
    {
        return asyncOnAcceptCaller.EndInvoke(result);
    }

    protected override IAsyncResult OnBeginWaitForChannel(TimeSpan timeout, AsyncCallback callback, object state)
    {
        throw new NotImplementedException();
    }

    protected override bool OnEndWaitForChannel(IAsyncResult result)
    {
        throw new NotImplementedException();
    }

    protected override bool OnWaitForChannel(TimeSpan timeout)
    {
        throw new NotImplementedException();
    }

    public override Uri Uri
    {
        get { return this.uri; }
    }

    protected override void OnAbort()
    {
        throw new NotImplementedException();
    }

    protected override IAsyncResult OnBeginClose(TimeSpan timeout, AsyncCallback callback, object state)
    {
        throw new NotImplementedException();
    }

    protected override IAsyncResult OnBeginOpen(TimeSpan timeout, AsyncCallback callback, object state)
    {
        throw new NotImplementedException();
    }

    protected override void OnClose(TimeSpan timeout)
    {
        throw new NotImplementedException();
    }

    protected override void OnEndClose(IAsyncResult result)
    {
        throw new NotImplementedException();
    }

    protected override void OnEndOpen(IAsyncResult result)
    {
        throw new NotImplementedException();
    }

    protected override void OnOpen(TimeSpan timeout)
    {

    }
}

Let’s create our channelbase now. Please note that you need to pass in ChannelManagerBase to the constructor. Our read and write message methods will simply create new messages with the data as a string passed in from the request and reply channels. Depending on your requirements you may want to implement your own mechanism of creating messages eg. read from files etc.

 public abstract class CustomChannelBase : ChannelBase
 {
    #region privates
    readonly EndpointAddress address;
    readonly MessageEncoder encoder;
    readonly ChannelManagerBase manager;

    #endregion

    public EndpointAddress RemoteAddress
    {
        get { return this.address; }
    }

    public CustomChannelBase(ChannelManagerBase manager, MessageEncoderFactory encoderFactory, EndpointAddress addres)
        : base(manager)
    {
        this.address = address;
        this.manager = manager;
        this.encoder = encoderFactory.CreateSessionEncoder();
    }

    public Message ReadMessage(string data)
    {
        return Message.CreateMessage(MessageVersion.Default, "fault", data);
    }

    public Message WriteMessage(string data)
    {
        return Message.CreateMessage(MessageVersion.Default, "fault", data);
    }

    protected override void OnAbort()
    {
        throw new NotImplementedException();
    }

    protected override IAsyncResult OnBeginClose(TimeSpan timeout, AsyncCallback callback, object state)
    {
        throw new NotImplementedException();
    }

    protected override IAsyncResult OnBeginOpen(TimeSpan timeout, AsyncCallback callback, object state)
    {
        throw new NotImplementedException();
    }

    protected override void OnClose(TimeSpan timeout)
    {

    }

    protected override void OnEndClose(IAsyncResult result)
    {
        throw new NotImplementedException();
    }

    protected override void OnEndOpen(IAsyncResult result)
    {
        throw new NotImplementedException();
    }

    protected override void OnOpen(TimeSpan timeout)
    {

    }
}

Finally, we can create our reply channel that will be used to reply to incoming requests. In this example we will use tcpListener to communicate with the client. In this case WCF service will serve as a wrapper for the underlying TCP communication. In the method WaitForRequest we are simply waiting for incoming message and returning true. After that, the method IReplyChannel.ReceiveRequest is triggered. In that method we simply read the message from the TCP client passing it to the request context.

 public class CustomReplyChannel : CustomChannelBase, IReplyChannel
{
    #region privates
    readonly EndpointAddress localAddress;
    readonly object readLock;
    readonly MessageEncoderFactory encoderFactory;
    delegate IReplyChannel AsyncOnAcceptCaller(TimeSpan timeout);
    AsyncOnAcceptCaller asyncOnAcceptCaller;

    TcpListener tcpListener;
    TcpClient tcpClient;
    #endregion

    public EndpointAddress LocalAddress
    {
        get { return this.localAddress; }
    }

    public CustomReplyChannel(ChannelManagerBase manager, MessageEncoderFactory encoderFactory, EndpointAddress address)
        : base(manager, encoderFactory, address)
    {
        this.encoderFactory = encoderFactory;
        this.localAddress = address;
        this.asyncOnAcceptCaller = new AsyncOnAcceptCaller(this.OnAcceptChannel);

        //start listener
        if (this.tcpListener == null)
        {
            this.tcpListener = new TcpListener(address.Uri.Port);
        }

        tcpListener.Start();
    }

    protected IReplyChannel OnAcceptChannel(TimeSpan timeout)
    {
        var address = new EndpointAddress(this.localAddress.Uri);

        return new CustomReplyChannel(this.Manager, this.encoderFactory, address);
    }

    #region IReplyChannel Members

    IAsyncResult IReplyChannel.BeginReceiveRequest(TimeSpan timeout, AsyncCallback callback, object state)
    {
        throw new NotImplementedException();
    }

    IAsyncResult IReplyChannel.BeginReceiveRequest(AsyncCallback callback, object state)
    {
        throw new NotImplementedException();
    }

    IAsyncResult IReplyChannel.BeginTryReceiveRequest(TimeSpan timeout, AsyncCallback callback, object state)
    {
        return asyncOnAcceptCaller.BeginInvoke(timeout, callback, state);
    }

    IAsyncResult IReplyChannel.BeginWaitForRequest(TimeSpan timeout, AsyncCallback callback, object state)
    {
        throw new NotImplementedException();
    }

    RequestContext IReplyChannel.EndReceiveRequest(IAsyncResult result)
    {
        throw new NotImplementedException();
    }

    bool IReplyChannel.EndTryReceiveRequest(IAsyncResult result, out RequestContext context)
    {
        context = ((IReplyChannel)this).ReceiveRequest(DefaultReceiveTimeout);
        return true;
    }

    bool IReplyChannel.EndWaitForRequest(IAsyncResult result)
    {
        throw new NotImplementedException();
    }

    EndpointAddress IReplyChannel.LocalAddress
    {
        get { throw new NotImplementedException(); }
    }

    RequestContext IReplyChannel.ReceiveRequest(TimeSpan timeout)
    {
        ThrowIfDisposedOrNotOpen();

        try
        {
            var clientStream = tcpClient.GetStream();

            var message = new byte[4096];
            var enc = new ASCIIEncoding();

            var bytesRead = clientStream.Read(message, 0, 4096);
            var response = enc.GetString(message, 0, bytesRead);

            var buffer = enc.GetBytes("Message received");

            clientStream.Write(buffer, 0, buffer.Length);
            clientStream.Flush();

            return new CustomRequestContext(this.ReadMessage(response), this);
        }
        catch (SocketException ex)
        {
            return new CustomRequestContext(this.ReadMessage(ex.Message), this);
        }
        catch (Exception ex)
        {
            return new CustomRequestContext(this.ReadMessage(ex.Message), this);
        }
    }

    RequestContext IReplyChannel.ReceiveRequest()
    {
        throw new NotImplementedException();
    }

    bool IReplyChannel.TryReceiveRequest(TimeSpan timeout, out RequestContext context)
    {
        throw new NotImplementedException();
    }

    bool IReplyChannel.WaitForRequest(TimeSpan timeout)
    {
        ThrowIfDisposedOrNotOpen();

        //blocks until a client has sent a message
        this.tcpClient = tcpListener.AcceptTcpClient();

        return true;
    }

    #endregion

    #region IChannel Members

    T IChannel.GetProperty<T>()
    {
        T channel = encoderFactory.Encoder.GetProperty<T>();
        if (channel != null)
        {
            return channel;
        }

        if (typeof(T) == typeof(MessageVersion))
        {
            return (T)(object)encoderFactory.Encoder.MessageVersion;
        }

        return base.GetProperty<T>();
    }

    #endregion

    #region ICommunicationObject Members

    void ICommunicationObject.Abort()
    {
        throw new NotImplementedException();
    }

    IAsyncResult ICommunicationObject.BeginClose(TimeSpan timeout, AsyncCallback callback, object state)
    {
        throw new NotImplementedException();
    }

    IAsyncResult ICommunicationObject.BeginClose(AsyncCallback callback, object state)
    {
        throw new NotImplementedException();
    }

    IAsyncResult ICommunicationObject.BeginOpen(TimeSpan timeout, AsyncCallback callback, object state)
    {
        throw new NotImplementedException();
    }

    IAsyncResult ICommunicationObject.BeginOpen(AsyncCallback callback, object state)
    {
        throw new NotImplementedException();
    }

    void ICommunicationObject.Close()
    {
        throw new NotImplementedException();
    }

    event EventHandler ICommunicationObject.Closed
    {
        add { throw new NotImplementedException(); }
        remove { throw new NotImplementedException(); }
    }

    event EventHandler ICommunicationObject.Closing
    {
        add { throw new NotImplementedException(); }
        remove { throw new NotImplementedException(); }
    }

    void ICommunicationObject.EndClose(IAsyncResult result)
    {
        throw new NotImplementedException();
    }

    void ICommunicationObject.EndOpen(IAsyncResult result)
    {
        throw new NotImplementedException();
    }

    event EventHandler ICommunicationObject.Faulted
    {
        add { throw new NotImplementedException(); }
        remove { throw new NotImplementedException(); }
    }

    event EventHandler ICommunicationObject.Opened
    {
        add { throw new NotImplementedException(); }
        remove { throw new NotImplementedException(); }
    }

    event EventHandler ICommunicationObject.Opening
    {
        add { throw new NotImplementedException(); }
        remove { throw new NotImplementedException(); }
    }

    CommunicationState ICommunicationObject.State
    {
        get { throw new NotImplementedException(); }
    }

    #endregion
}

The request channel is quite straightforward as it simply sends messages using TCP client. We are also reading reply to confirm that our message has been delivered.

 public class CustomRequestChannel : CustomChannelBase, IRequestChannel
 {
    readonly Uri via;

    public Uri Via
    {
        get { return this.via; }
    }

    public CustomRequestChannel(ChannelManagerBase manager, MessageEncoderFactory encoderFactory, EndpointAddress address, Uri via)
        : base(manager, encoderFactory, address)
    {
        this.via = via;
    }

    public Message Request(Message message, TimeSpan timeout)
    {
        ThrowIfDisposedOrNotOpen();

        try
        {
            using (var tcpClient = new TcpClient(this.Via.Host, this.Via.Port))
            {
                var clientStream = tcpClient.GetStream();

                tcpClient.ReceiveTimeout = timeout.Seconds;
                tcpClient.SendTimeout = timeout.Seconds;

                var msg = new byte[4096];
                var encoder = new ASCIIEncoding();

                //get string value from message body
                var messageBody = message.GetBody<string>();
                var buffer = encoder.GetBytes(messageBody);

                //send message
                clientStream.Write(buffer, 0, buffer.Length);
                clientStream.Flush();

                //read reply
                var bytesRead = clientStream.Read(msg, 0, 4096);
                var response = encoder.GetString(msg, 0, bytesRead);

                return this.ReadMessage(response);
            }
        }
        catch (SocketException ex)
        {
            return this.ReadMessage(ex.Message);
        }
        catch (Exception ex)
        {
            return this.ReadMessage(ex.Message);
        }
    }

    public Message Request(Message message)
    {
        return this.Request(message, DefaultReceiveTimeout);
    }

    public IAsyncResult BeginRequest(Message message, TimeSpan timeout, AsyncCallback callback, object state)
    {
        throw new NotImplementedException();
    }

    public IAsyncResult BeginRequest(Message message, AsyncCallback callback, object state)
    {
        throw new NotImplementedException();
    }

    public Message EndRequest(IAsyncResult result)
    {
        throw new NotImplementedException();
    }
}

Finally we can test our server service

 static void StartService()
    {
        var binding = new WCFCustomChannelLib.CustomBinding();
        var uri = new Uri("myProtocol://localhost:81/x");

        var listener = binding.BuildChannelListener<IReplyChannel>(uri, new BindingParameterCollection());

        listener.Open(TimeSpan.FromSeconds(5));

        Console.Write("Creating channel...");
        Console.Write(Environment.NewLine);

        var channel = listener.AcceptChannel(TimeSpan.FromSeconds(5));
        channel.Open(TimeSpan.FromSeconds(5));

        Console.Write("Waiting for request...");
        Console.Write(Environment.NewLine);

        while (channel.WaitForRequest(TimeSpan.FromMinutes(1)))
        {
            using (var context = channel.ReceiveRequest(TimeSpan.FromSeconds(5)))
            {
                using (var message = context.RequestMessage)
                {
                    Console.WriteLine("Received message: {0}", message.GetBody<string>());
                    Console.Write(Environment.NewLine);

                    var replyMessage = Message.CreateMessage(MessageVersion.Default, "fault", "Message received");

                    context.Reply(replyMessage, TimeSpan.FromSeconds(5));
                }
            }
            Console.Write("Waiting for request...");
            Console.Write(Environment.NewLine + "------------------" + Environment.NewLine);
        }

        Console.WriteLine("terminated");
        channel.Close(TimeSpan.FromSeconds(5));
    }
}

And the client service

 static void Main(string[] args)
    {
        Console.Write("Creating factory...");

        var binding = new WCFCustomChannelLib.CustomBinding();

        var factory = binding.BuildChannelFactory<IRequestChannel>();
        factory.Open(TimeSpan.FromSeconds(5));

        Console.Write(Environment.NewLine);
        Console.Write("Creating channel...");

        var uri = new Uri("myProtocol://localhost:81/x");
        var channel = factory.CreateChannel(new EndpointAddress(uri));

        Console.Write(Environment.NewLine);
        Console.Write("Opening channel...");
        Console.Write(Environment.NewLine);

        channel.Open(TimeSpan.FromSeconds(5));
           
        while (true)
        {
            Console.Write("Enter message text: ");
            Console.Write(Environment.NewLine + "------------------" + Environment.NewLine);

            var messageText = Console.ReadLine();
            if (messageText == null) { break; }

            Console.Write("Sending request...");
            Console.Write(Environment.NewLine);

            var requestMessage = Message.CreateMessage(MessageVersion.Default, "fault", messageText);
            var replyMessage = channel.Request(requestMessage, TimeSpan.FromSeconds(5));
               
            using (replyMessage)
            {
                if (replyMessage != null)
                {
                    Console.WriteLine("Reply: {0}", replyMessage.GetBody<string>());
                }
            }
        }

        channel.Close(TimeSpan.FromSeconds(5));
        factory.Close();
    }
}

I have included working sample that you can download and test on your own. Feel free to play with it 🙂

WCFCustomChannel

1 Star2 Stars3 Stars4 Stars5 Stars (No Ratings Yet)
Loading...Loading...